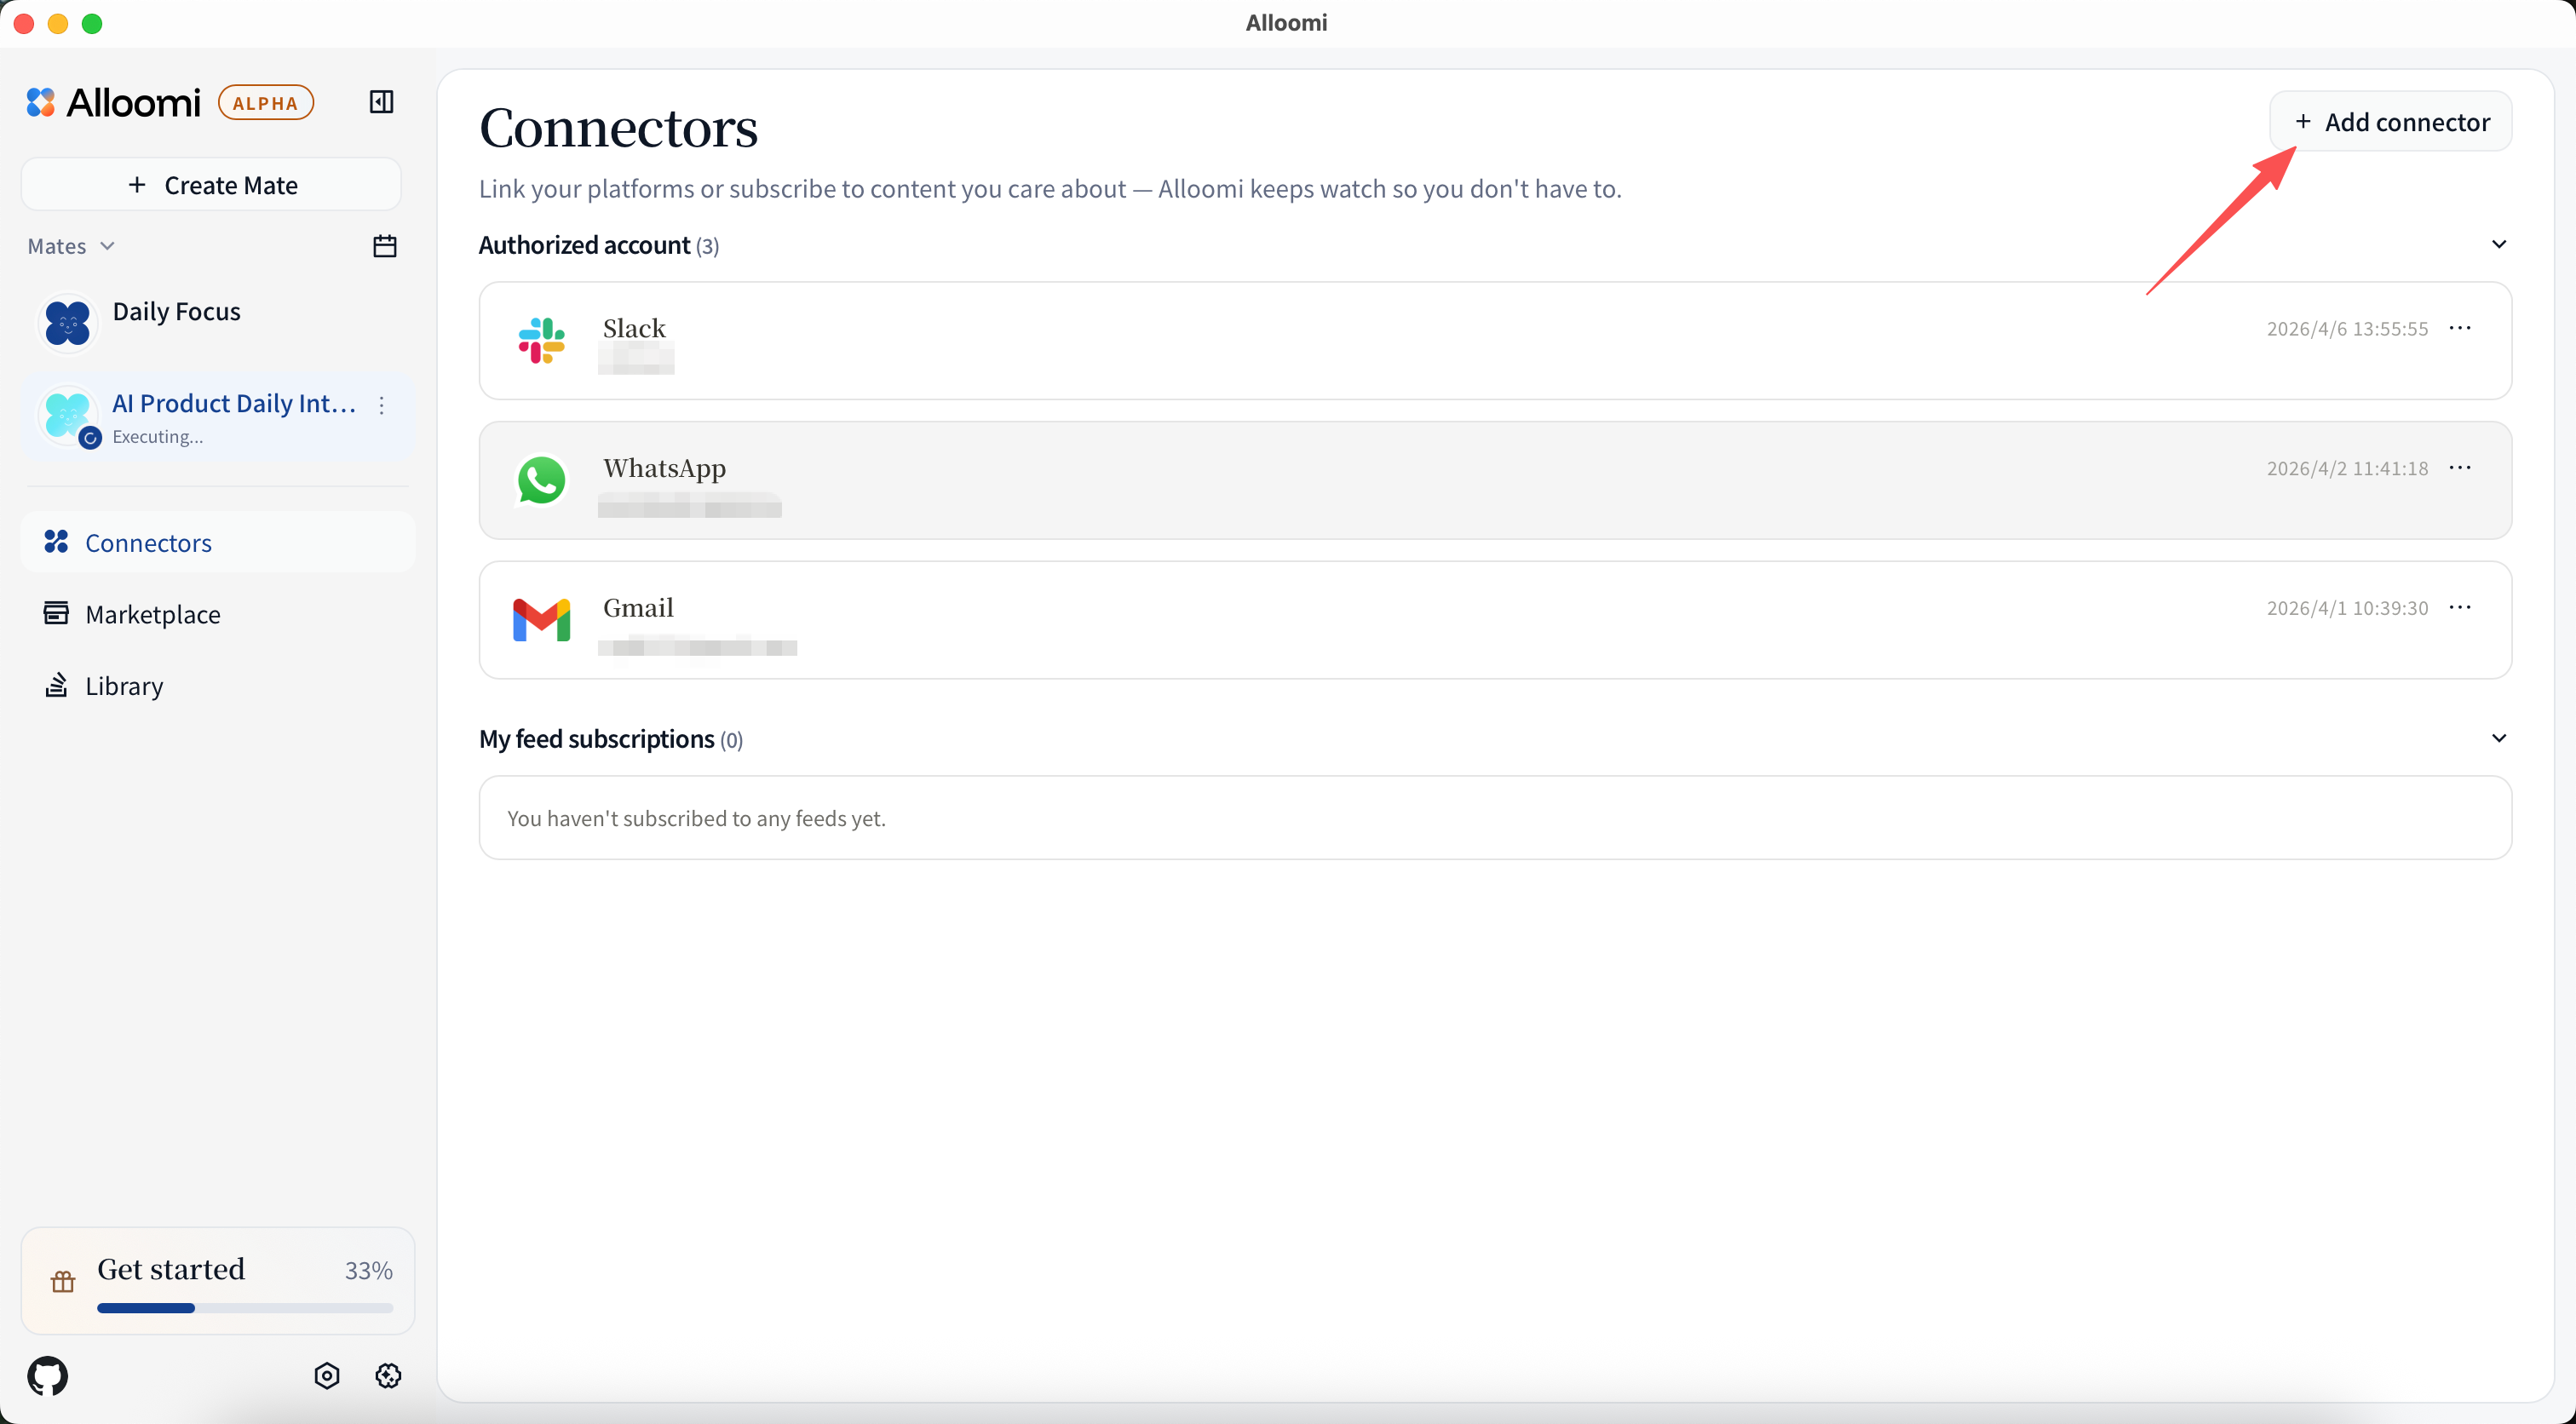
Connectors
Link your platforms or subscribe to content you care about — OpenLoomi keeps watch so you don’t have to.
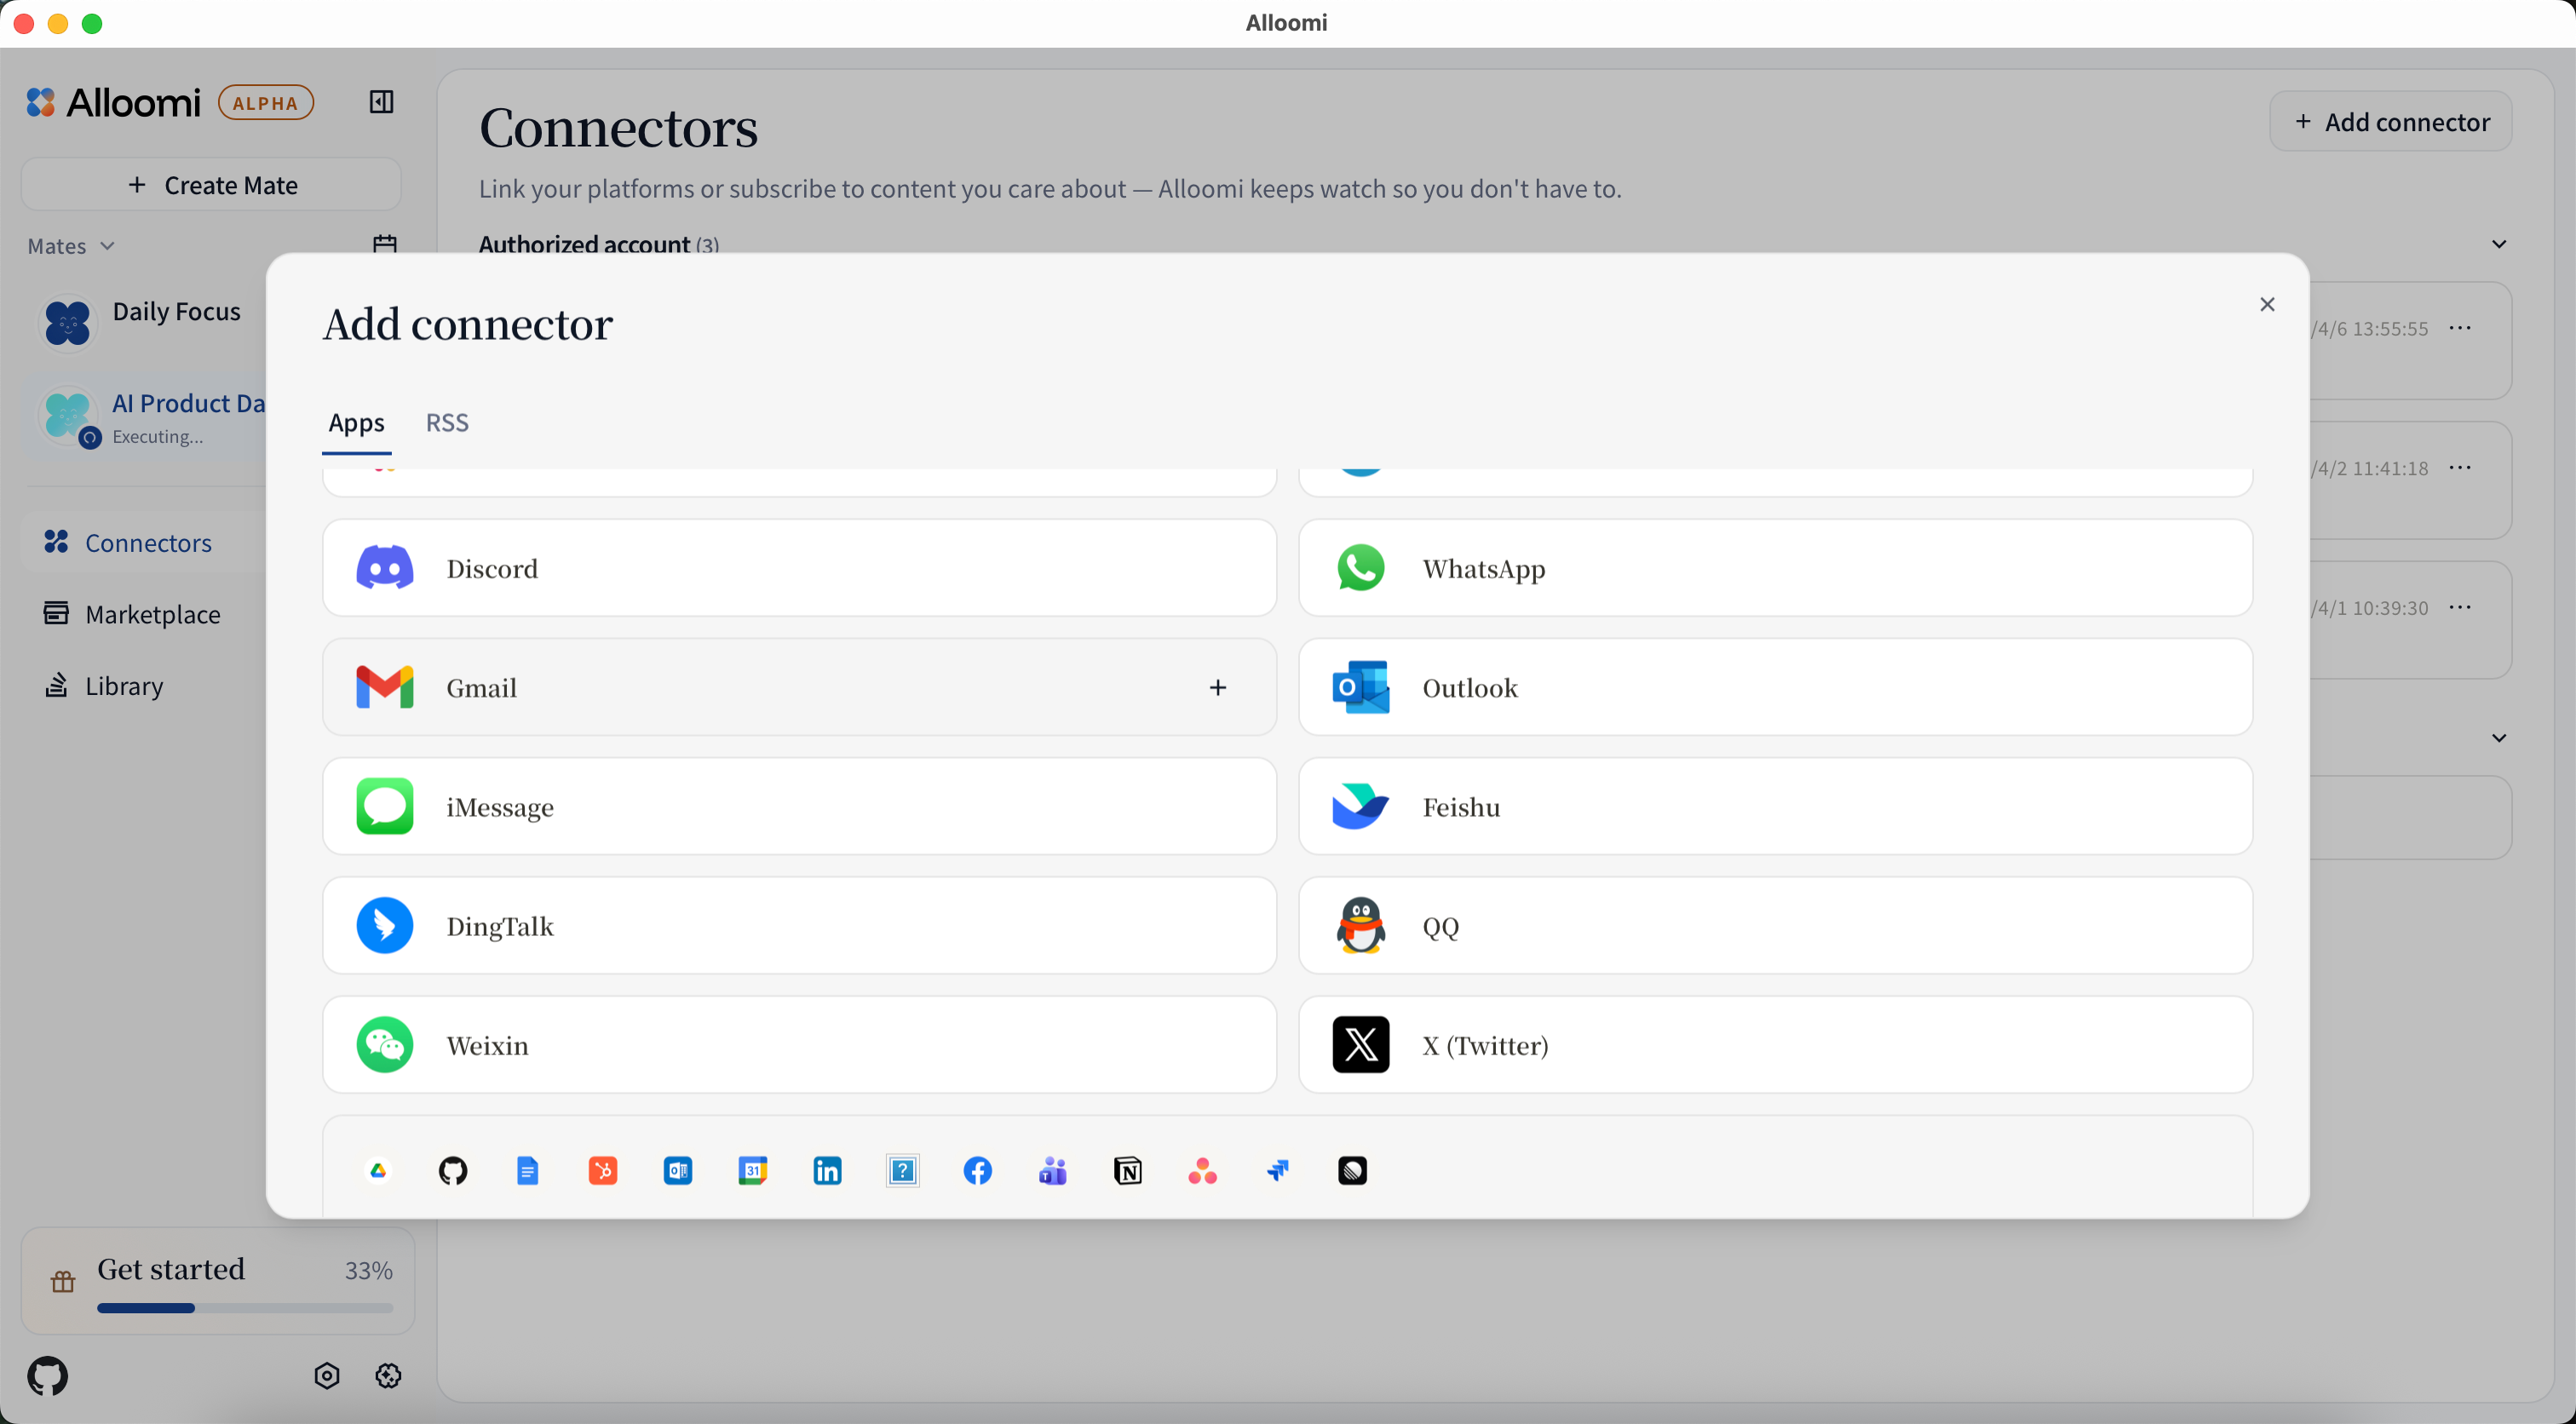
To add a connector, open Settings → Connectors and click + Add New Connector. OpenLoomi will guide you through the authorization process for each platform.
🔒 Privacy by design: OpenLoomi only reads messages to generate insights. It does not store raw message content on its servers — data is processed locally or encrypted in transit.
Supported Platforms
Messaging Platforms and Social Media
| Platform | Status | Description |
|---|---|---|
| Telegram | 🟢 Available | Personal messaging |
| 🟢 Available | Personal messaging | |
| Slack | 🟢 Available | Team communications |
| Discord | 🟢 Available | Community & teams |
| iMessage | 🟢 Available | Personal messaging |
| 🟢 Available | Bot messaging | |
| Lark/Feishu | 🟢 Available | Bot messaging |
| DingTalk | 🟢 Available | Bot messaging |
| Weixin | 🟢 Available | Bot messaging |
| Gmail | 🟢 Available | |
| Outlook | 🟢 Available | |
| X | 🟢 Available | Marketing Automation |
| 🟡 Coming Soon | Marketing Automation | |
| Microsoft Teams | 🟡 Coming Soon | Team communications |
Productivity Tools
| Platform | Status | Description |
|---|---|---|
| Google Drive | 🟡 Coming Soon | File storage |
| Notion | 🟡 Coming Soon | Knowledge base |
| HubSpot | 🟡 Coming Soon | CRM |
| Google Calendar | 🟡 Coming Soon | Scheduling |
| GitHub | 🟡 Coming Soon | R & D |
Other
| Platform | Status | Description |
|---|---|---|
| RSS | 🟢 Available | News & updates |
What Each Connector Does
The table below compares what each connector supports across key capabilities. Use this to choose the right platform for your workflow.
Note: Microsoft Teams, Google Drive, Notion, HubSpot, Google Calendar, and GitHub are coming soon and not included in the table below.
Messaging Platforms
| Connector | Read Messages | Send / Reply | Interactive Chat | AI Translation | AI Polishing | Notes & Files | Setup |
|---|---|---|---|---|---|---|---|
| Telegram | ✅ | ✅ | ✅ | ✅ | ✅ | ✅ | QR / Phone |
| ✅ | ✅ | ✅ | ✅ | ✅ | ✅ | QR / Phone | |
| Slack | ✅ | ✅ | ❌ | ✅ | ✅ | ✅ | OAuth |
| Discord | ✅ | ✅ | ❌ | ✅ | ✅ | ✅ | OAuth |
| iMessage | ✅ | ✅ | ✅ | ✅ | ✅ | ✅ | Local (macOS) |
| ⚠️ | ✅ | ✅ | ✅ | ❌ | ❌ | Bot Token | |
| Lark/Feishu | ⚠️ | ✅ | ✅ | ✅ | ❌ | ❌ | Bot Token |
| DingTalk | ⚠️ | ✅ | ✅ | ✅ | ❌ | ❌ | Bot Token |
| Weixin | ❌ | ❌ | ✅ | ❌ | ❌ | ❌ | QR |
| Connector | Read Messages | Send / Reply | Interactive Chat | AI Translation | AI Polishing | Notes & Files | Setup |
|---|---|---|---|---|---|---|---|
| Gmail | ✅ | ✅ | ❌ | ✅ | ✅ | ✅ | App Password |
| Outlook | ✅ | ✅ | ❌ | ✅ | ✅ | ✅ | App Password |
Social / Content
| Connector | Read Messages | Send / Reply | Interactive Chat | AI Translation | AI Polishing | Notes & Files | Setup |
|---|---|---|---|---|---|---|---|
| X | ✅ | ✅ | ❌ | ✅ | ✅ | ✅ | OAuth |
| RSS | ✅ | ❌ | ❌ | ❌ | ❌ | ❌ | URL / OPML |
Authorization Modes Explained
OpenLoomi supports two distinct authorization modes for messaging platforms. Understanding the difference helps you choose the right platform for your workflow.
Bot Token Mode — Feishu, DingTalk, QQ
These platforms use enterprise self-built applications with bot credentials (App ID + App Secret or Client ID + Client Secret).
| Platform | Credentials | Message Source | How Users Trigger AI |
|---|---|---|---|
| Feishu | App ID + Secret | Messages sent directly to bot or @bot in group | Find bot → private chat, or @mention bot in group |
| DingTalk | Client ID + Secret | Messages sent directly to bot or @bot in group | Find bot → private chat, or @mention bot in group |
| App ID + Token | Messages sent directly to bot or @bot in group | Find bot → private chat, or @mention bot in group |
How it works: You create a bot app on the platform, obtain credentials, and connect it to OpenLoomi. Users can either:
- Find your bot in the messaging app and send messages directly to it (private chat)
- Add the bot to a group and @mention it — the bot will respond to messages directed at it
⚠️ Group chat requires @mention: In group chats, the bot only reacts when explicitly @mentioned. It cannot passively read all group messages.
User Account Mode — Telegram, WhatsApp
These platforms connect to a user’s personal account via QR code or phone verification.
| Platform | Login Method | Message Source | How Users Trigger AI |
|---|---|---|---|
| Telegram | QR code / Phone | Saved Messages (user messages themselves) | Send message to yourself |
| QR code / Pair code | All personal account chats | Send message to yourself |
How it works: After logging into your personal account, OpenLoomi reads messages sent to your own account (Saved Messages / 自己发给自己). When you send a message to yourself, OpenLoomi reads it, generates an AI response, and you continue the conversation in the same chat.
Key Differences
| Bot Token Mode | User Account Mode | |
|---|---|---|
| Authorization | App credentials (App ID + Secret) | Personal account login (QR / phone) |
| Message scope | Only messages sent to the bot | All messages in the personal account |
| User interaction | User must find and chat with bot | User chats with their own account |
| Proactive monitoring | ❌ Bot can only respond to incoming messages | ✅ AI monitors Saved Messages / self-chats |
| Use case | Customer support bots, team assistants | Personal AI assistant, self-productivity |
💡 Tip: Bot Token mode is ideal for building customer-facing bots where users主动来找 bot. User Account mode is designed for personal AI assistants where you send notes to yourself and get AI-powered insights back.
How to
Platform Setup Details
Telegram
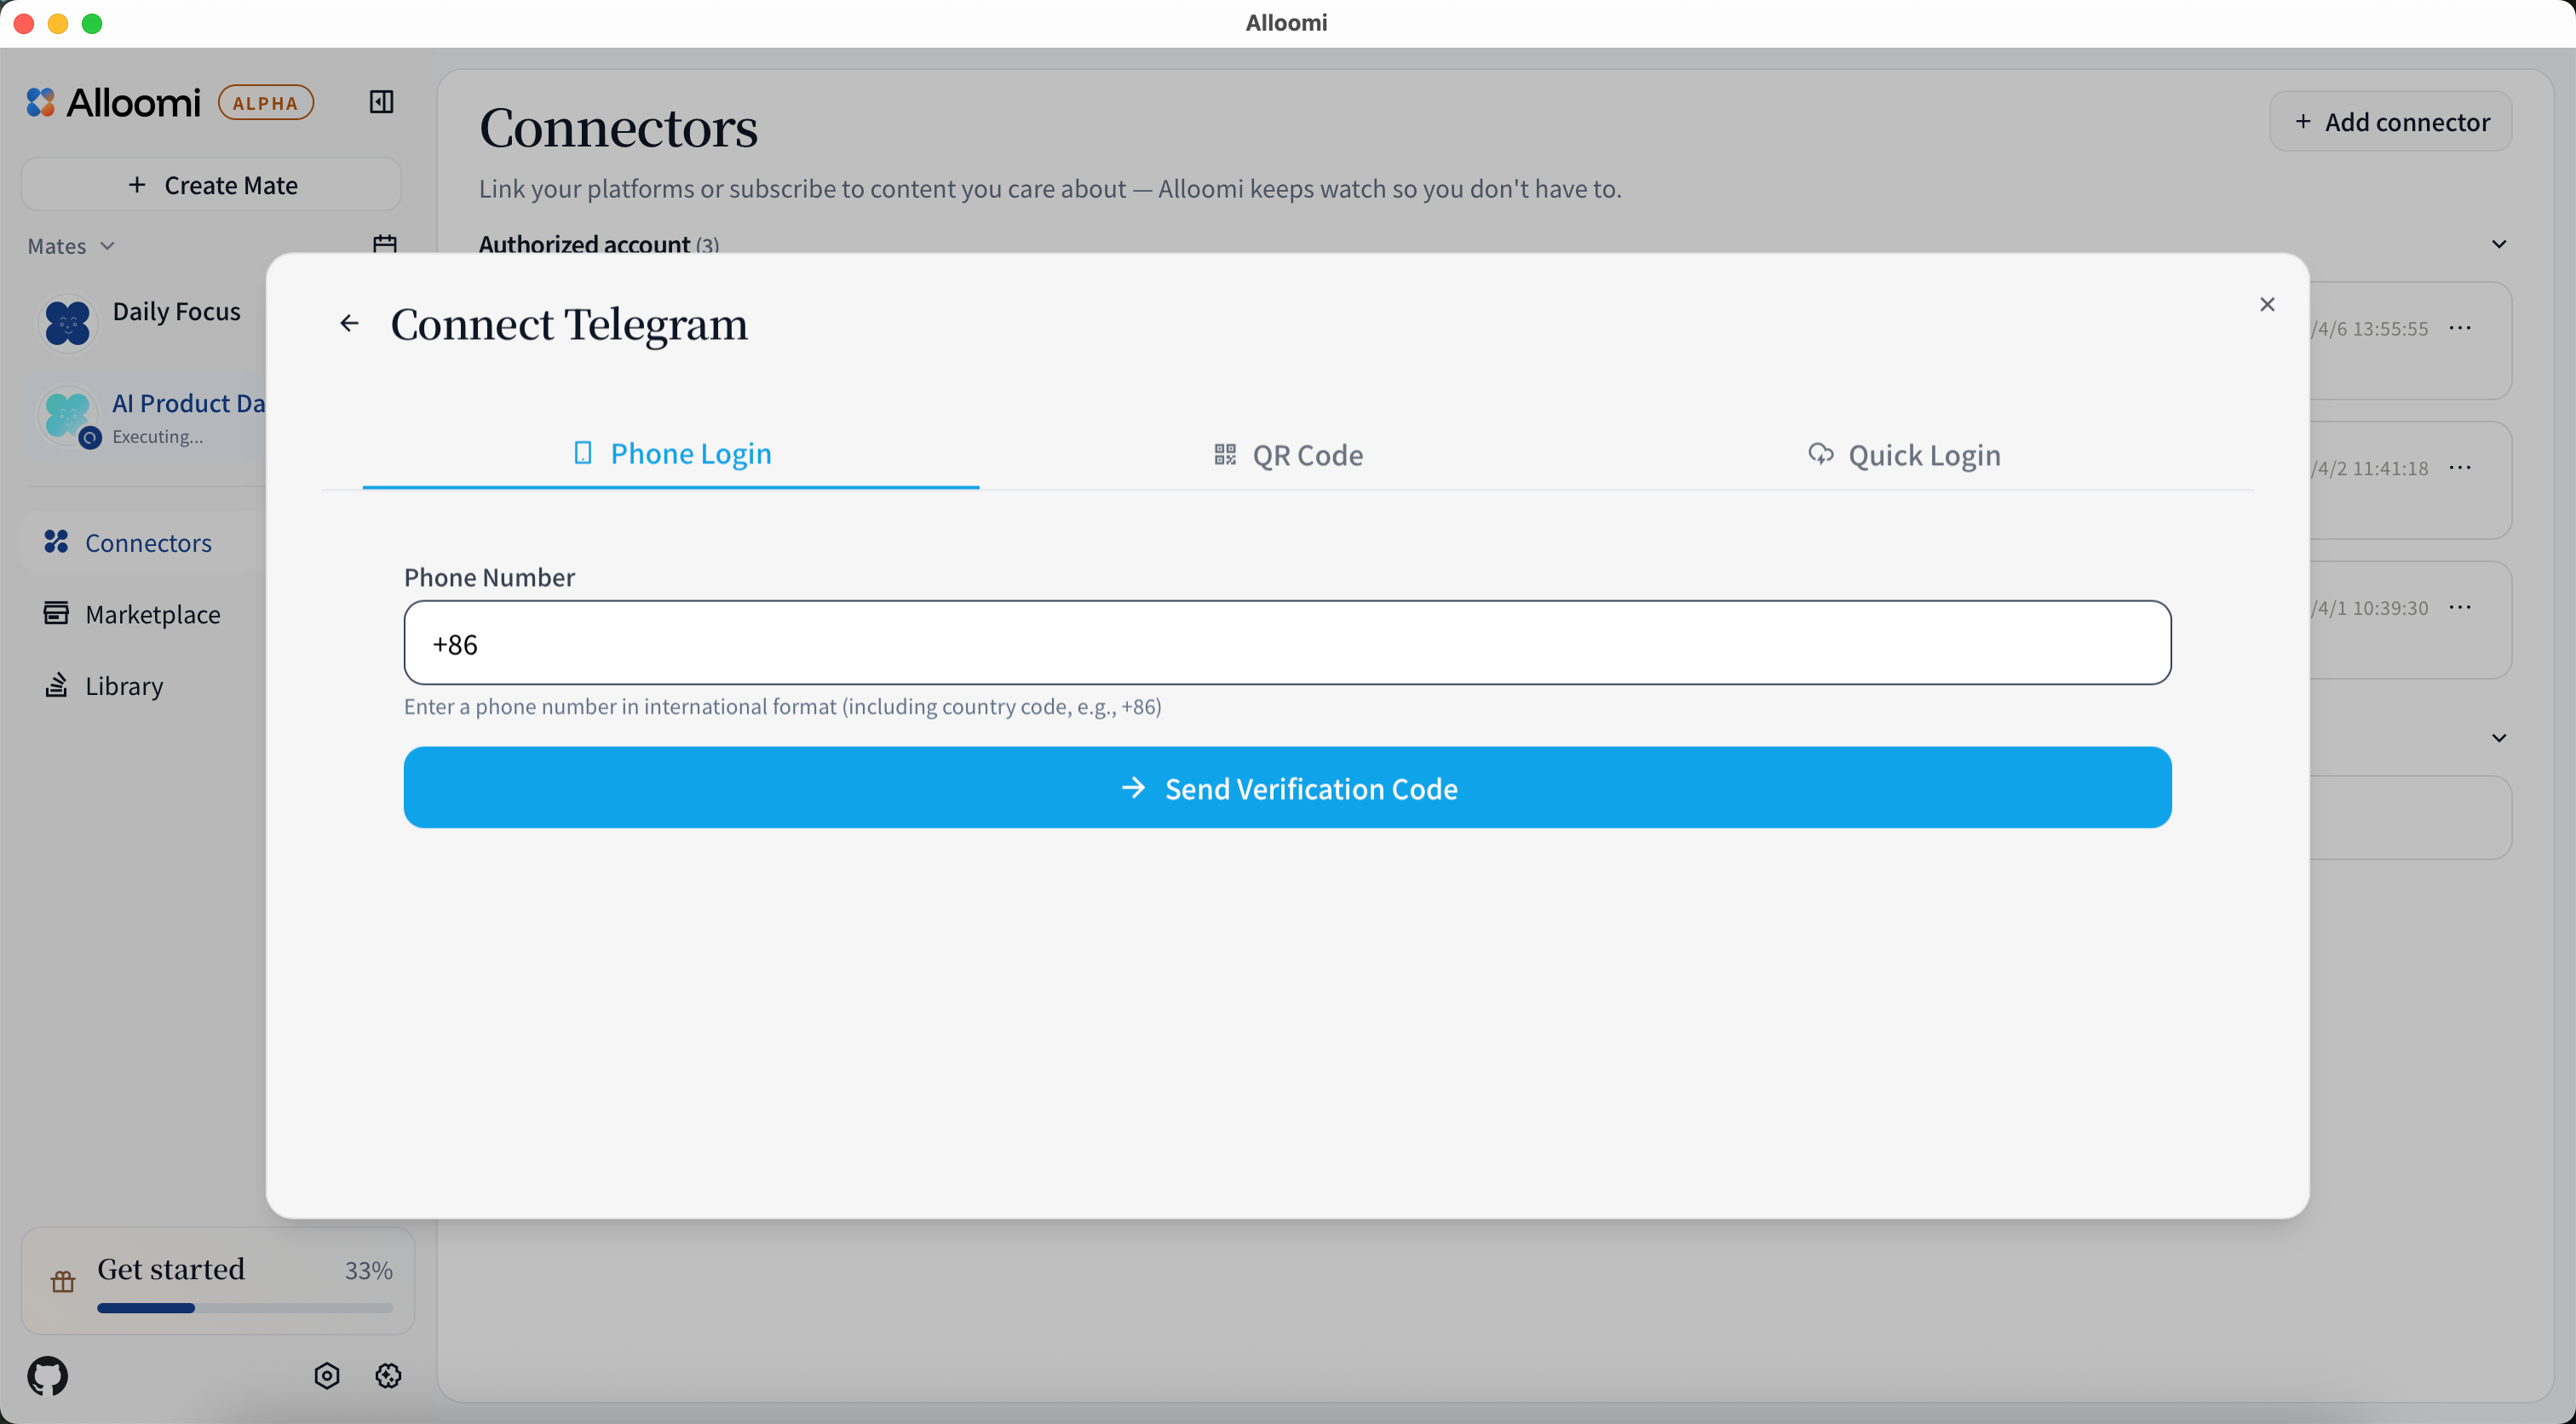
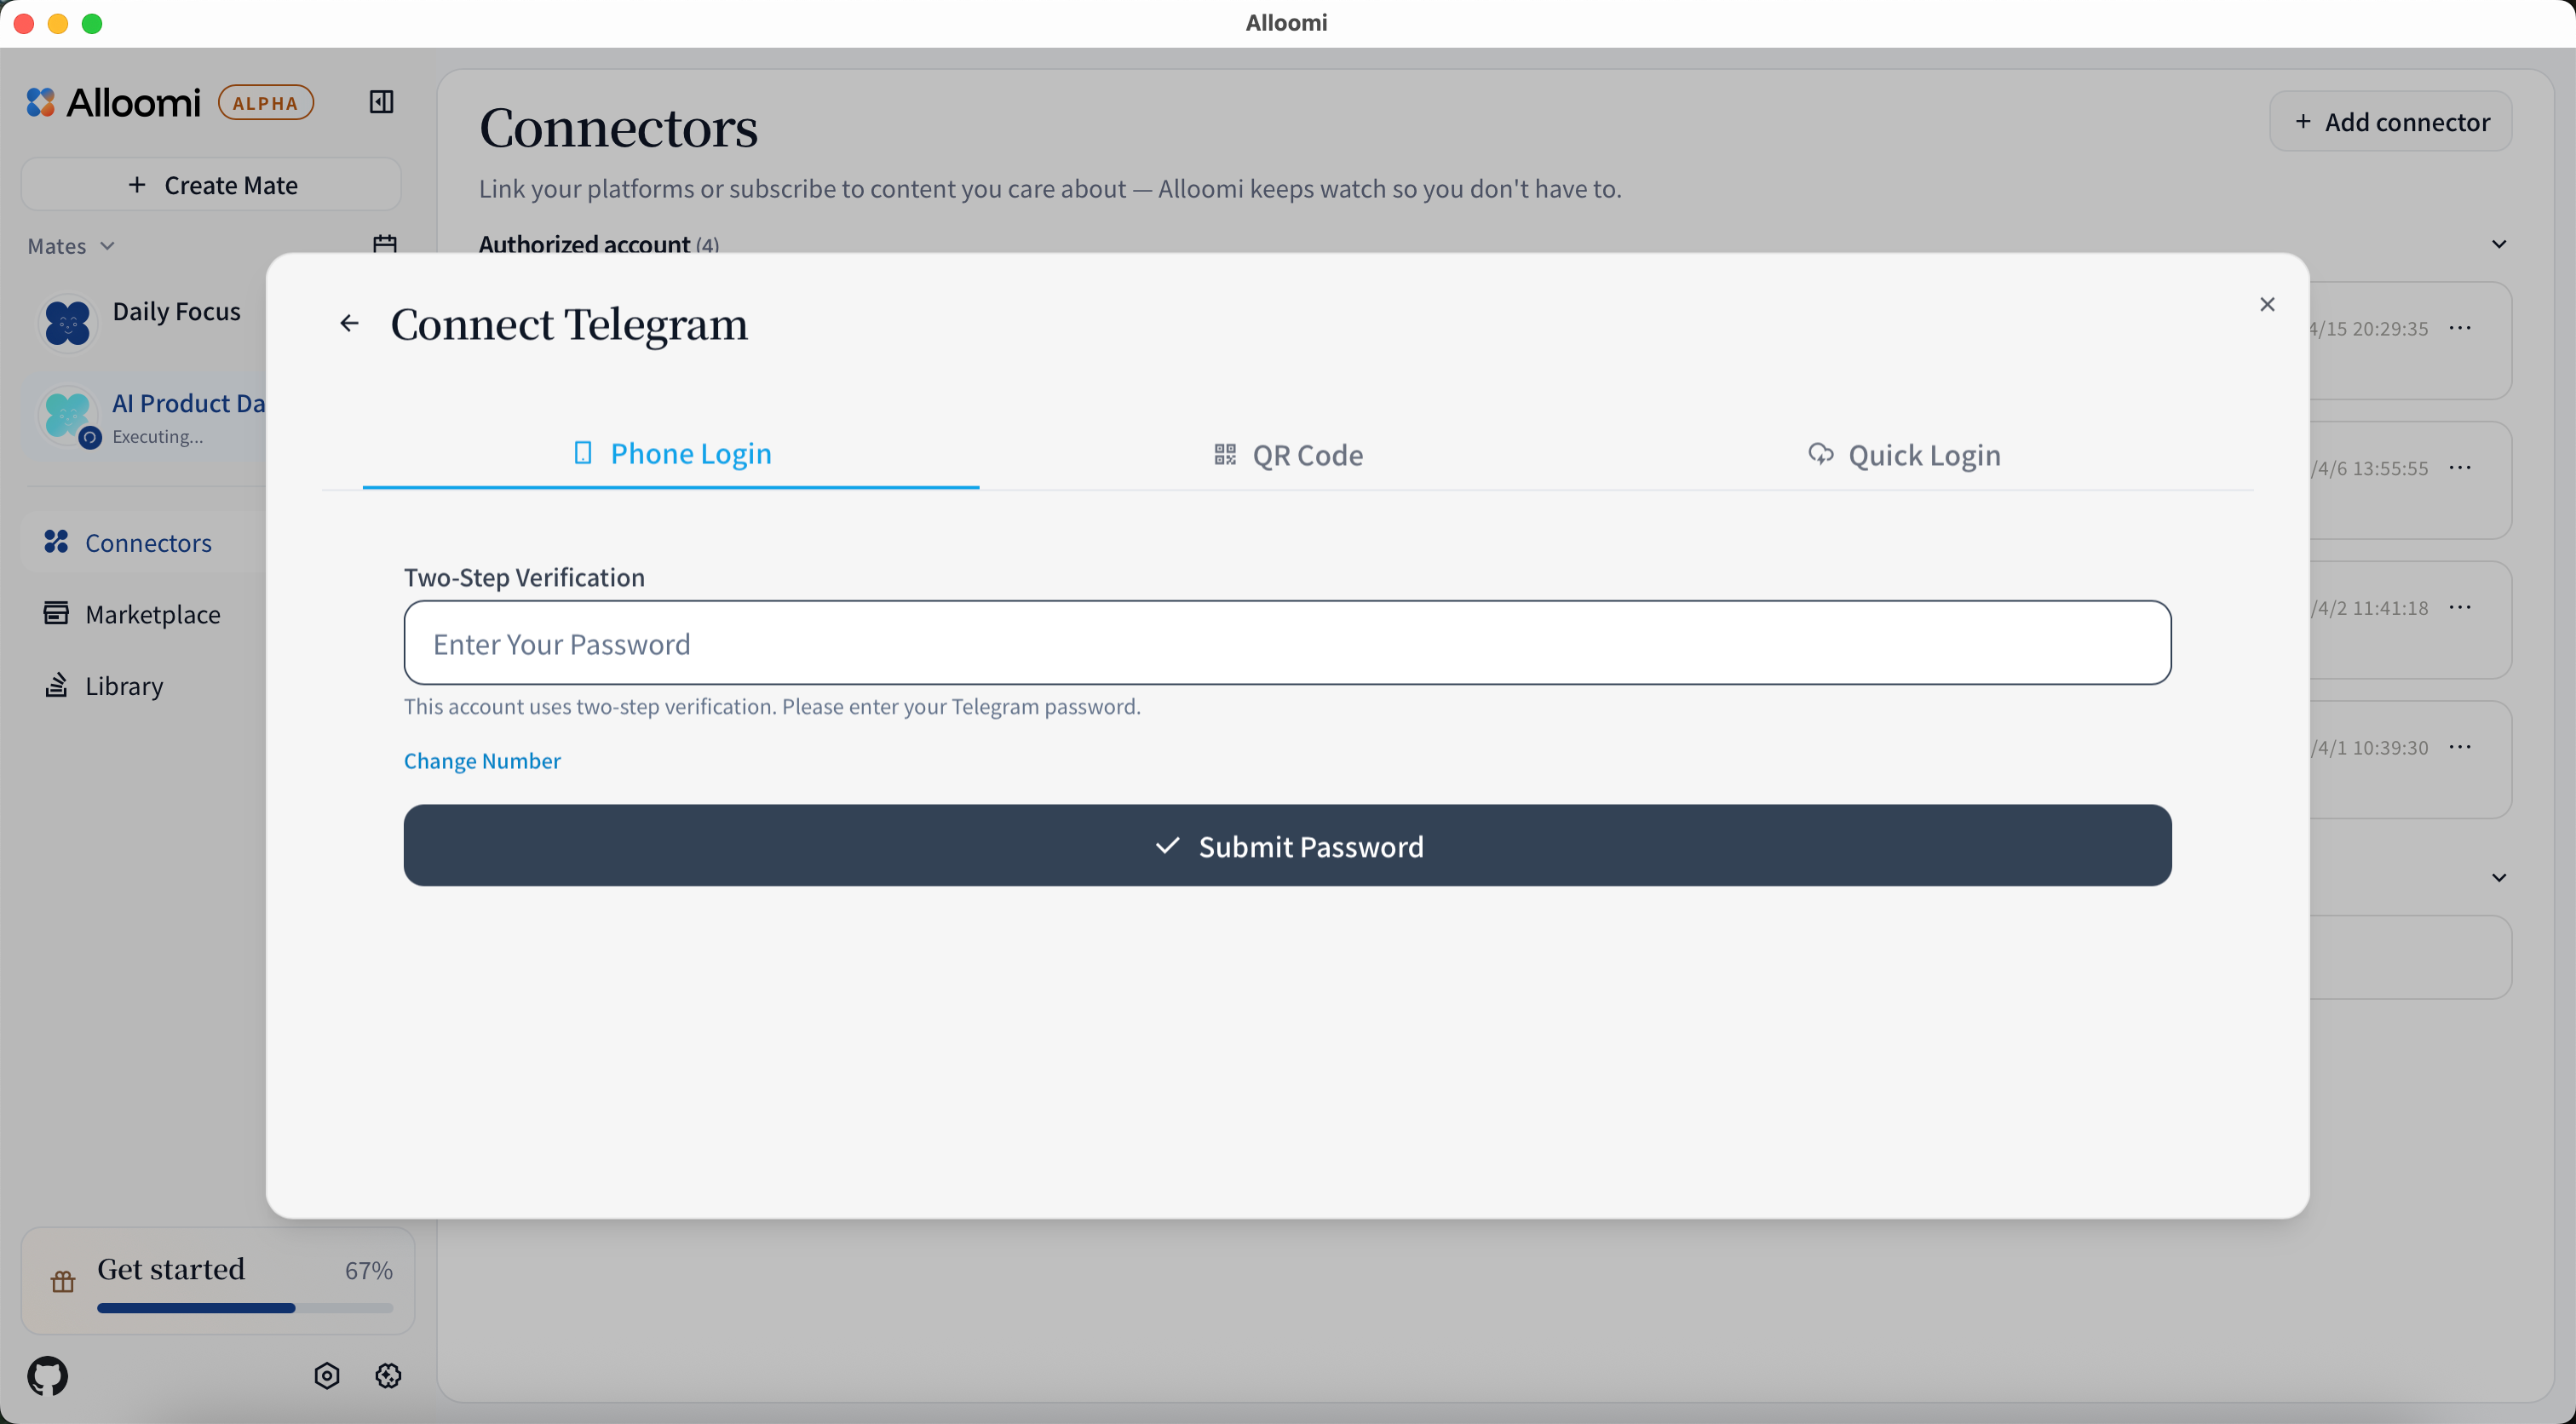
After clicking [Connect Telegram], you’ll be redirected to Telegram’s authorization page.
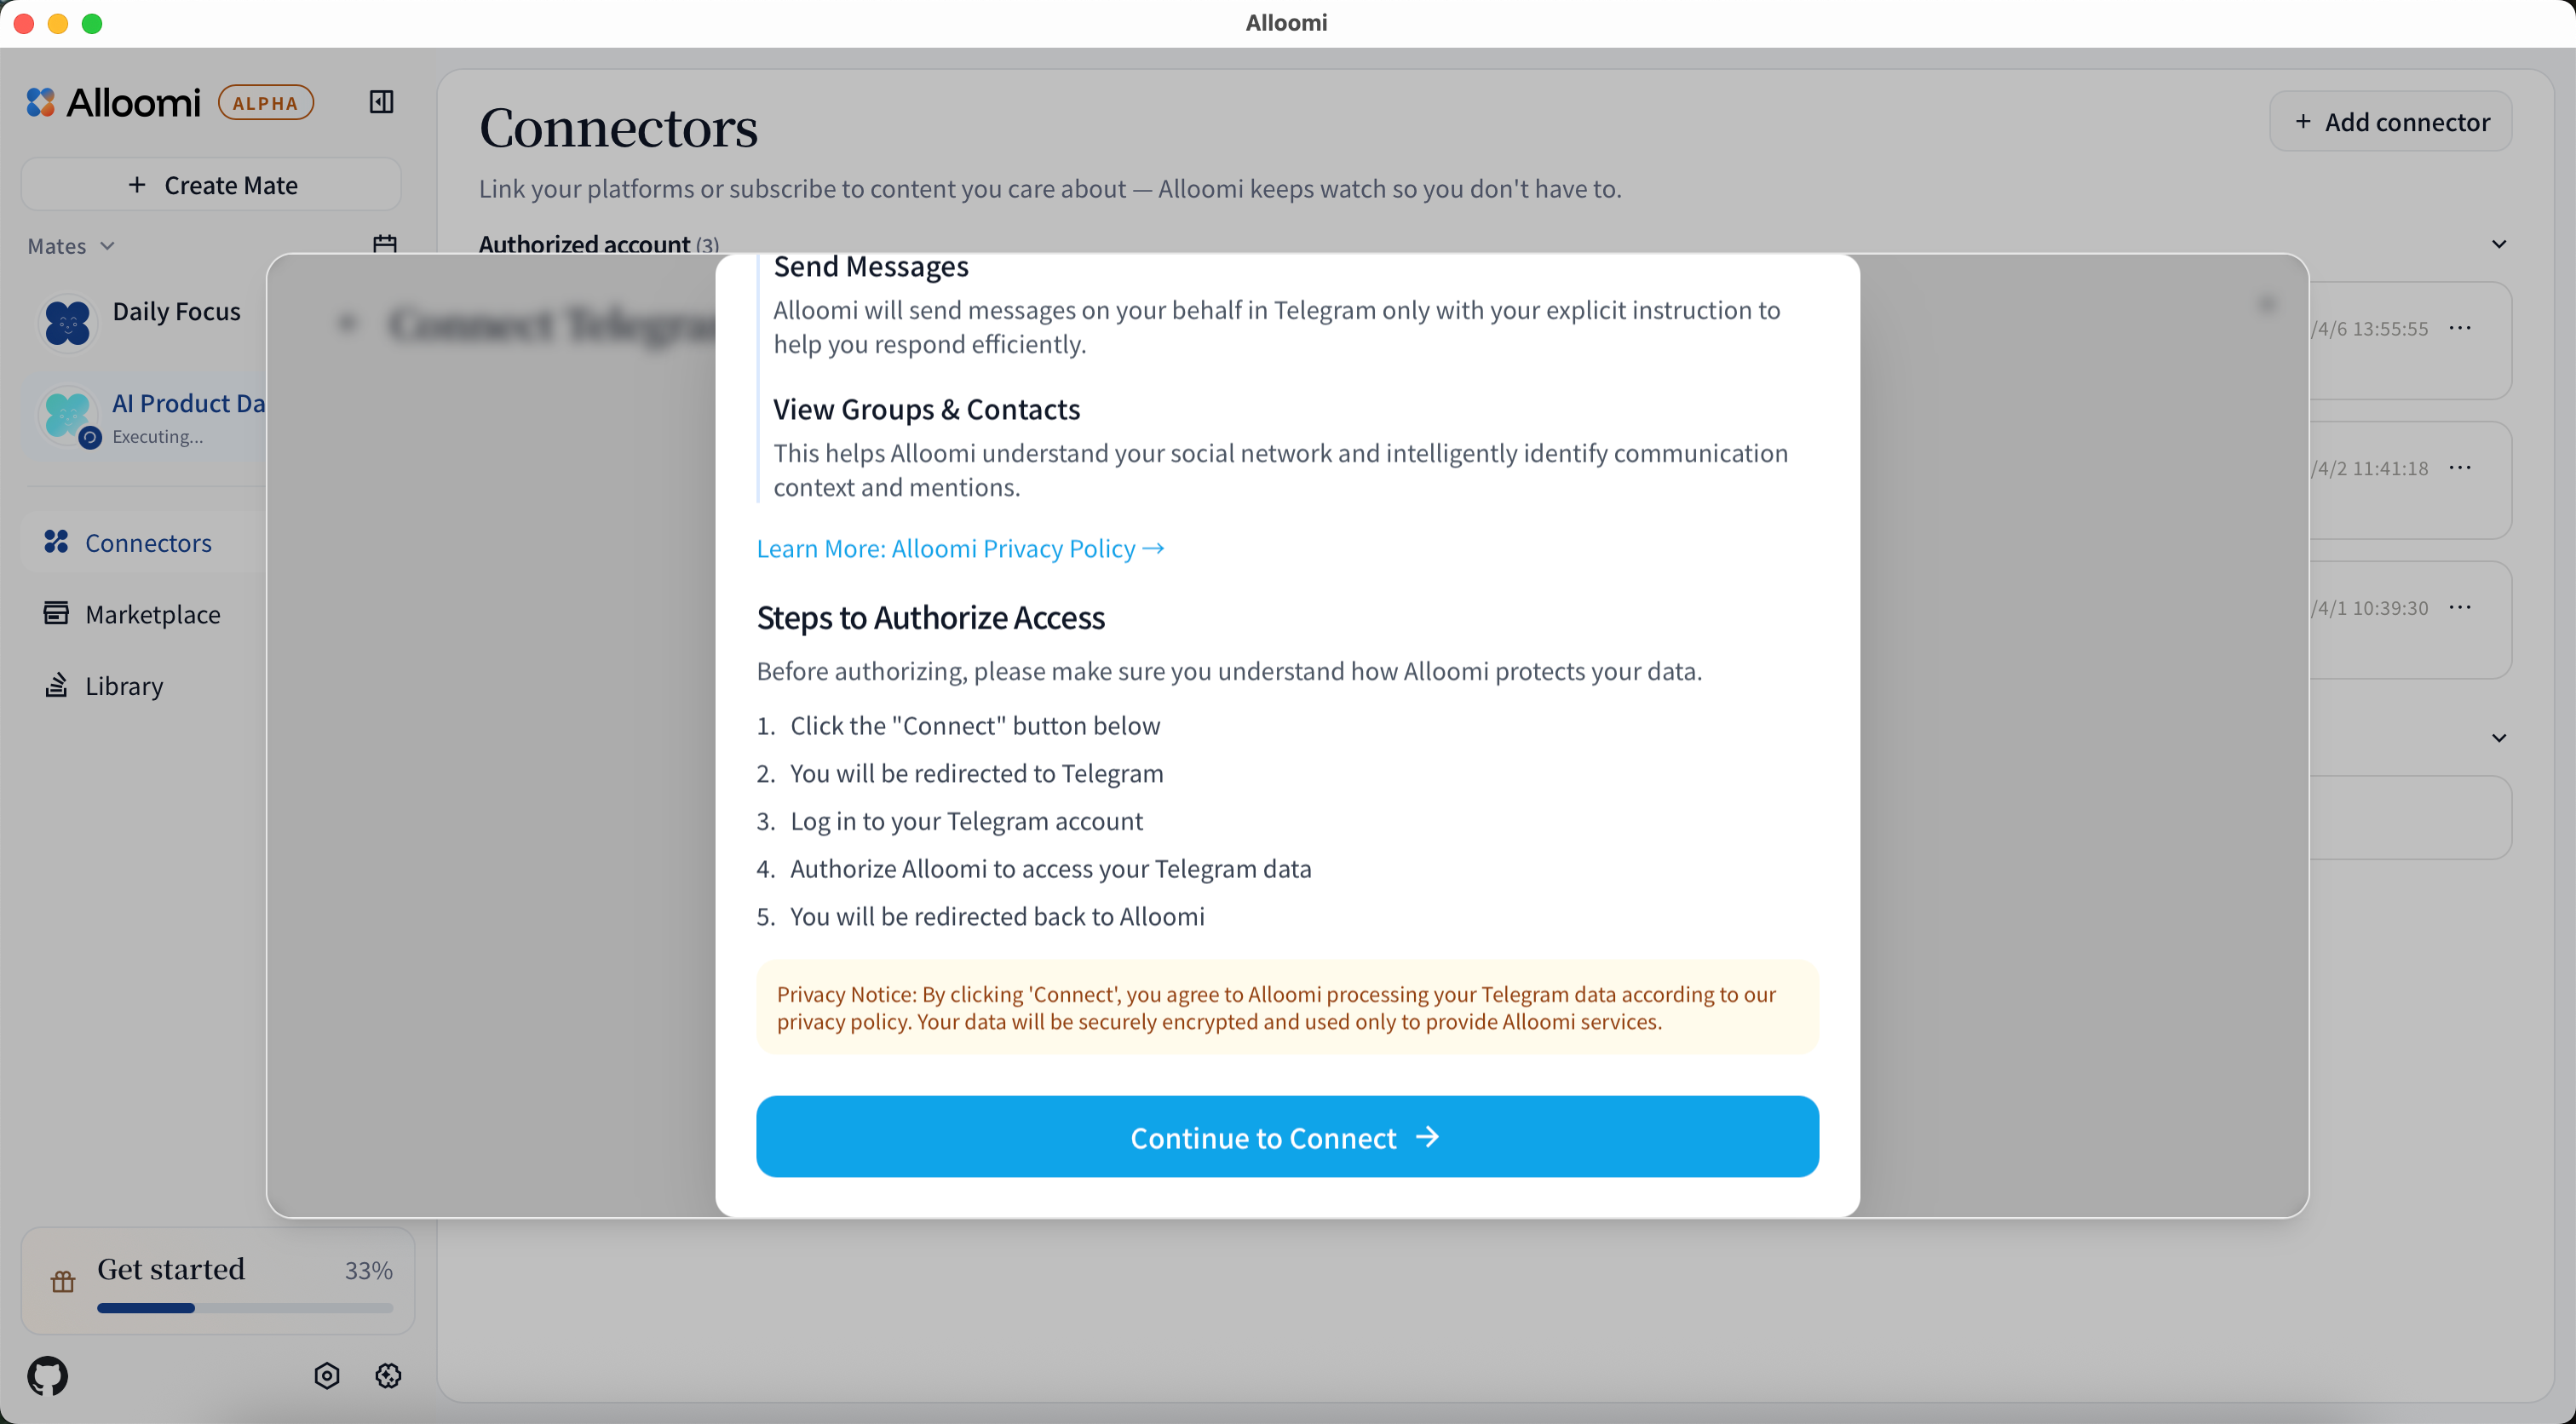
- Enter your phone number
- Enter the verification code sent to your Telegram app
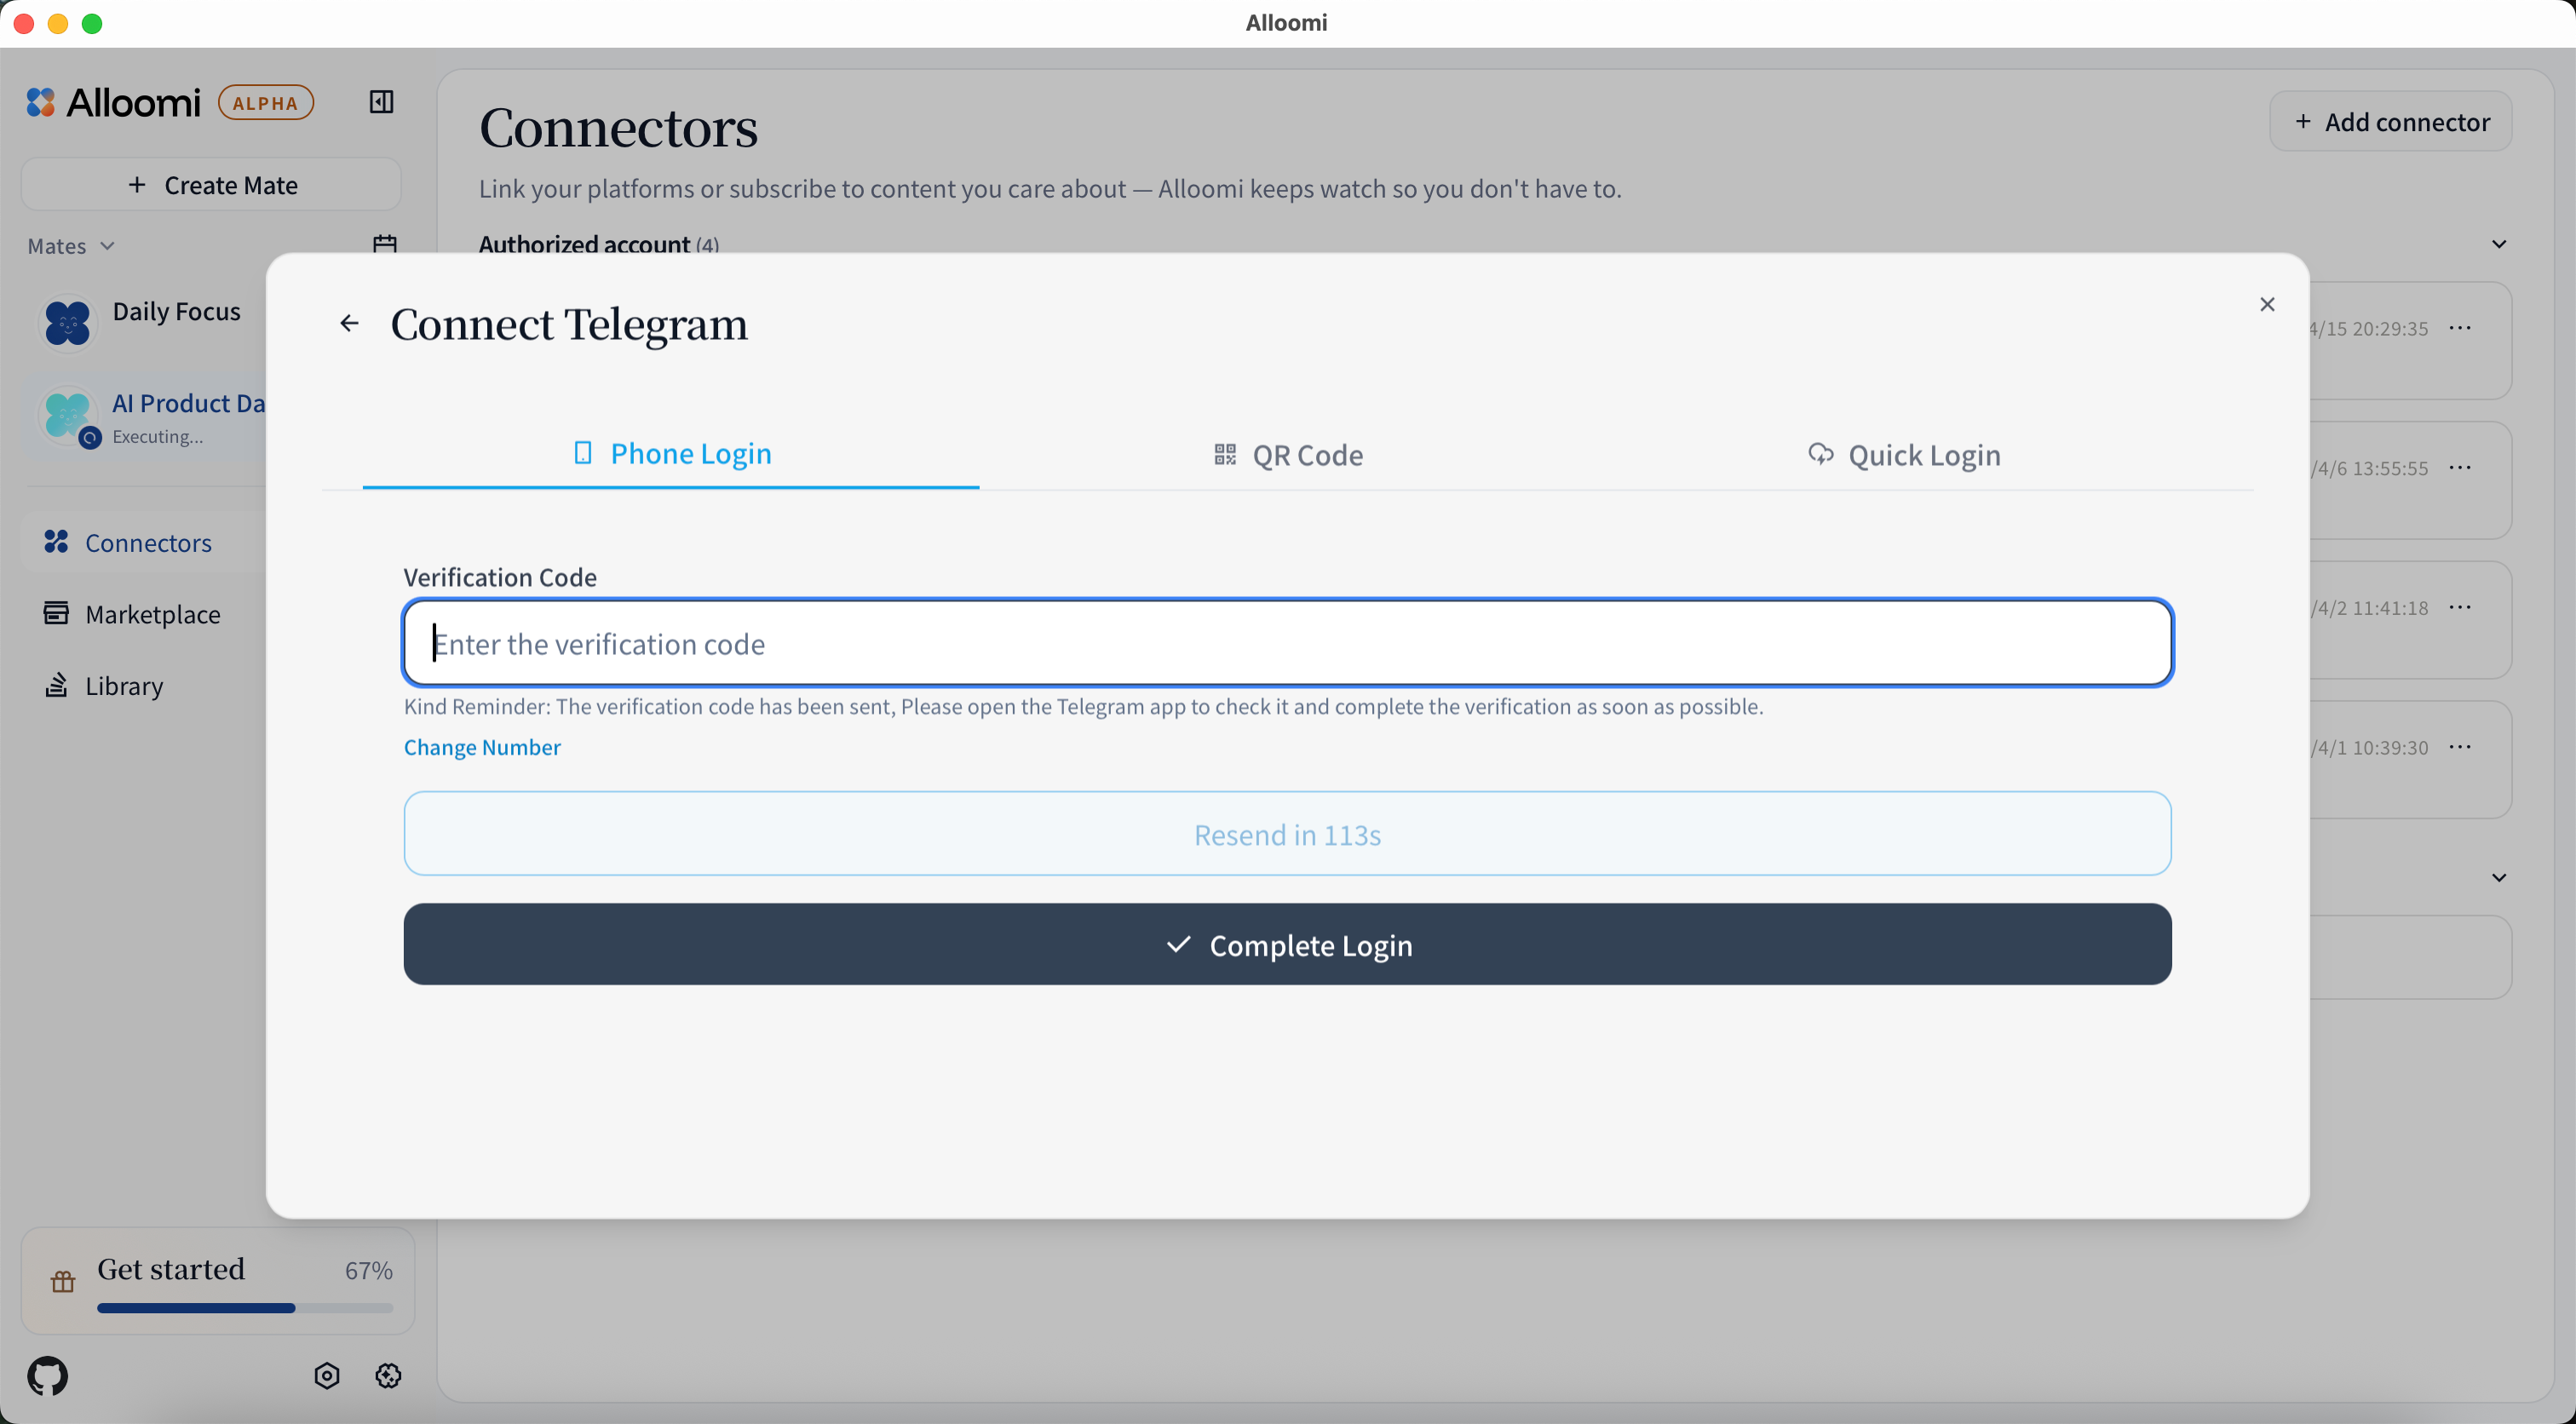
- If you have Two-Step Verification enabled, enter your password
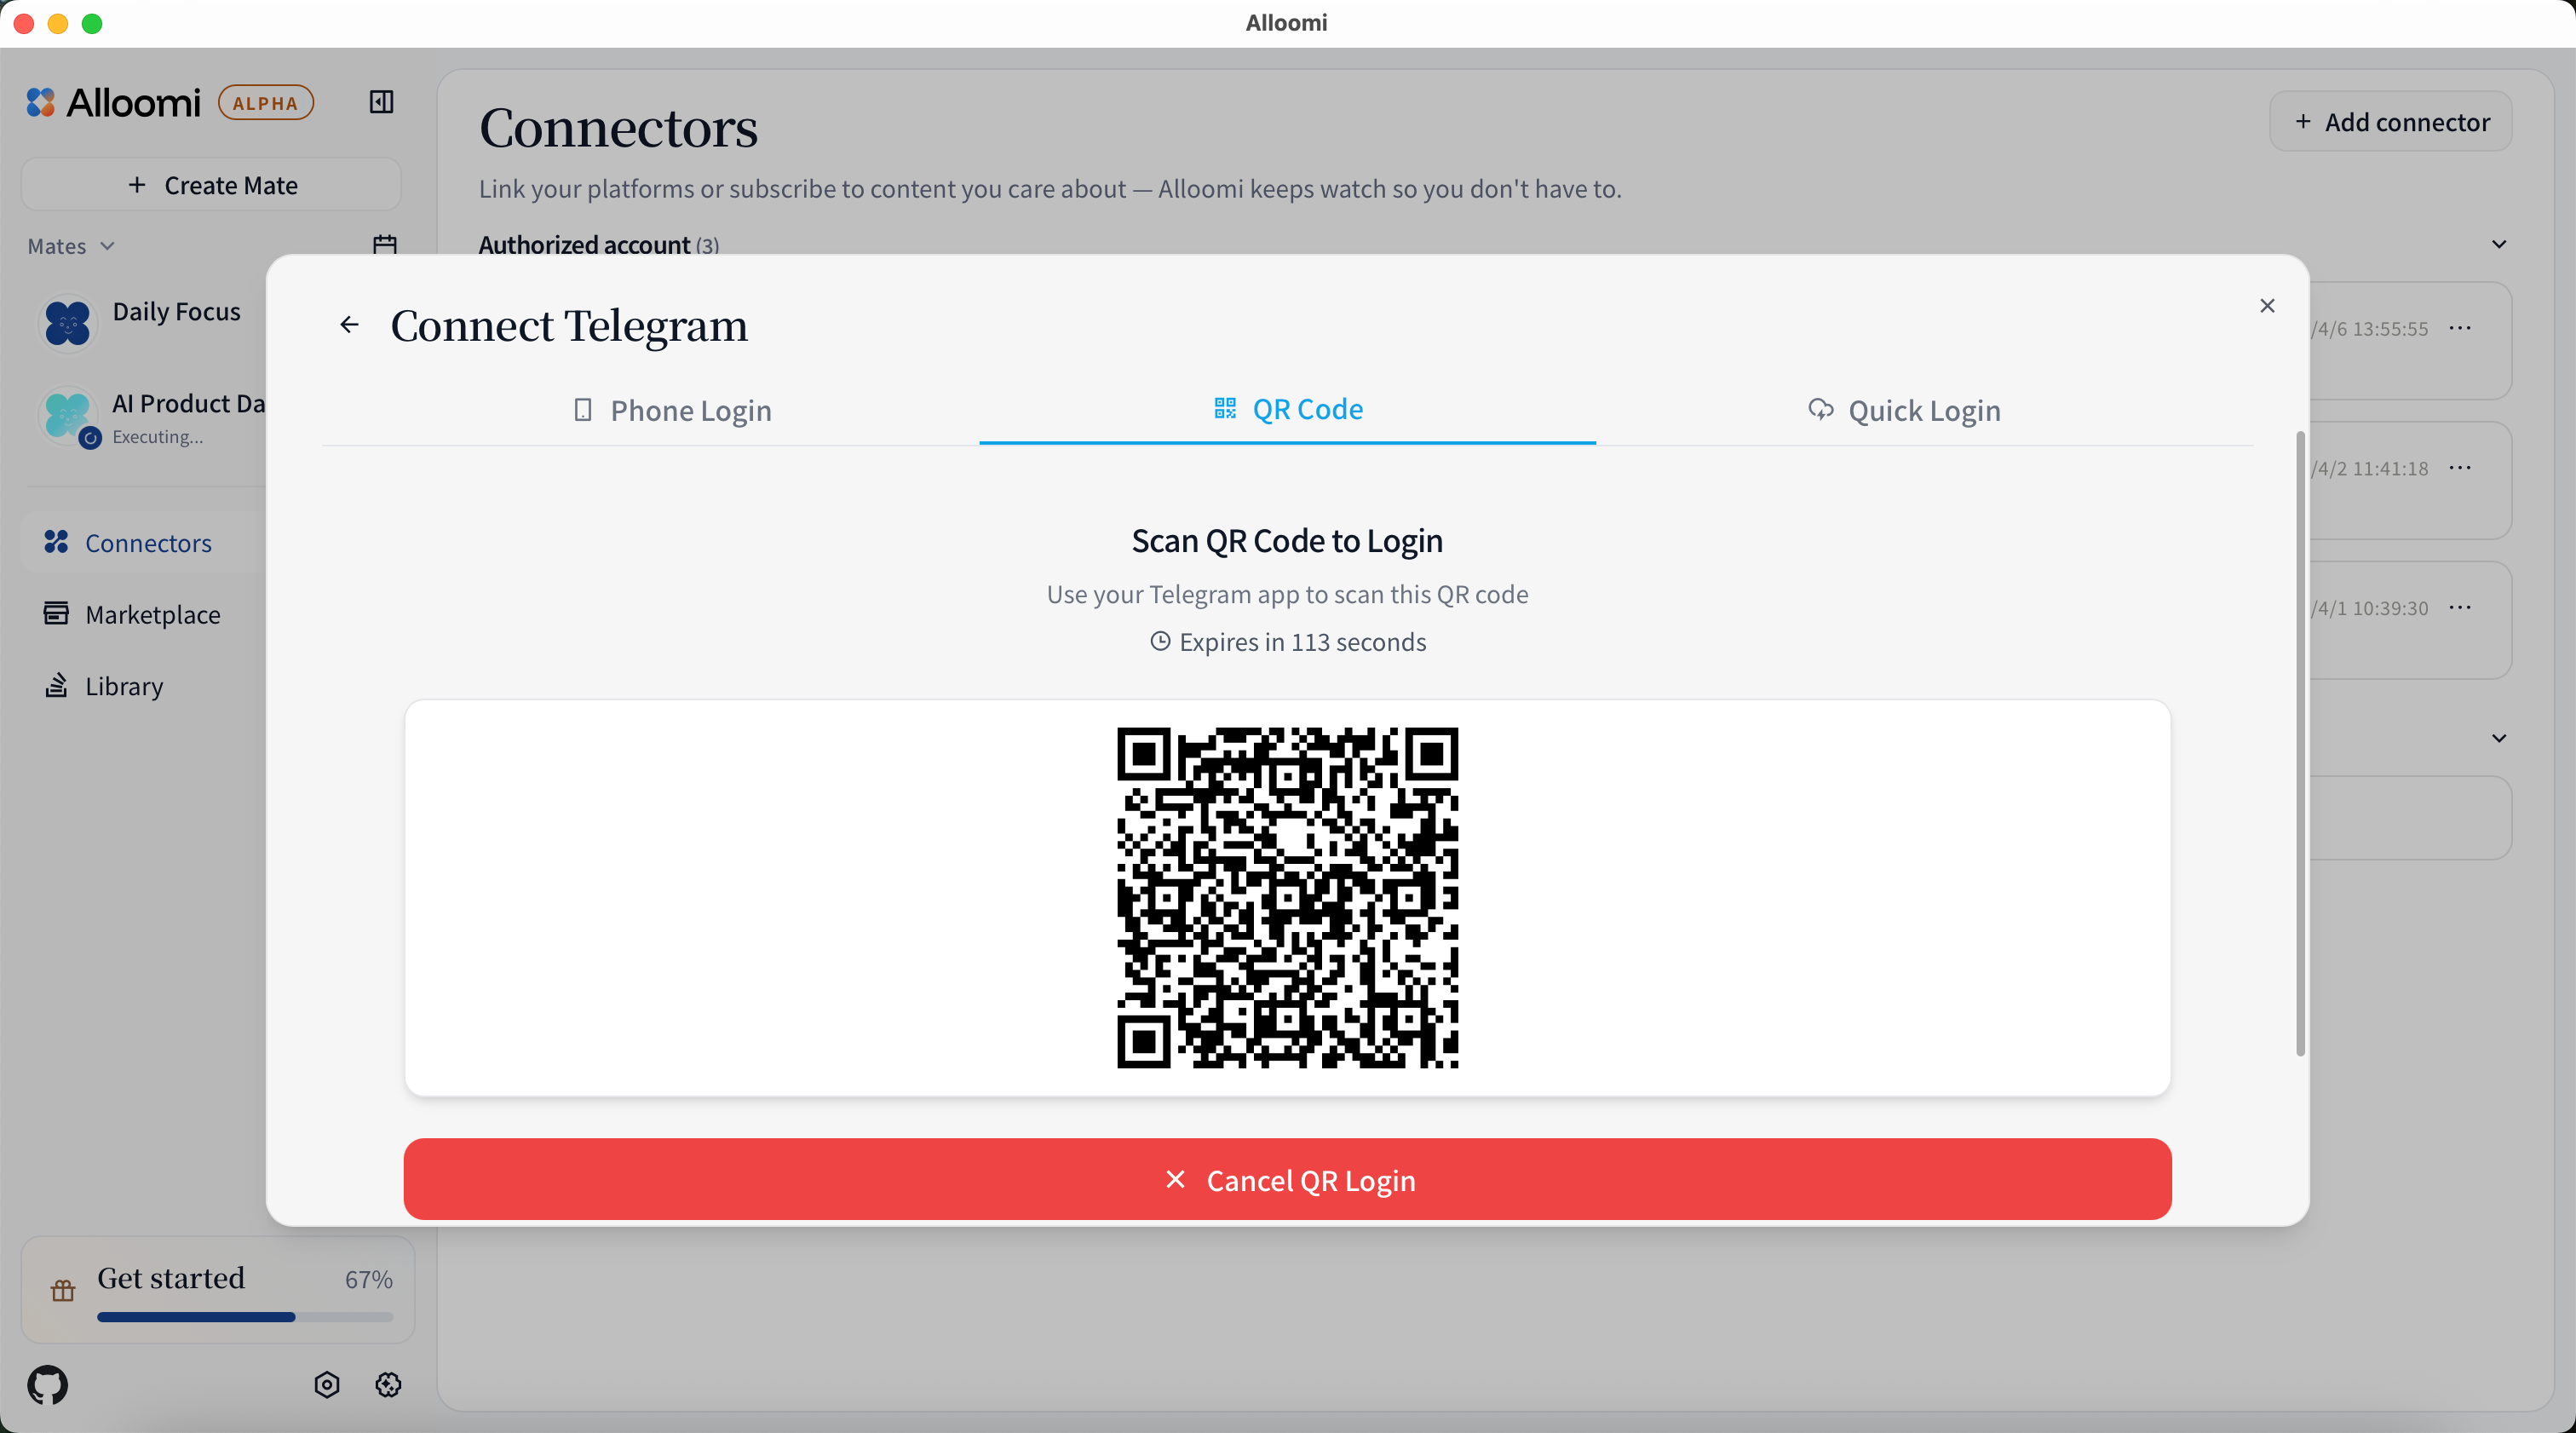
Or choose to authorize by scanning a QR code in the Telegram app
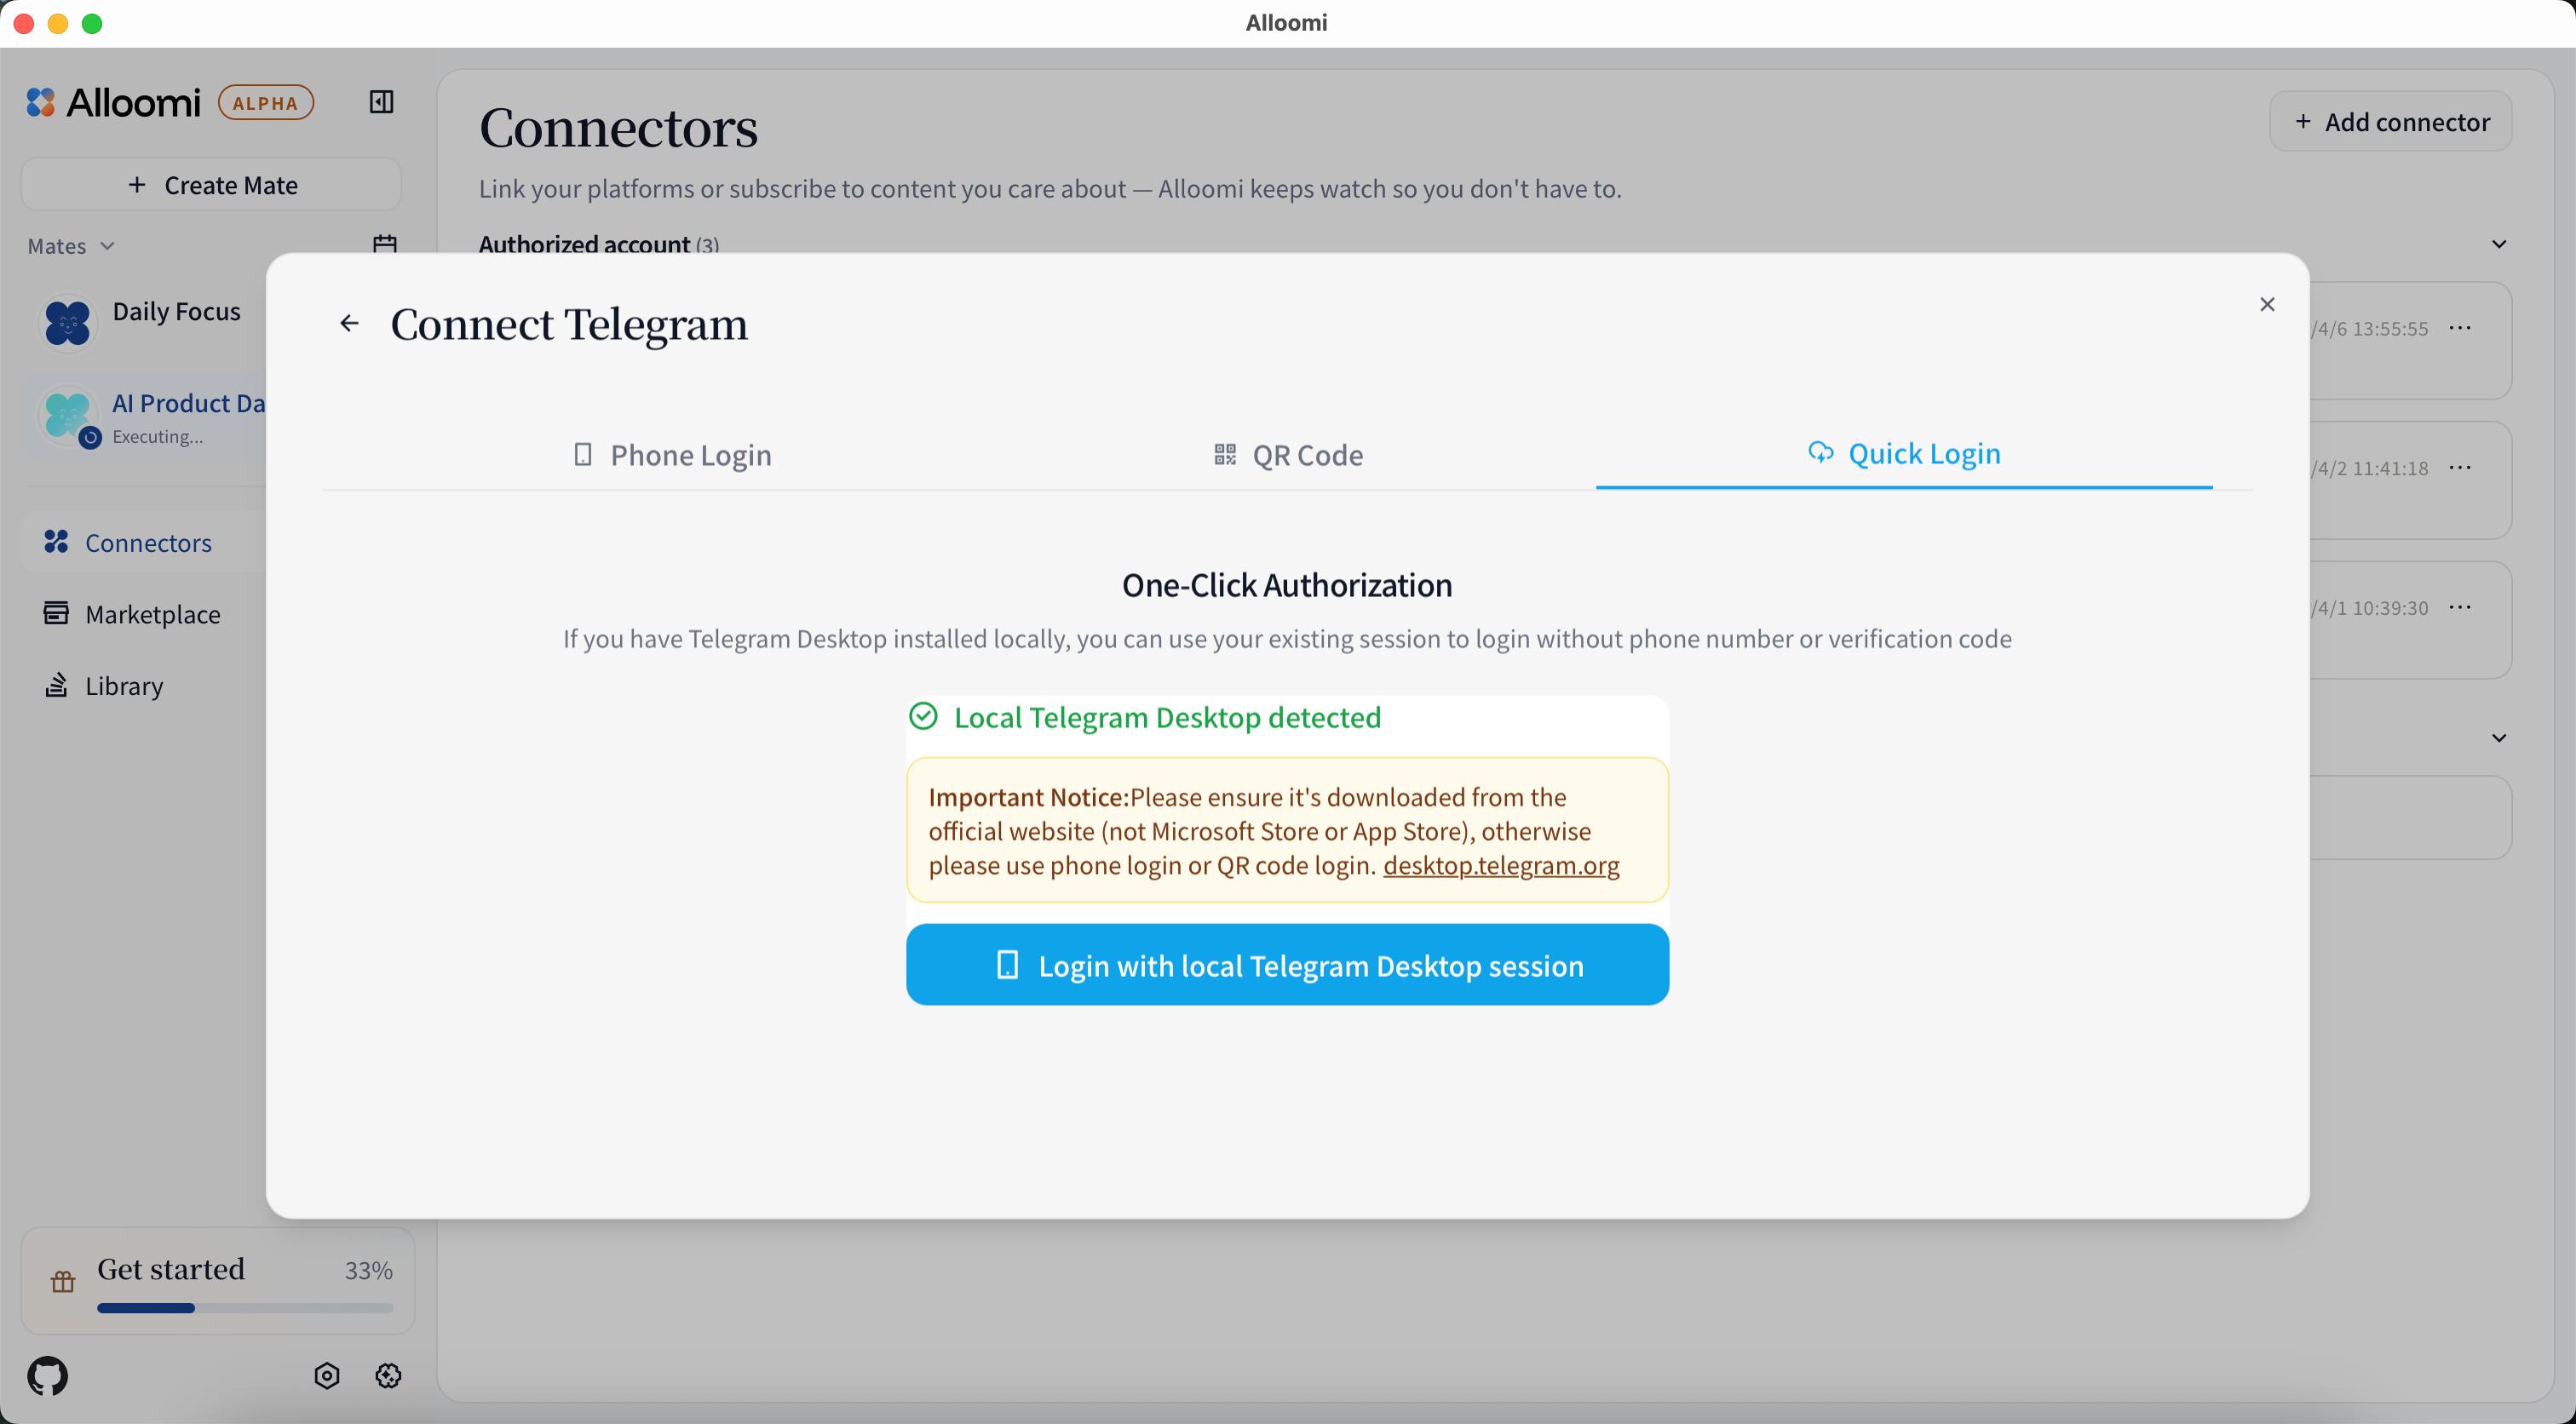
Or choose to authorize by quick login in the Telegram app if you have official telegram desktop installed locally, you can use your existing session to login without phone number or verification code
Slack
After clicking [Connect Slack], you’ll be redirected to Slack’s authorization page. Click [Install OpenLoomi] to add OpenLoomi to your workspace.
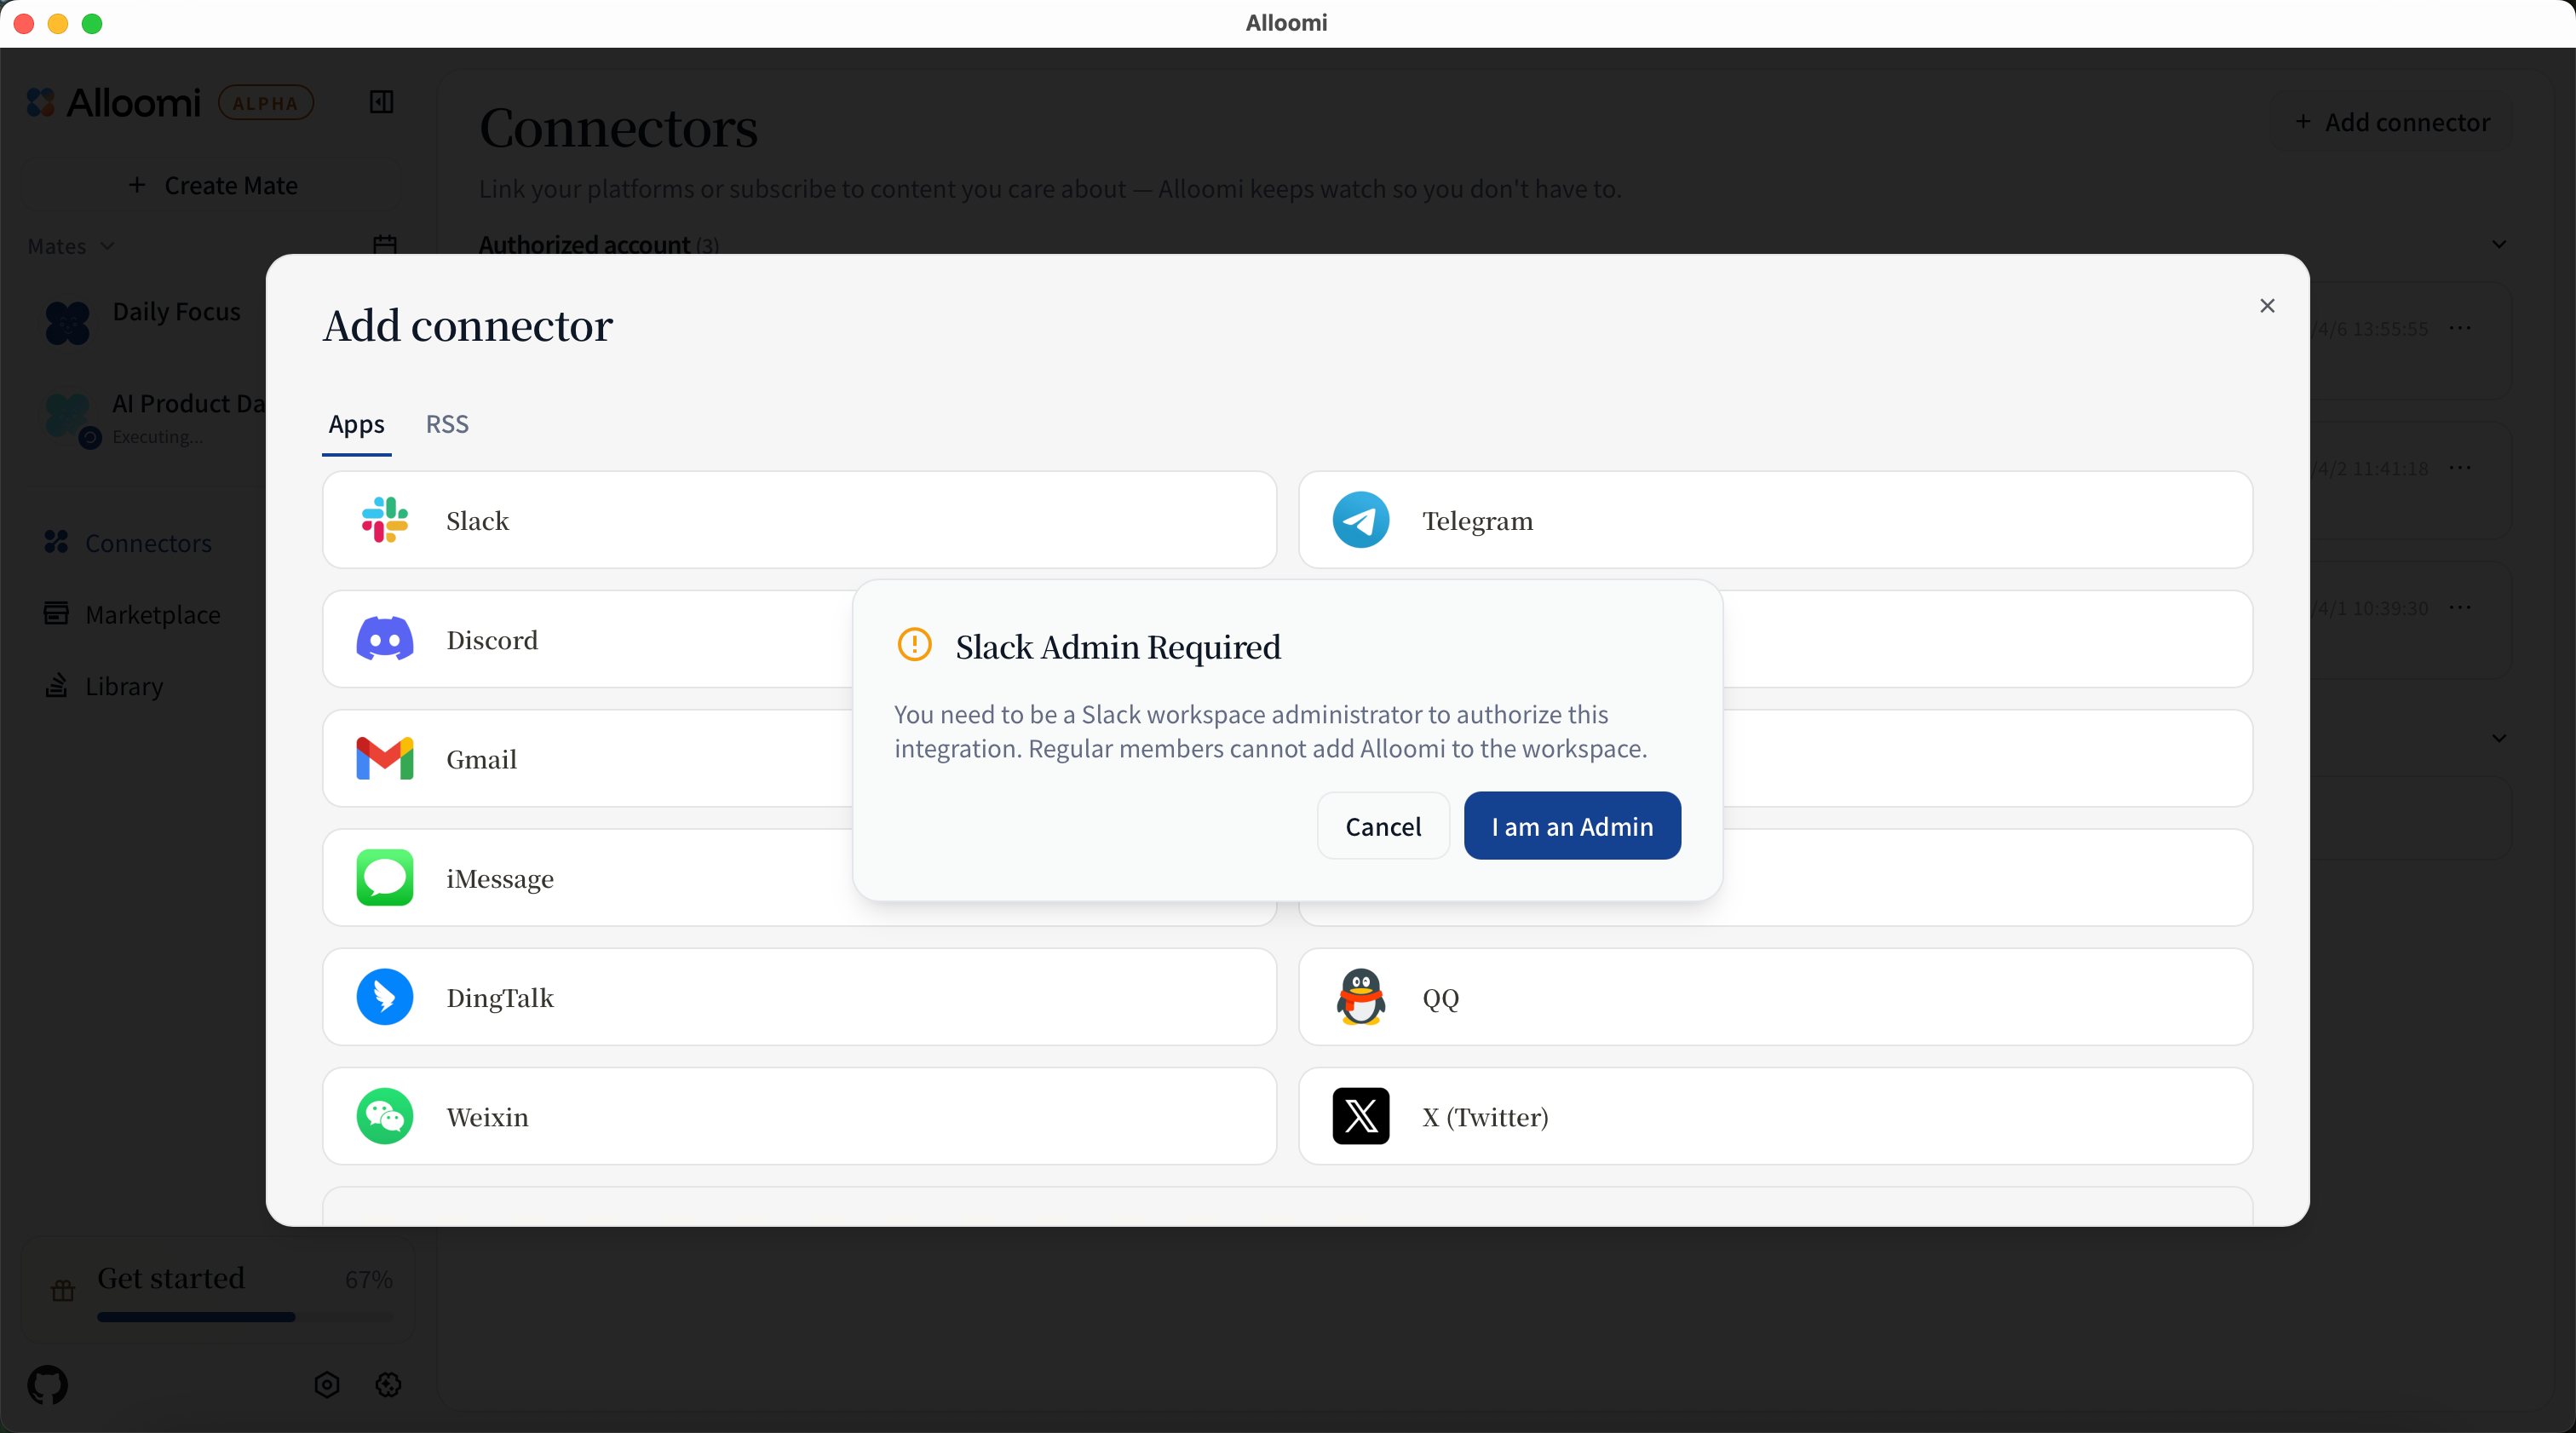
Note: Only workspace owners can install OpenLoomi currently.
Discord
After clicking [Connect Discord], select a Discord server to install OpenLoomi.
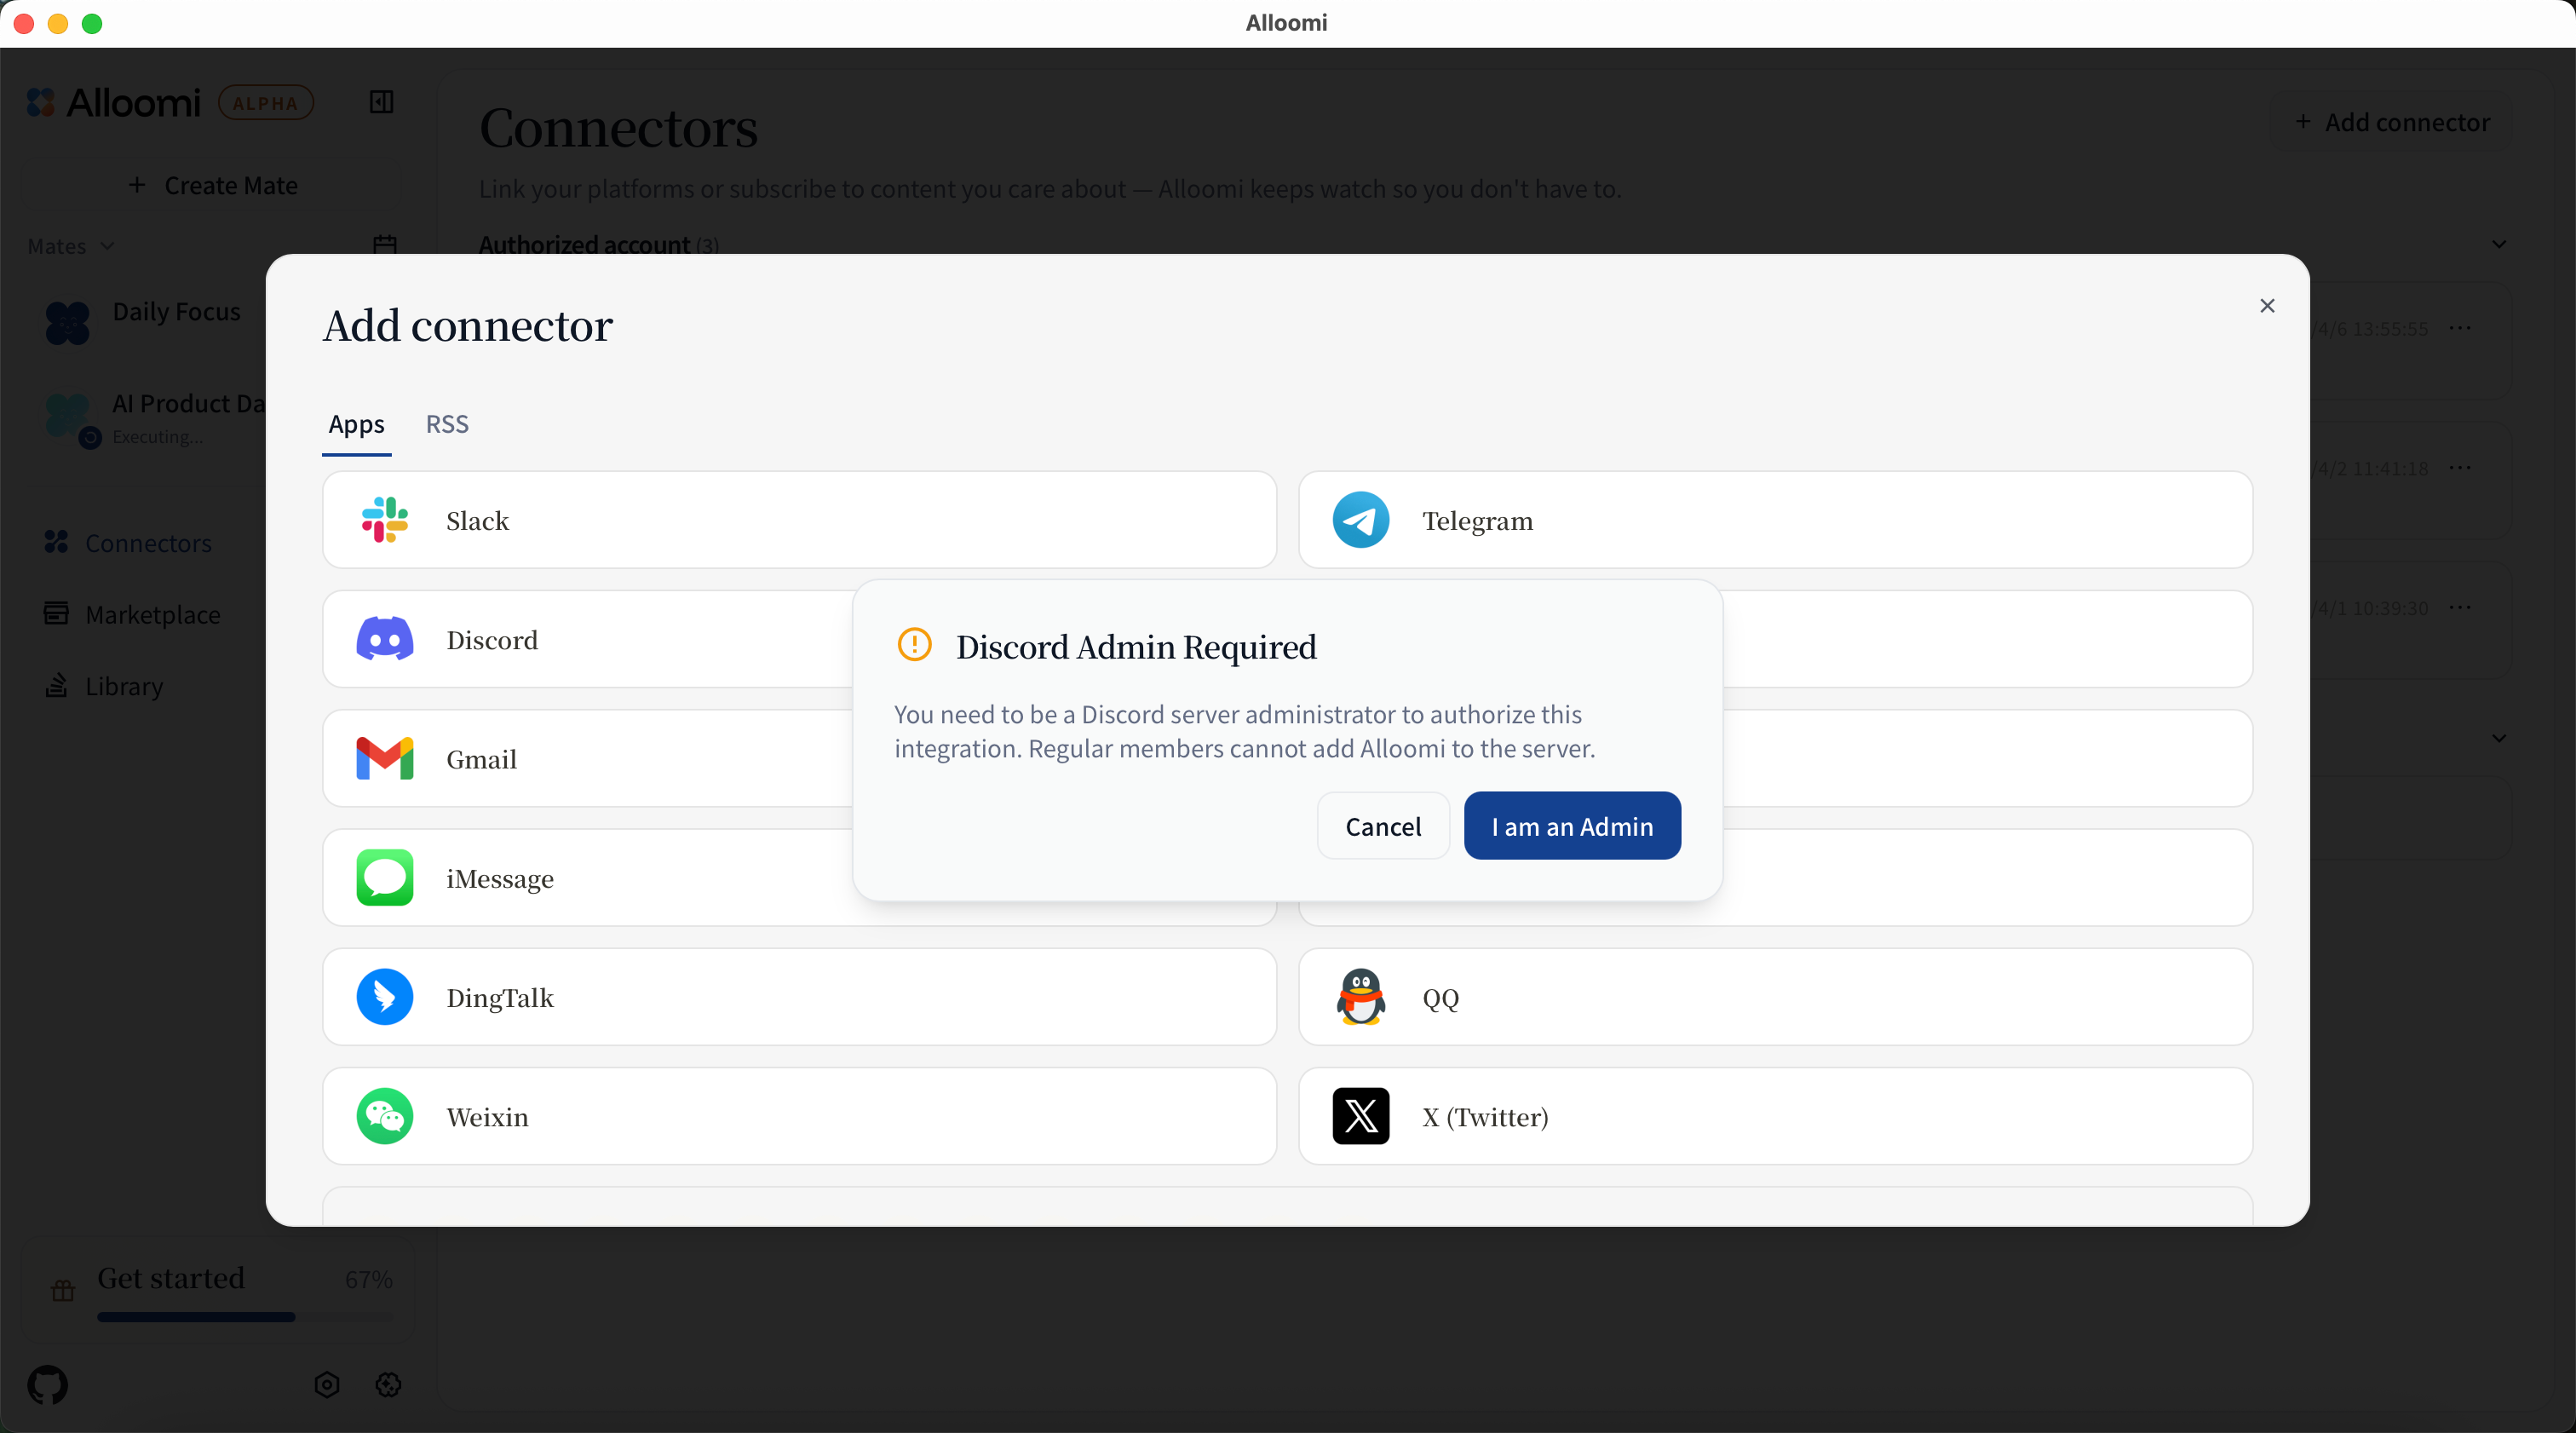
Note: Only Discord server managers can install OpenLoomi currently.
After clicking [Connect WhatsApp], scan the QR code in the WhatsApp app to complete authorization.
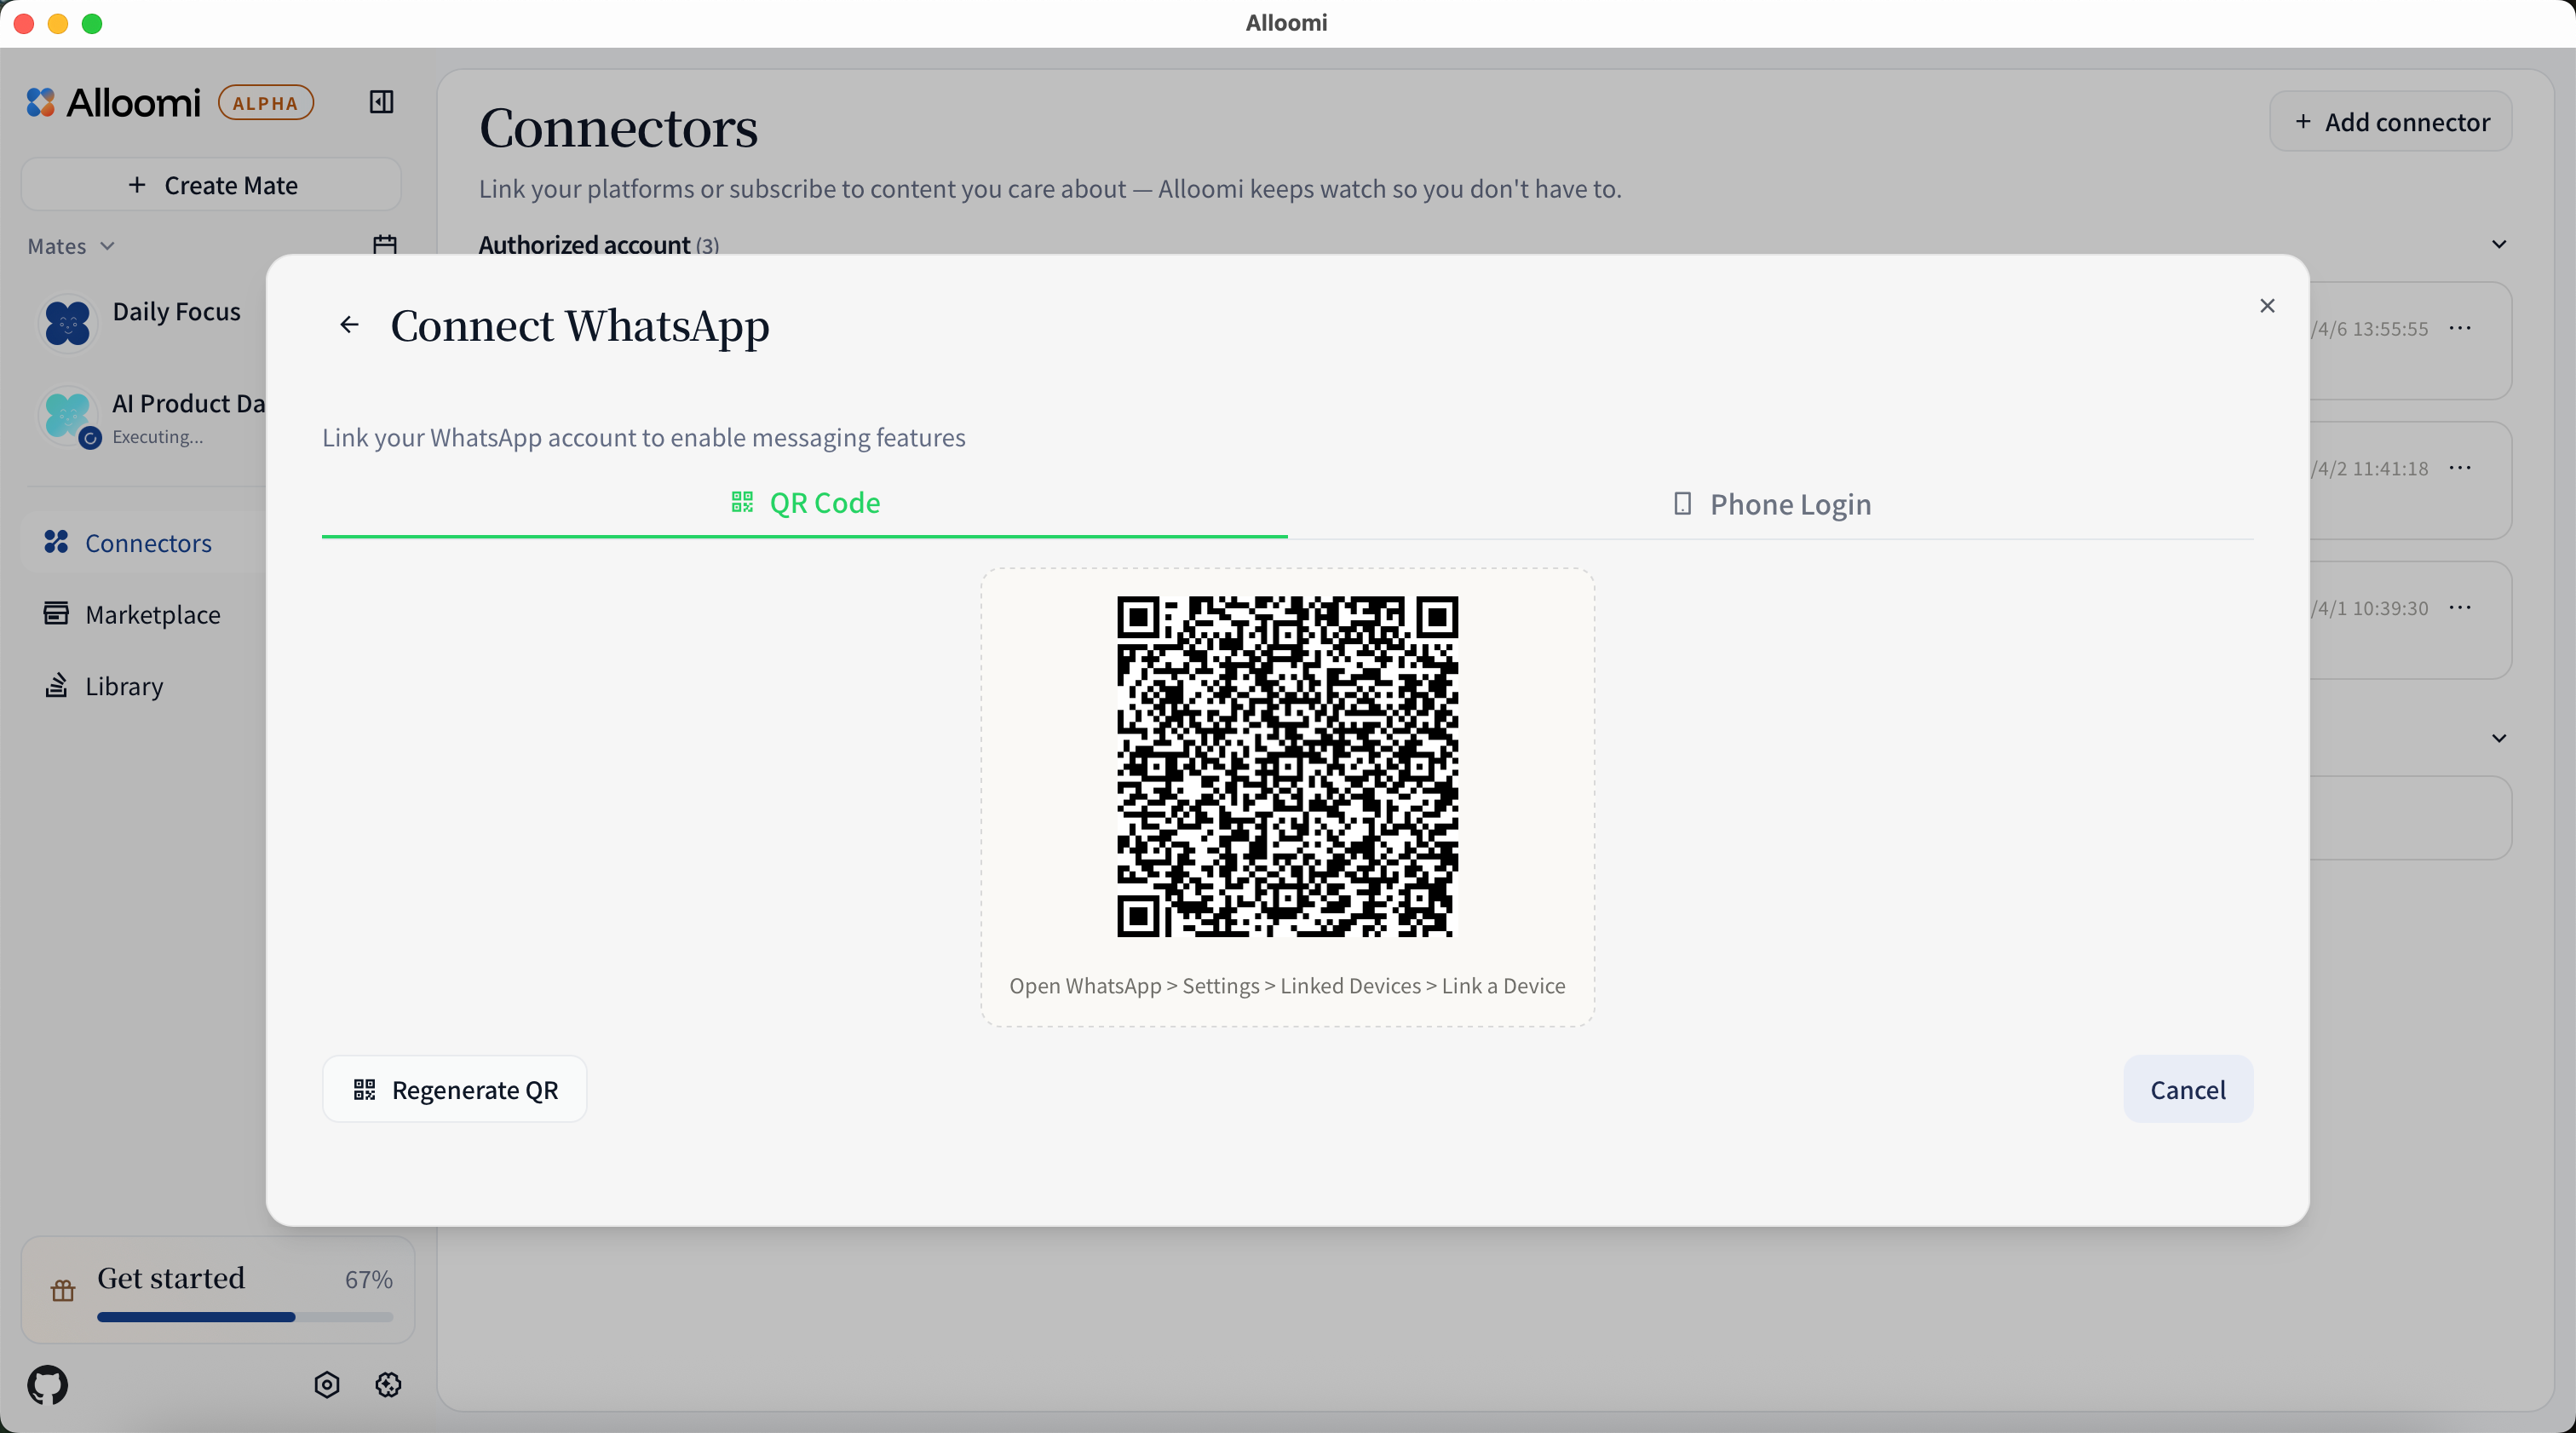
Or use a phone pair code to link WhatsApp without scanning:

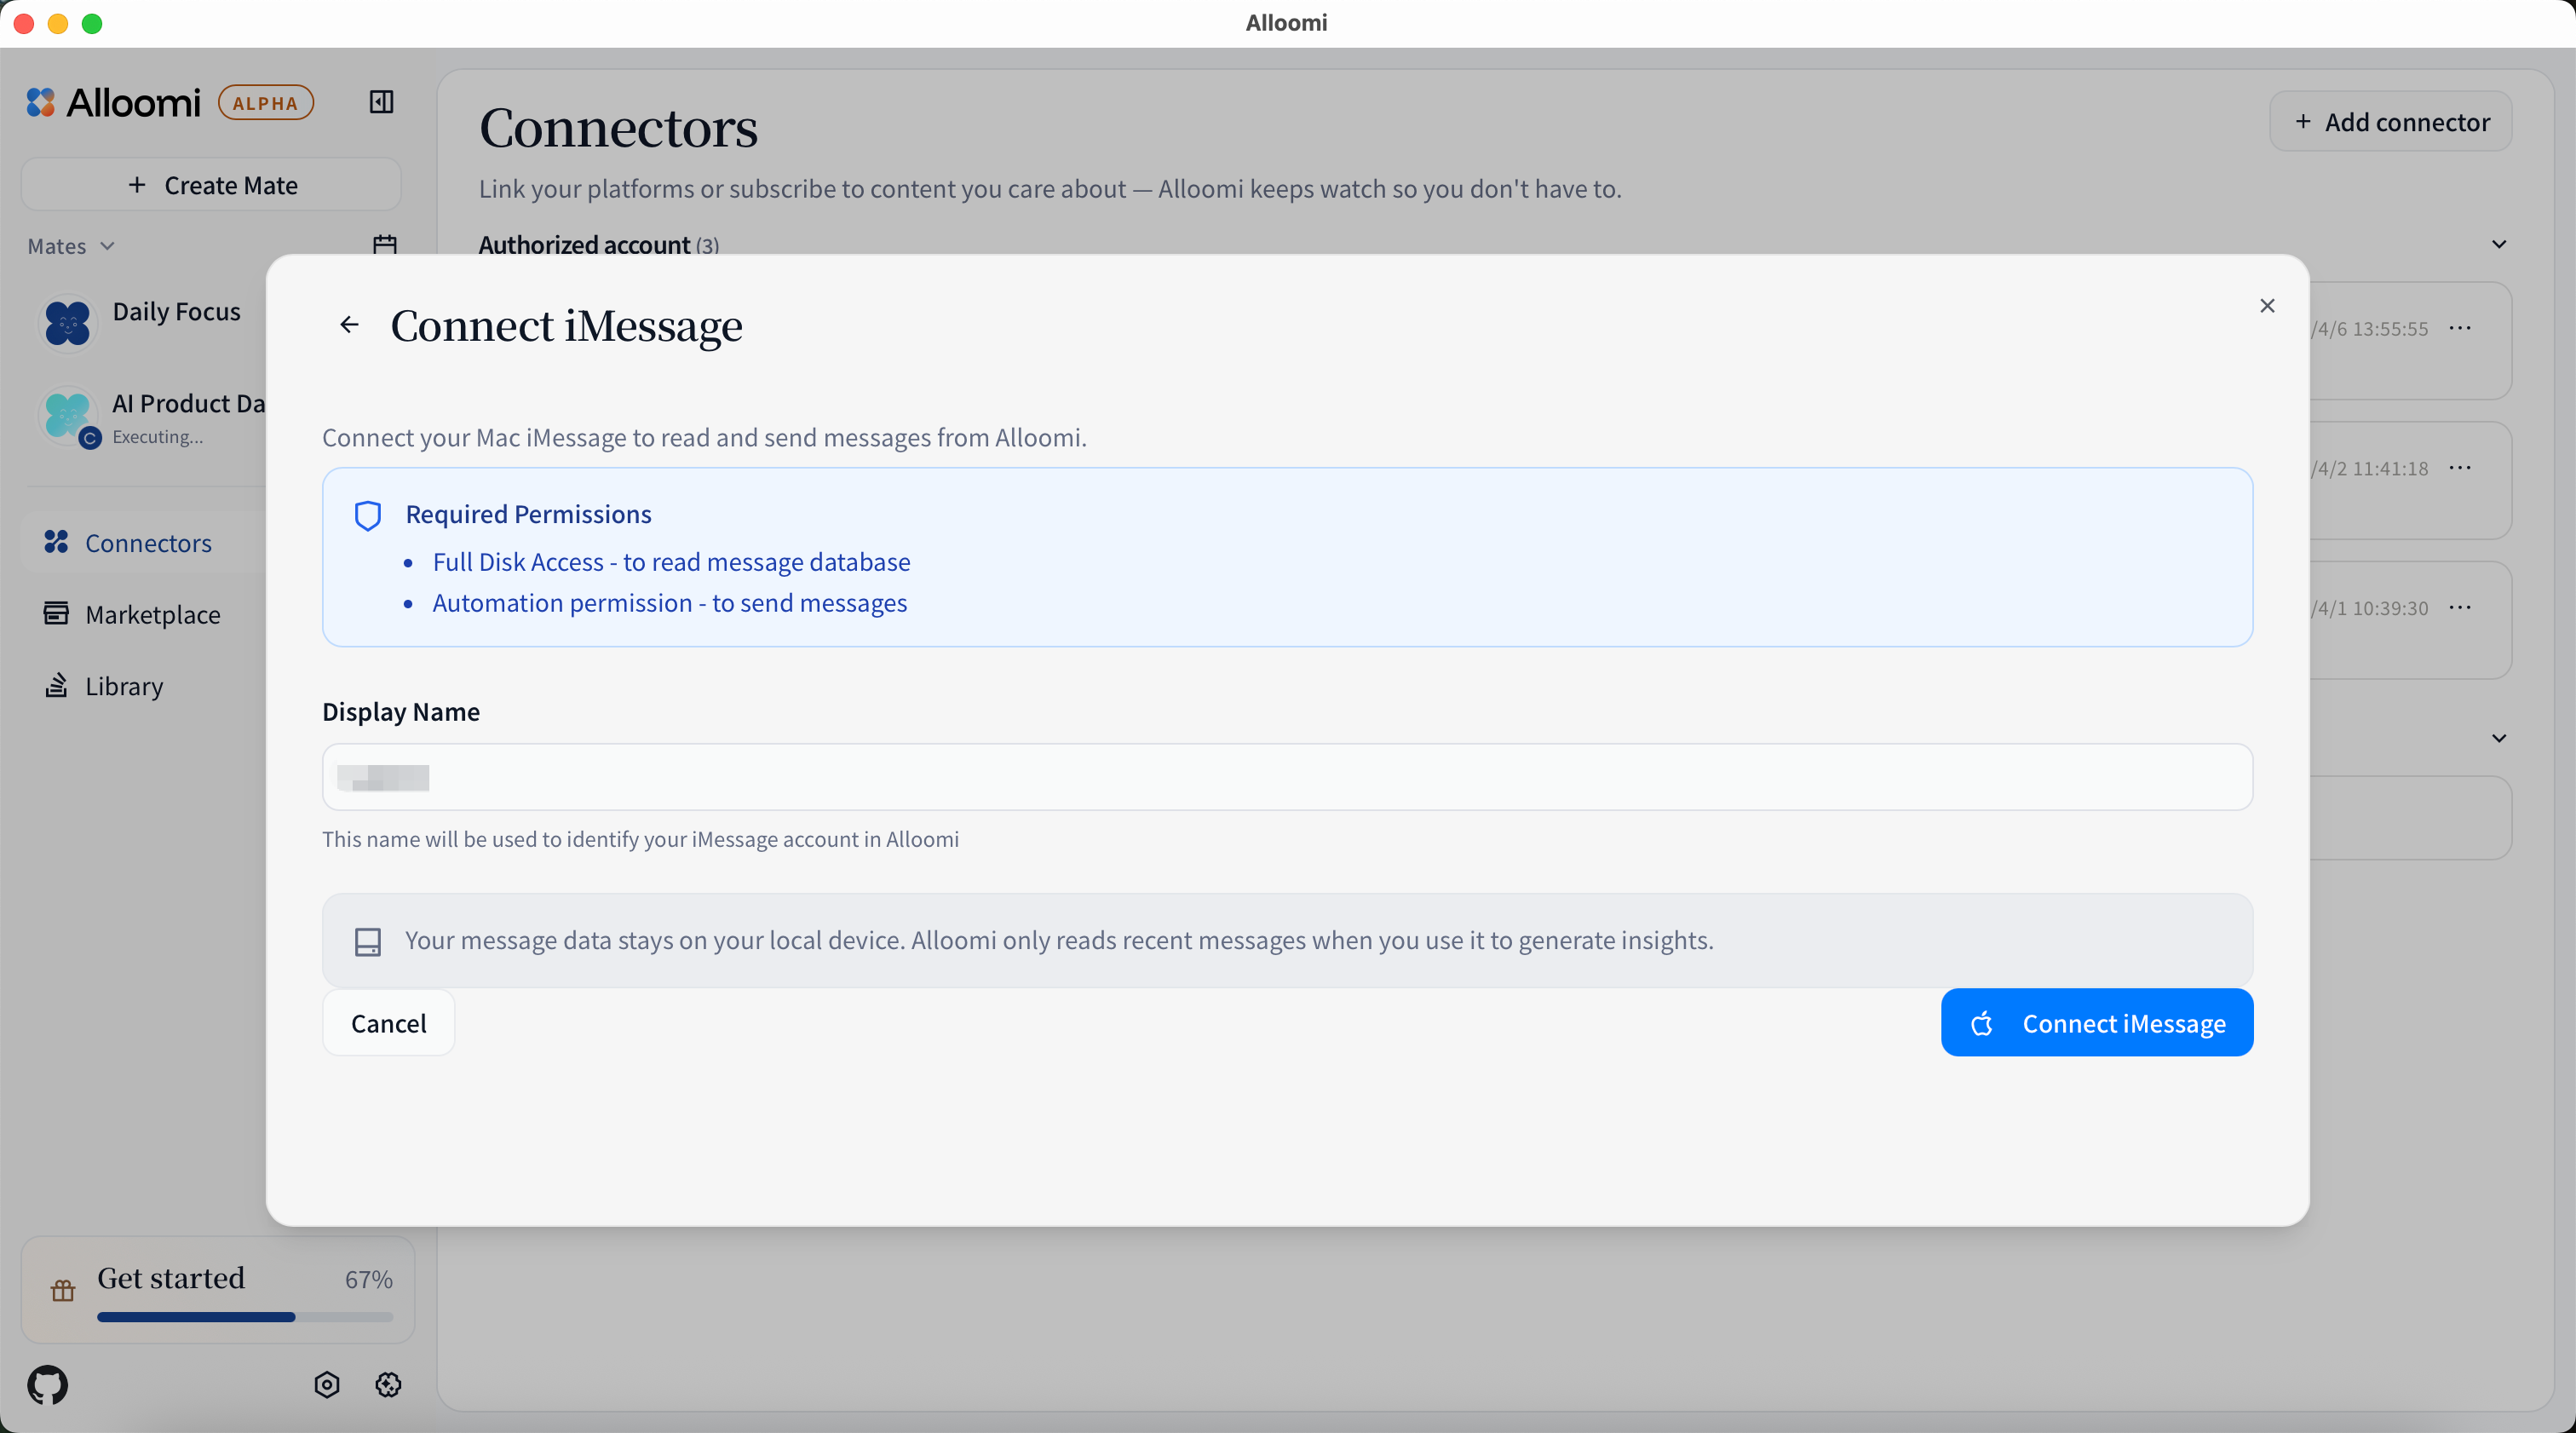
iMessage
iMessage integration is only available on macOS.
- Click [Connect iMessage]
- Grant the required permissions:
- Full Disk Access - Required to read iMessage database
- Automation Permission - Required to send messages
- Enter a display name for your iMessage account
- Click connect
How to grant permissions:
- Go to System Settings > Privacy & Security > Full Disk Access
- Add the running app (Terminal, Node, or OpenLoomi)
- Restart the app after granting permissions
💡 Your message data stays on your local device. OpenLoomi only reads recent messages when you use it to generate insights.
QQ integration uses a bot mode via a persistent WebSocket connection. Unlike Telegram or iMessage (which connect to your personal account), QQ requires you to set up a QQ bot first.
Before you start — set up a QQ bot:
- Register a QQ bot at the QQ Open Platform
- Create a new bot application and obtain your Bot App ID and Bot Token
- Enable the message receive permissions for your bot
Connect in OpenLoomi:
- Click + Add New Connector and select QQ
- Enter your Bot App ID and Bot Token
- Click Connect — OpenLoomi establishes a long-lived WebSocket connection to your bot
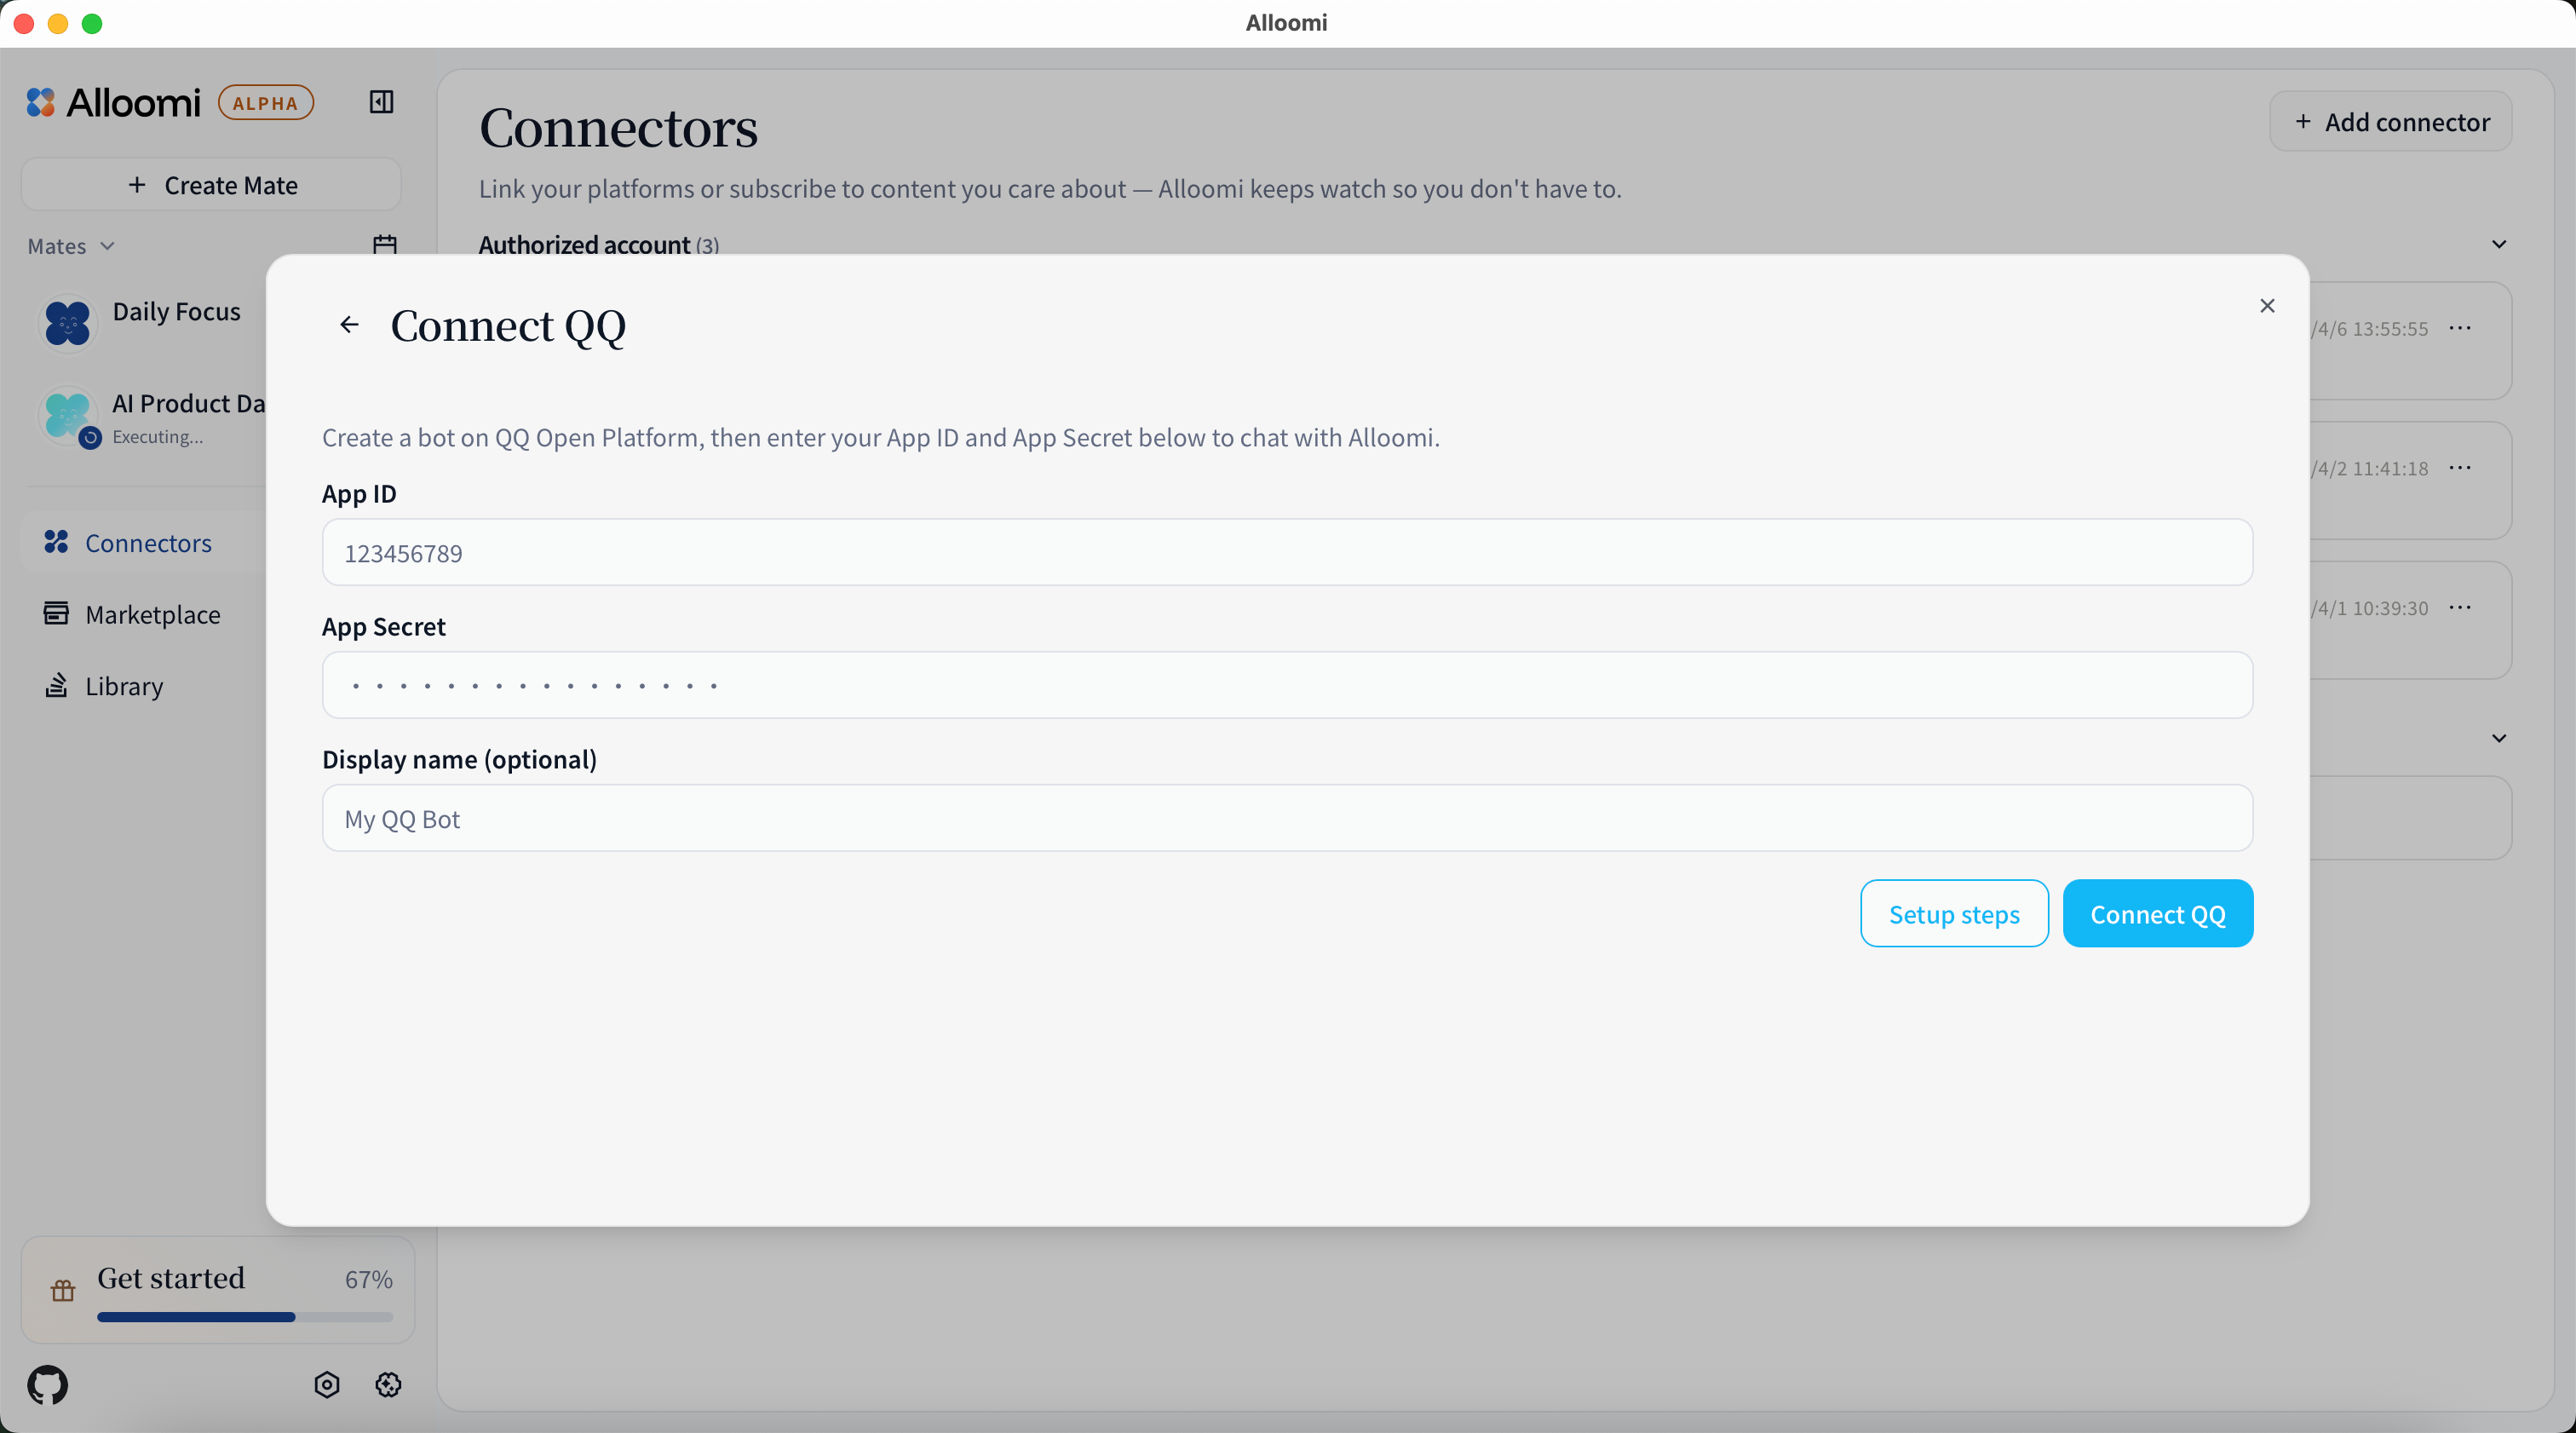
Once connected, users who message your QQ bot will have their conversations processed by OpenLoomi. OpenLoomi replies as the bot.
💡 QQ integration is in bot mode — OpenLoomi reads messages sent to your bot, not your personal QQ account.
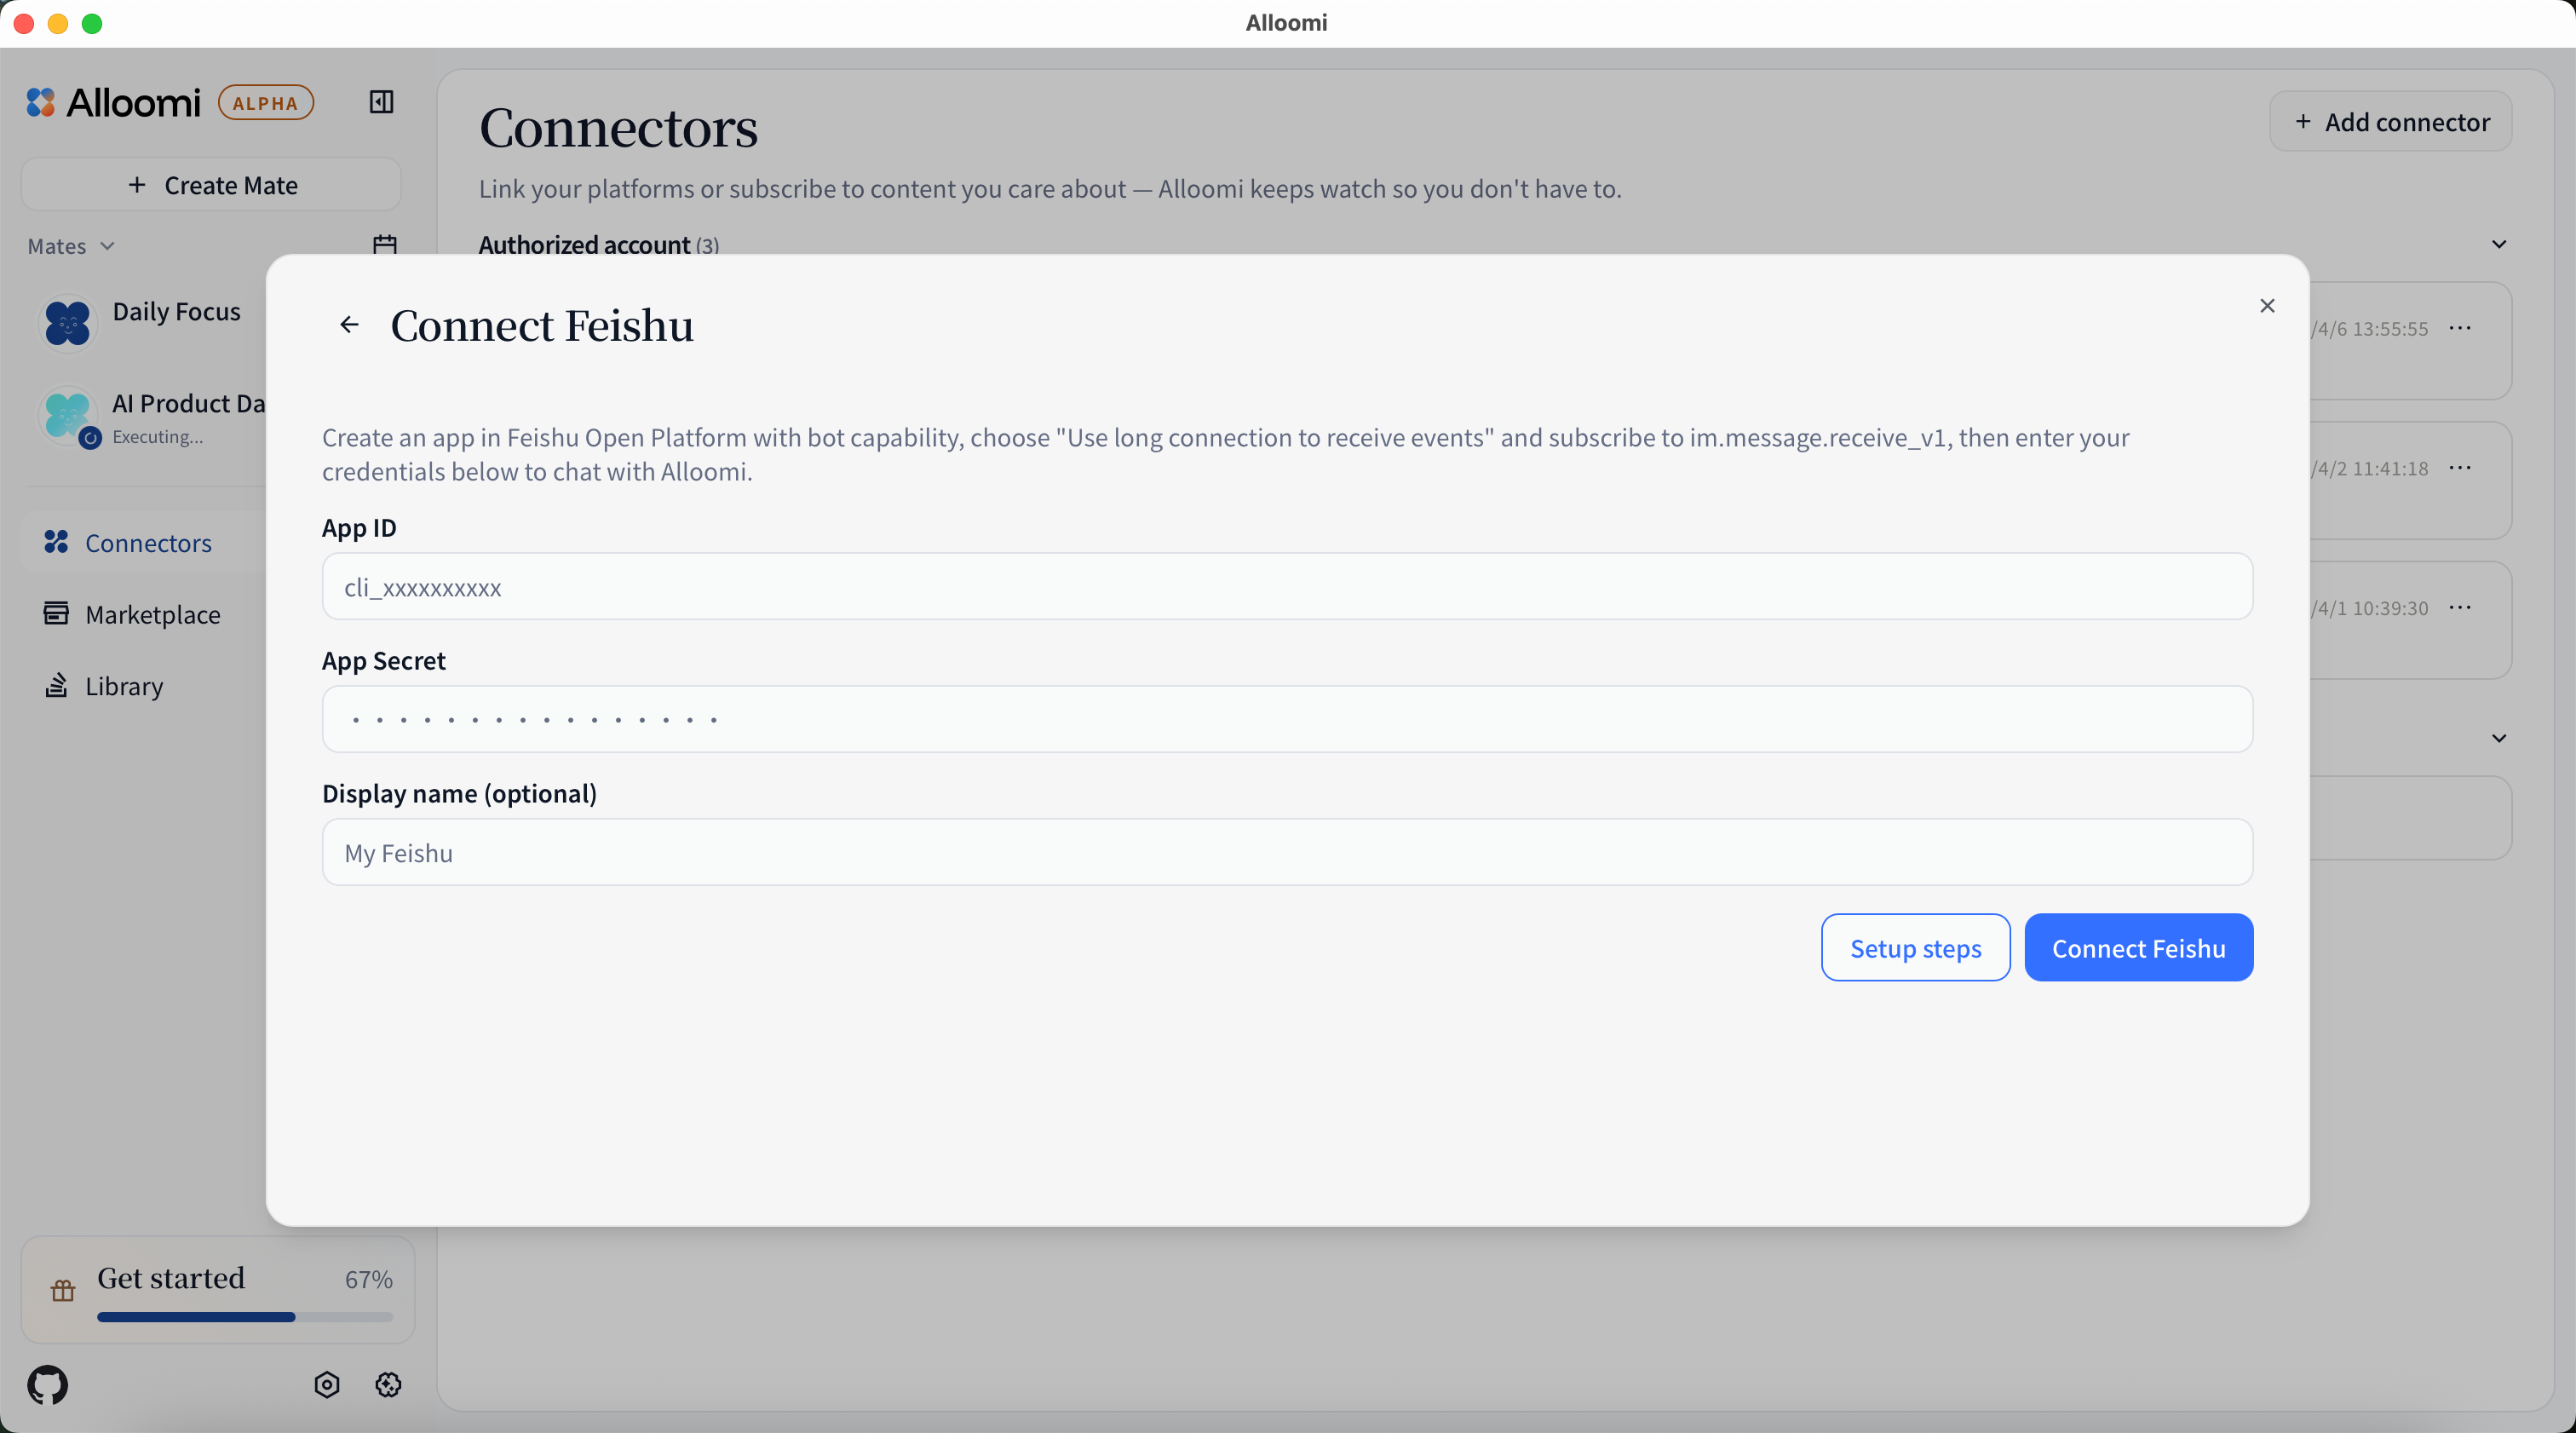
Lark/Feishu
Lark/Feishu integration uses a bot mode via a WebSocket long connection. You need to create an enterprise self-built application on the Lark/Feishu Open Platform — no public IP or domain is required.
⚠️ Important — App must be published: After setting up in the Lark/Feishu Open Platform, your app must be published in the enterprise admin console before colleagues can find and message it. This is the #1 reason the bot doesn’t appear.
Step 1 — Create a Lark/Feishu app:
- Go to Lark/Feishu Open Platform and sign in
- Click Create enterprise self-built app → fill in app name → click Create
- On the left sidebar, go to App capabilities → Bot → click Add
Step 2 — Configure permissions:
- Go to Permissions management → Add permissions
- Search and enable these permissions:
Tenant-level scopes:
| Permission key | Description |
|---|---|
aily:file:read | Read Aily files |
aily:file:write | Write Aily files |
application:application.app_message_stats.overview:readonly | Read app message stats |
application:application:self_manage | Manage application |
application:bot.menu:write | Write bot menu |
cardkit:card:write | Write card |
contact:user.employee_id:readonly | Read employee ID |
corehr:file:download | Download CoreHR files |
docs:document.content:read | Read document content |
event:ip_list | IP list |
im:chat | Chat access |
im:chat.access_event.bot_p2p_chat:read | Read bot P2P chat events |
im:chat.members:bot_access | Bot access to chat members |
im:message | Message access |
im:message.group_at_msg:readonly | Read group @ messages |
im:message.group_msg | Group message |
im:message.p2p_msg:readonly | Read direct messages |
im:message:readonly | Read message content |
im:message:send_as_bot | Send messages as bot |
im:resource | Access resources |
sheets:spreadsheet | Spreadsheet access |
wiki:wiki:readonly | Read wiki |
User-level scopes:
| Permission key | Description |
|---|---|
aily:file:read | Read Aily files |
aily:file:write | Write Aily files |
im:chat.access_event.bot_p2p_chat:read | Read bot P2P chat events |
im:chat:read | Read chat |
im:chat:readonly | Read chat info |
Step 3 — Subscribe to events (use WebSocket):
- Go to Event Subscriptions
- Choose Receive events via WebSocket (long connection) — no domain or IP needed
- Click Add event → search for
im.message.receive_v1→ add it
Step 4 — Get your credentials:
Go to Credentials & Basic Info and copy your:
- App ID (starts with
cli_) - App Secret
Step 5 — Connect in OpenLoomi:
- In OpenLoomi, go to Settings → Connectors → + Add New Connector → select Lark/Feishu
- Enter your App ID and App Secret
- Click Connect
Step 6 — Publish the app (required before use):
🔑 This step is essential. Without publishing, no one (including yourself) can find or chat with the bot.
- Go to Lark/Feishu Admin Console → Applications
- Find your app → click Publish
- For a self-built app in development, you can also use Version management → Create version → Submit for internal testing — this lets you and your team test immediately without full publication
Step 7 — Find and chat with your bot:
Once published, open Lark/Feishu and search for your bot’s name:
- In Lark/Feishu, click the + (new chat) button → Search for your bot name
- Click the bot → start chatting
💡 Your bot only responds to messages sent directly to it — it won’t respond to messages in group chats unless someone @mentions it.
DingTalk
DingTalk integration uses a Stream mode bot — a long-lived WebSocket connection with no public IP or domain required.
Before you start — set up a DingTalk app:
- Go to DingTalk Open Platform and sign in
- Create an enterprise internal app
- Add the Bot capability and choose Stream mode (long connection)
- Obtain your Client ID (AppKey) and Client Secret (AppSecret)
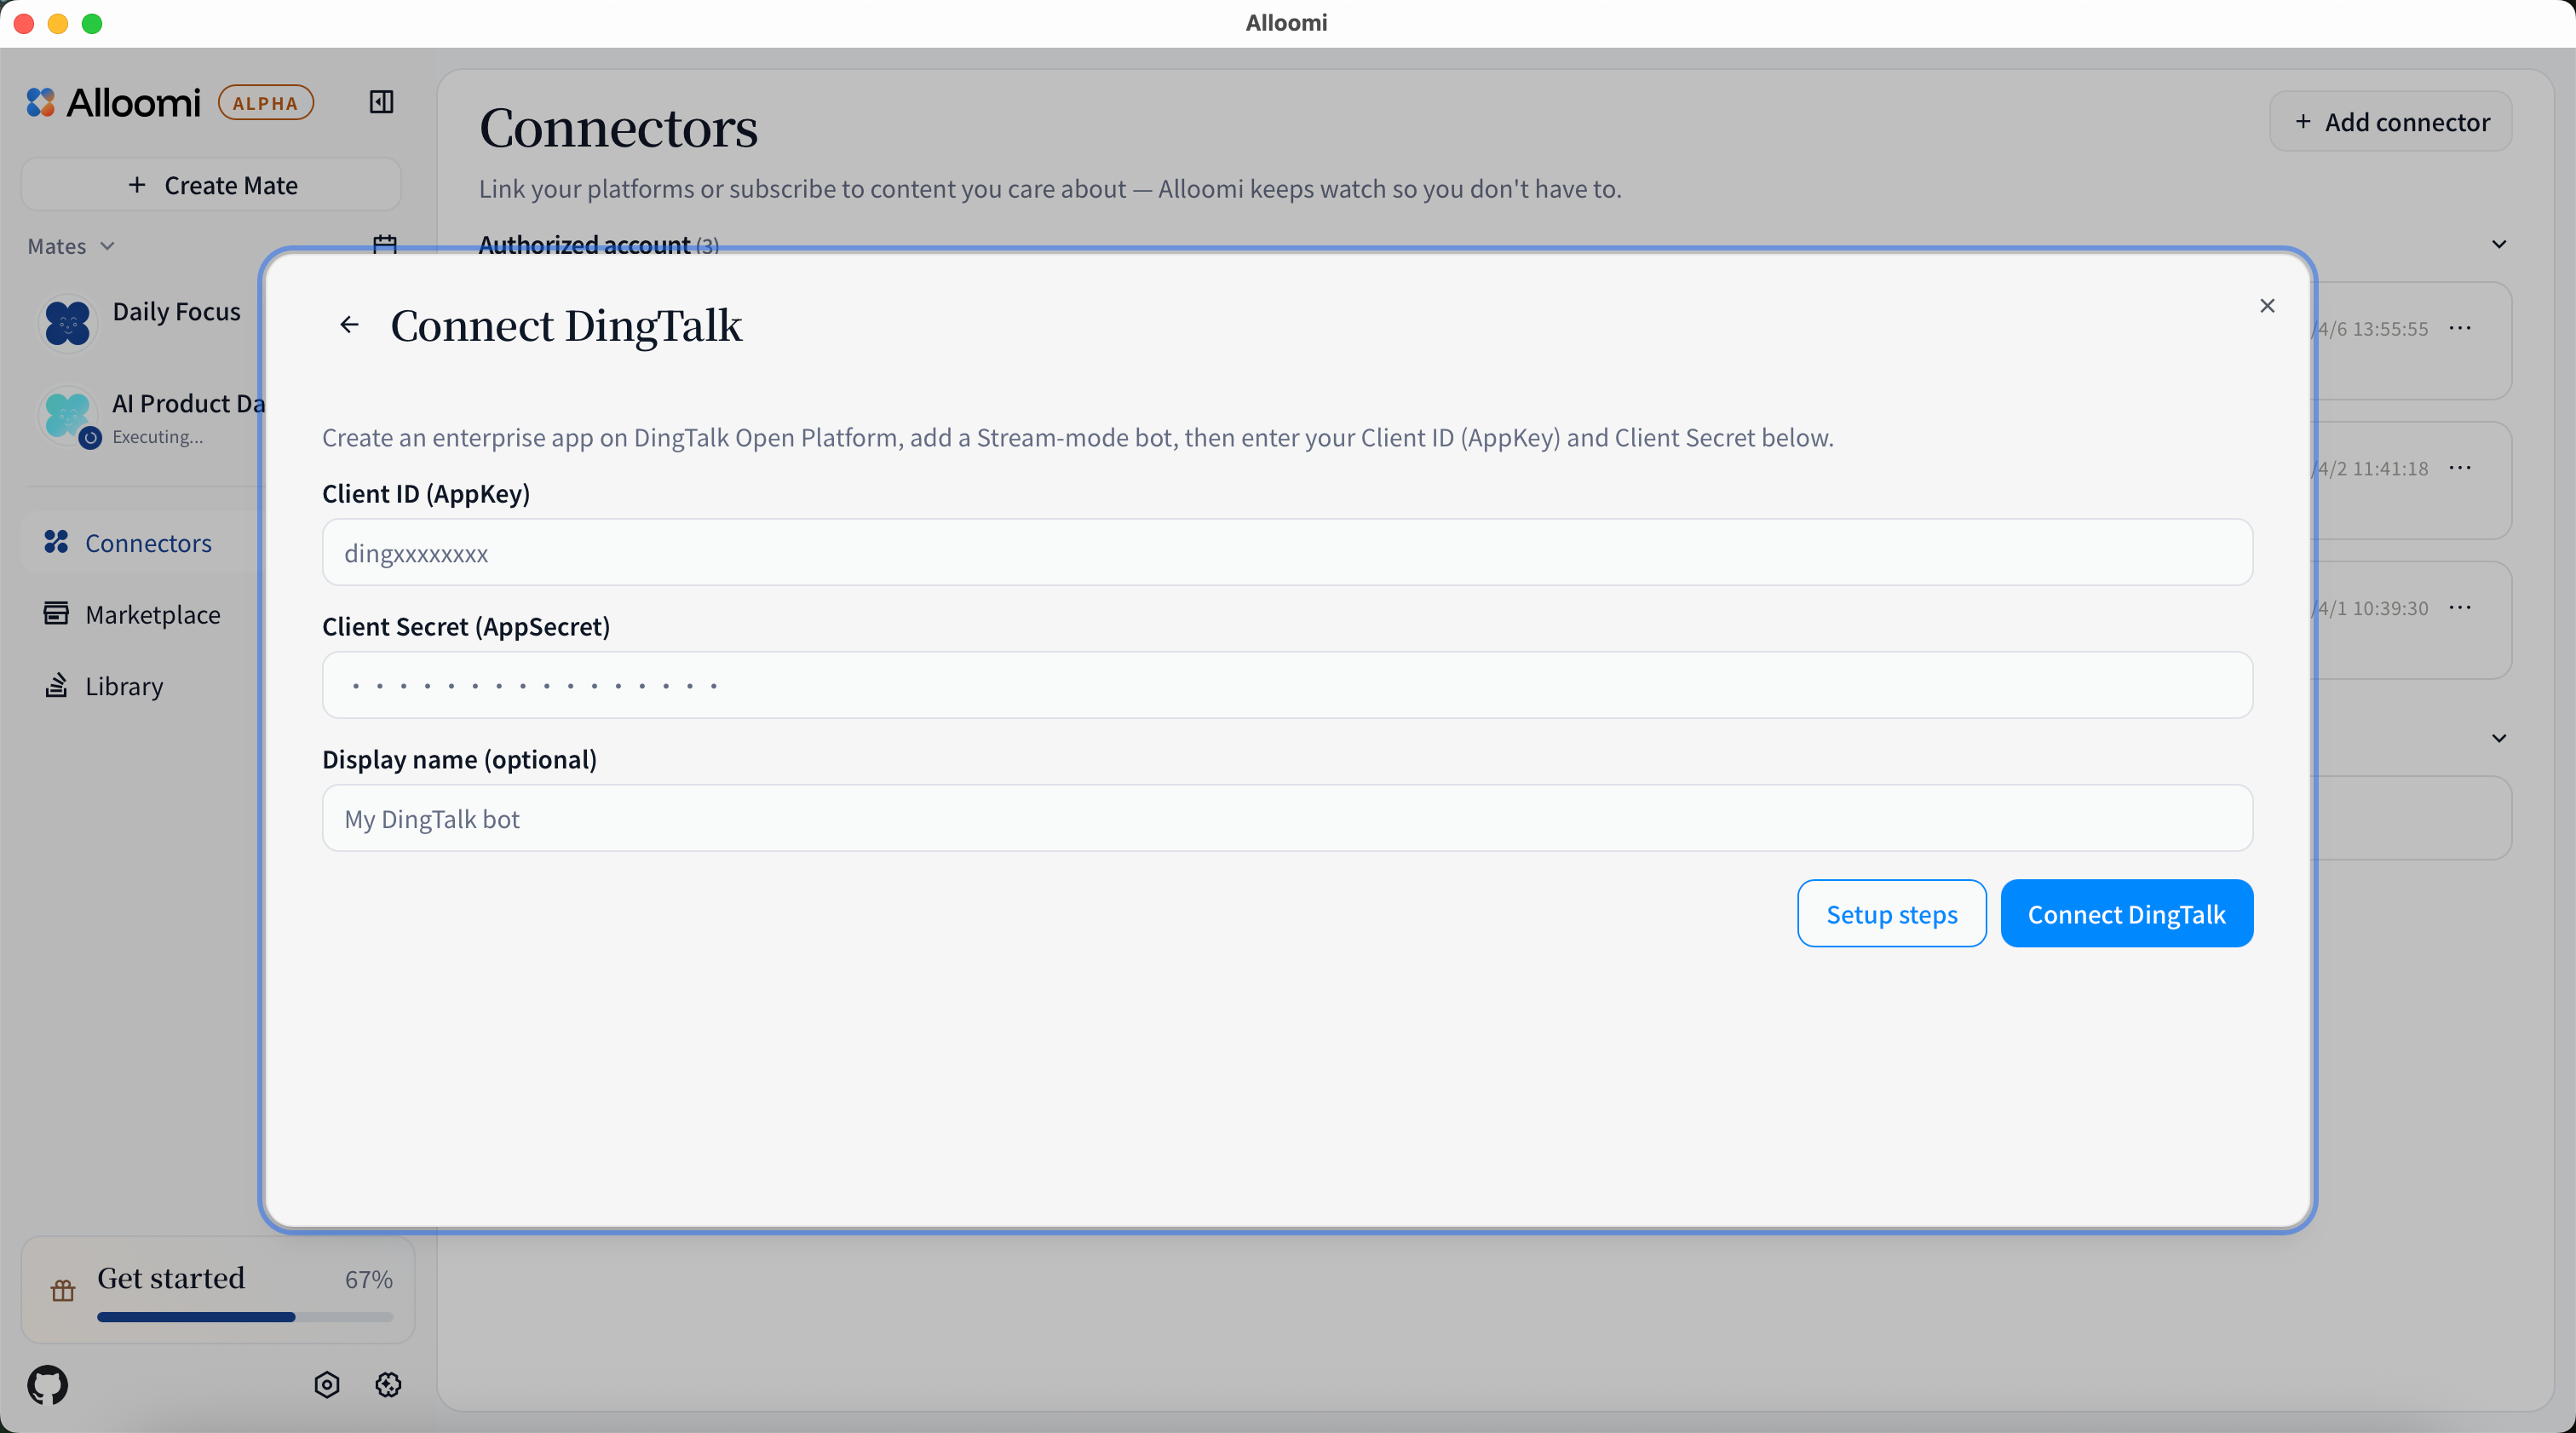
Connect in OpenLoomi:
- Click + Add New Connector and select DingTalk
- Enter your Client ID (AppKey) and Client Secret (AppSecret)
- Optionally set a display name for your bot
- Click Connect — OpenLoomi establishes a long-lived WebSocket connection to your bot
💡 Stream mode means OpenLoomi connects directly via WebSocket — no server or domain setup needed. Once connected, you can chat with your bot directly in DingTalk.
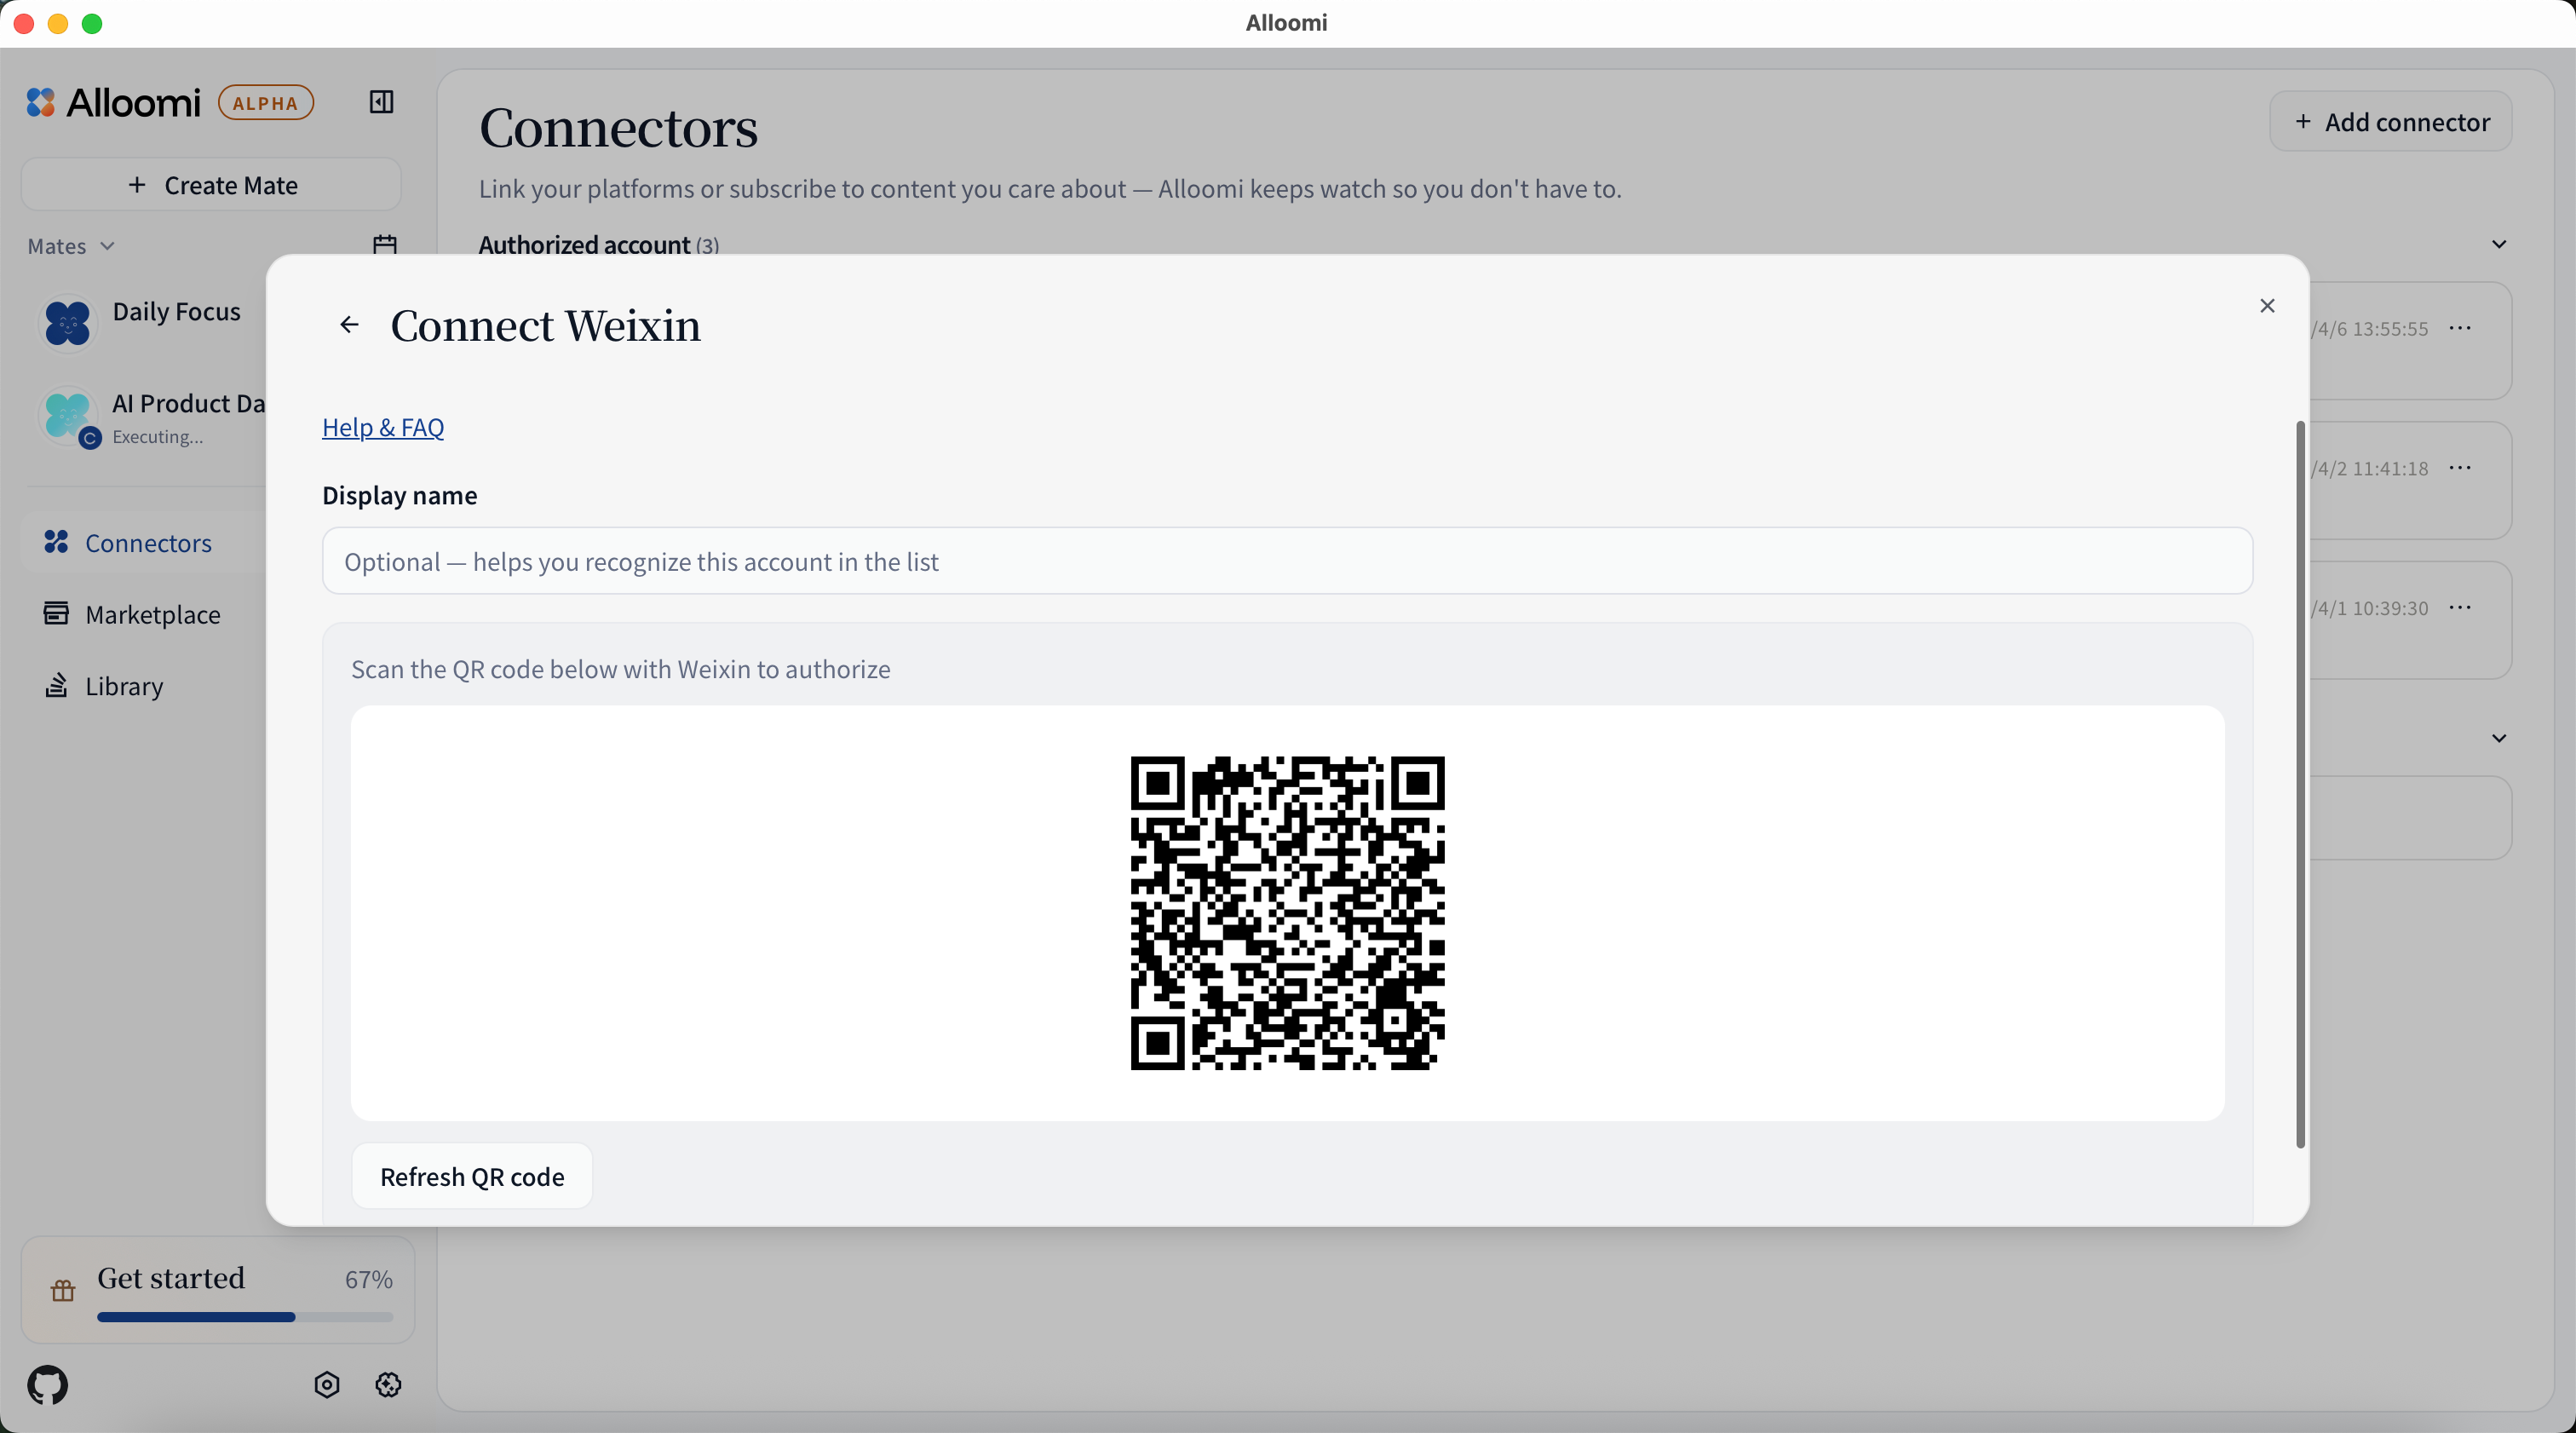
Weixin
After clicking [Connect Weixin], scan the QR code in the Weixin app to complete authorization.
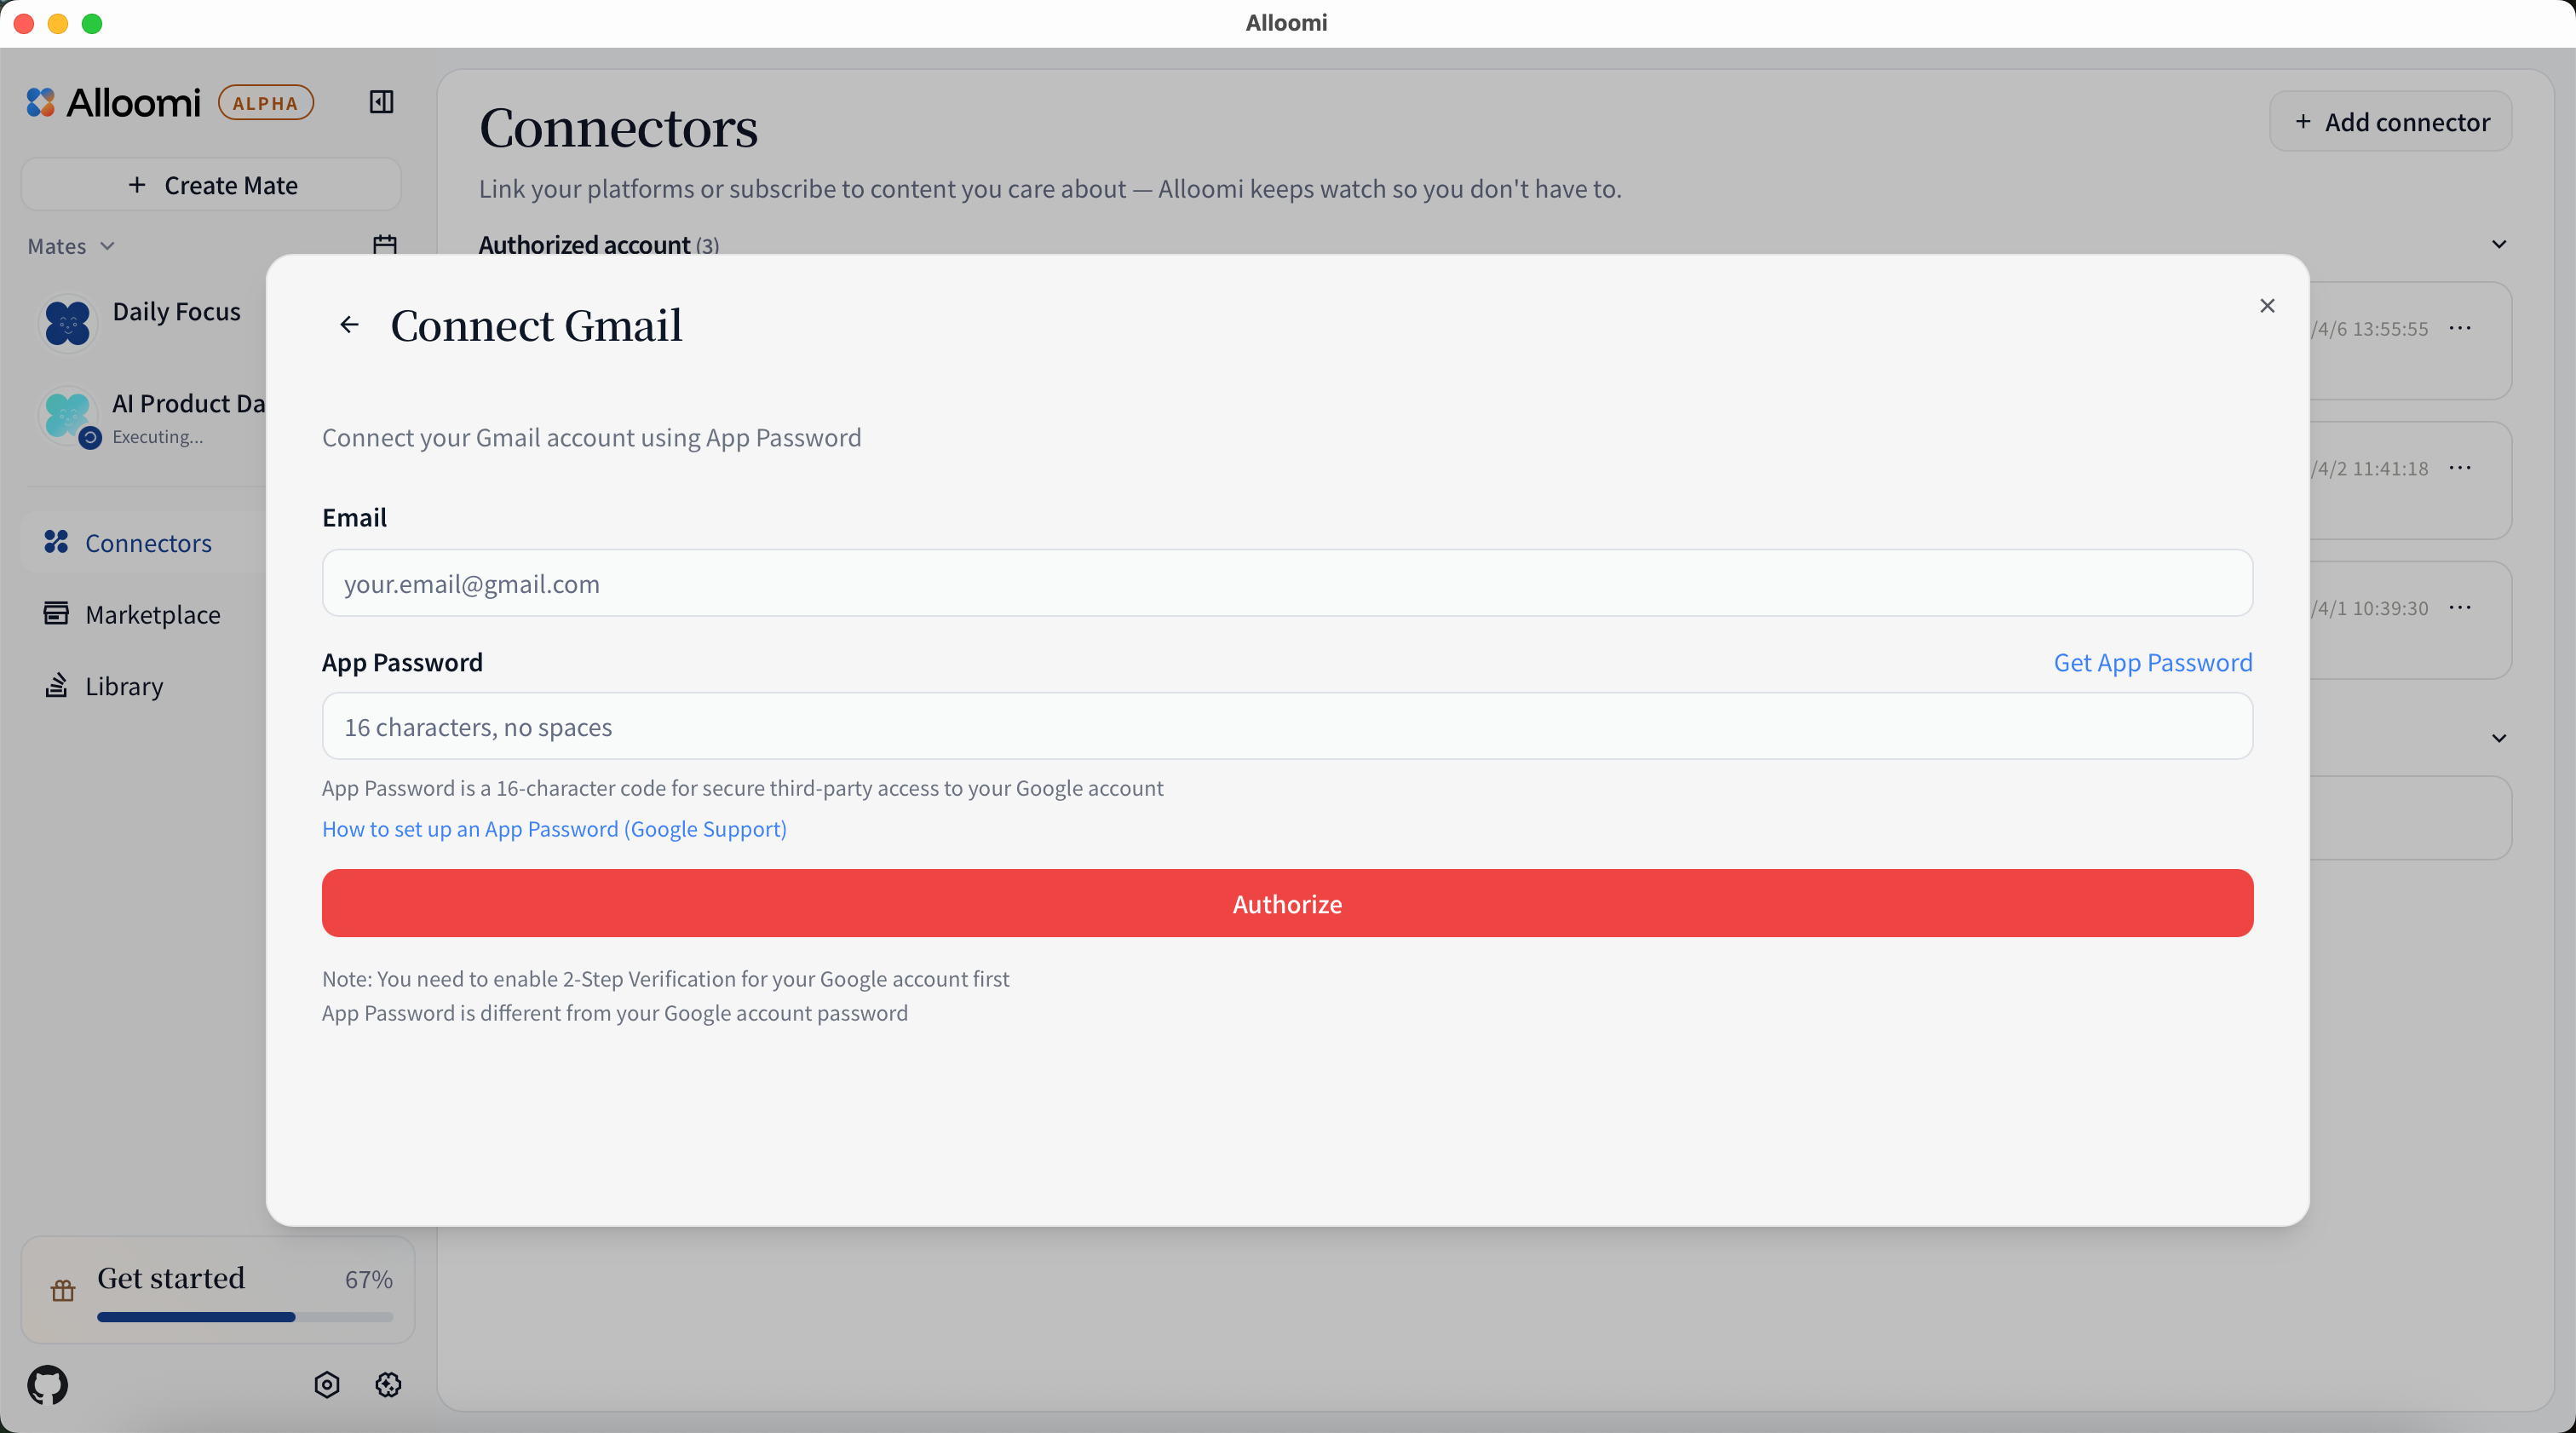
Gmail
After clicking [Connect Gmail], enter your email address and an App Password to authorize. (Regular Gmail password won’t work — App Passwords require 2-Step Verification to be enabled.)
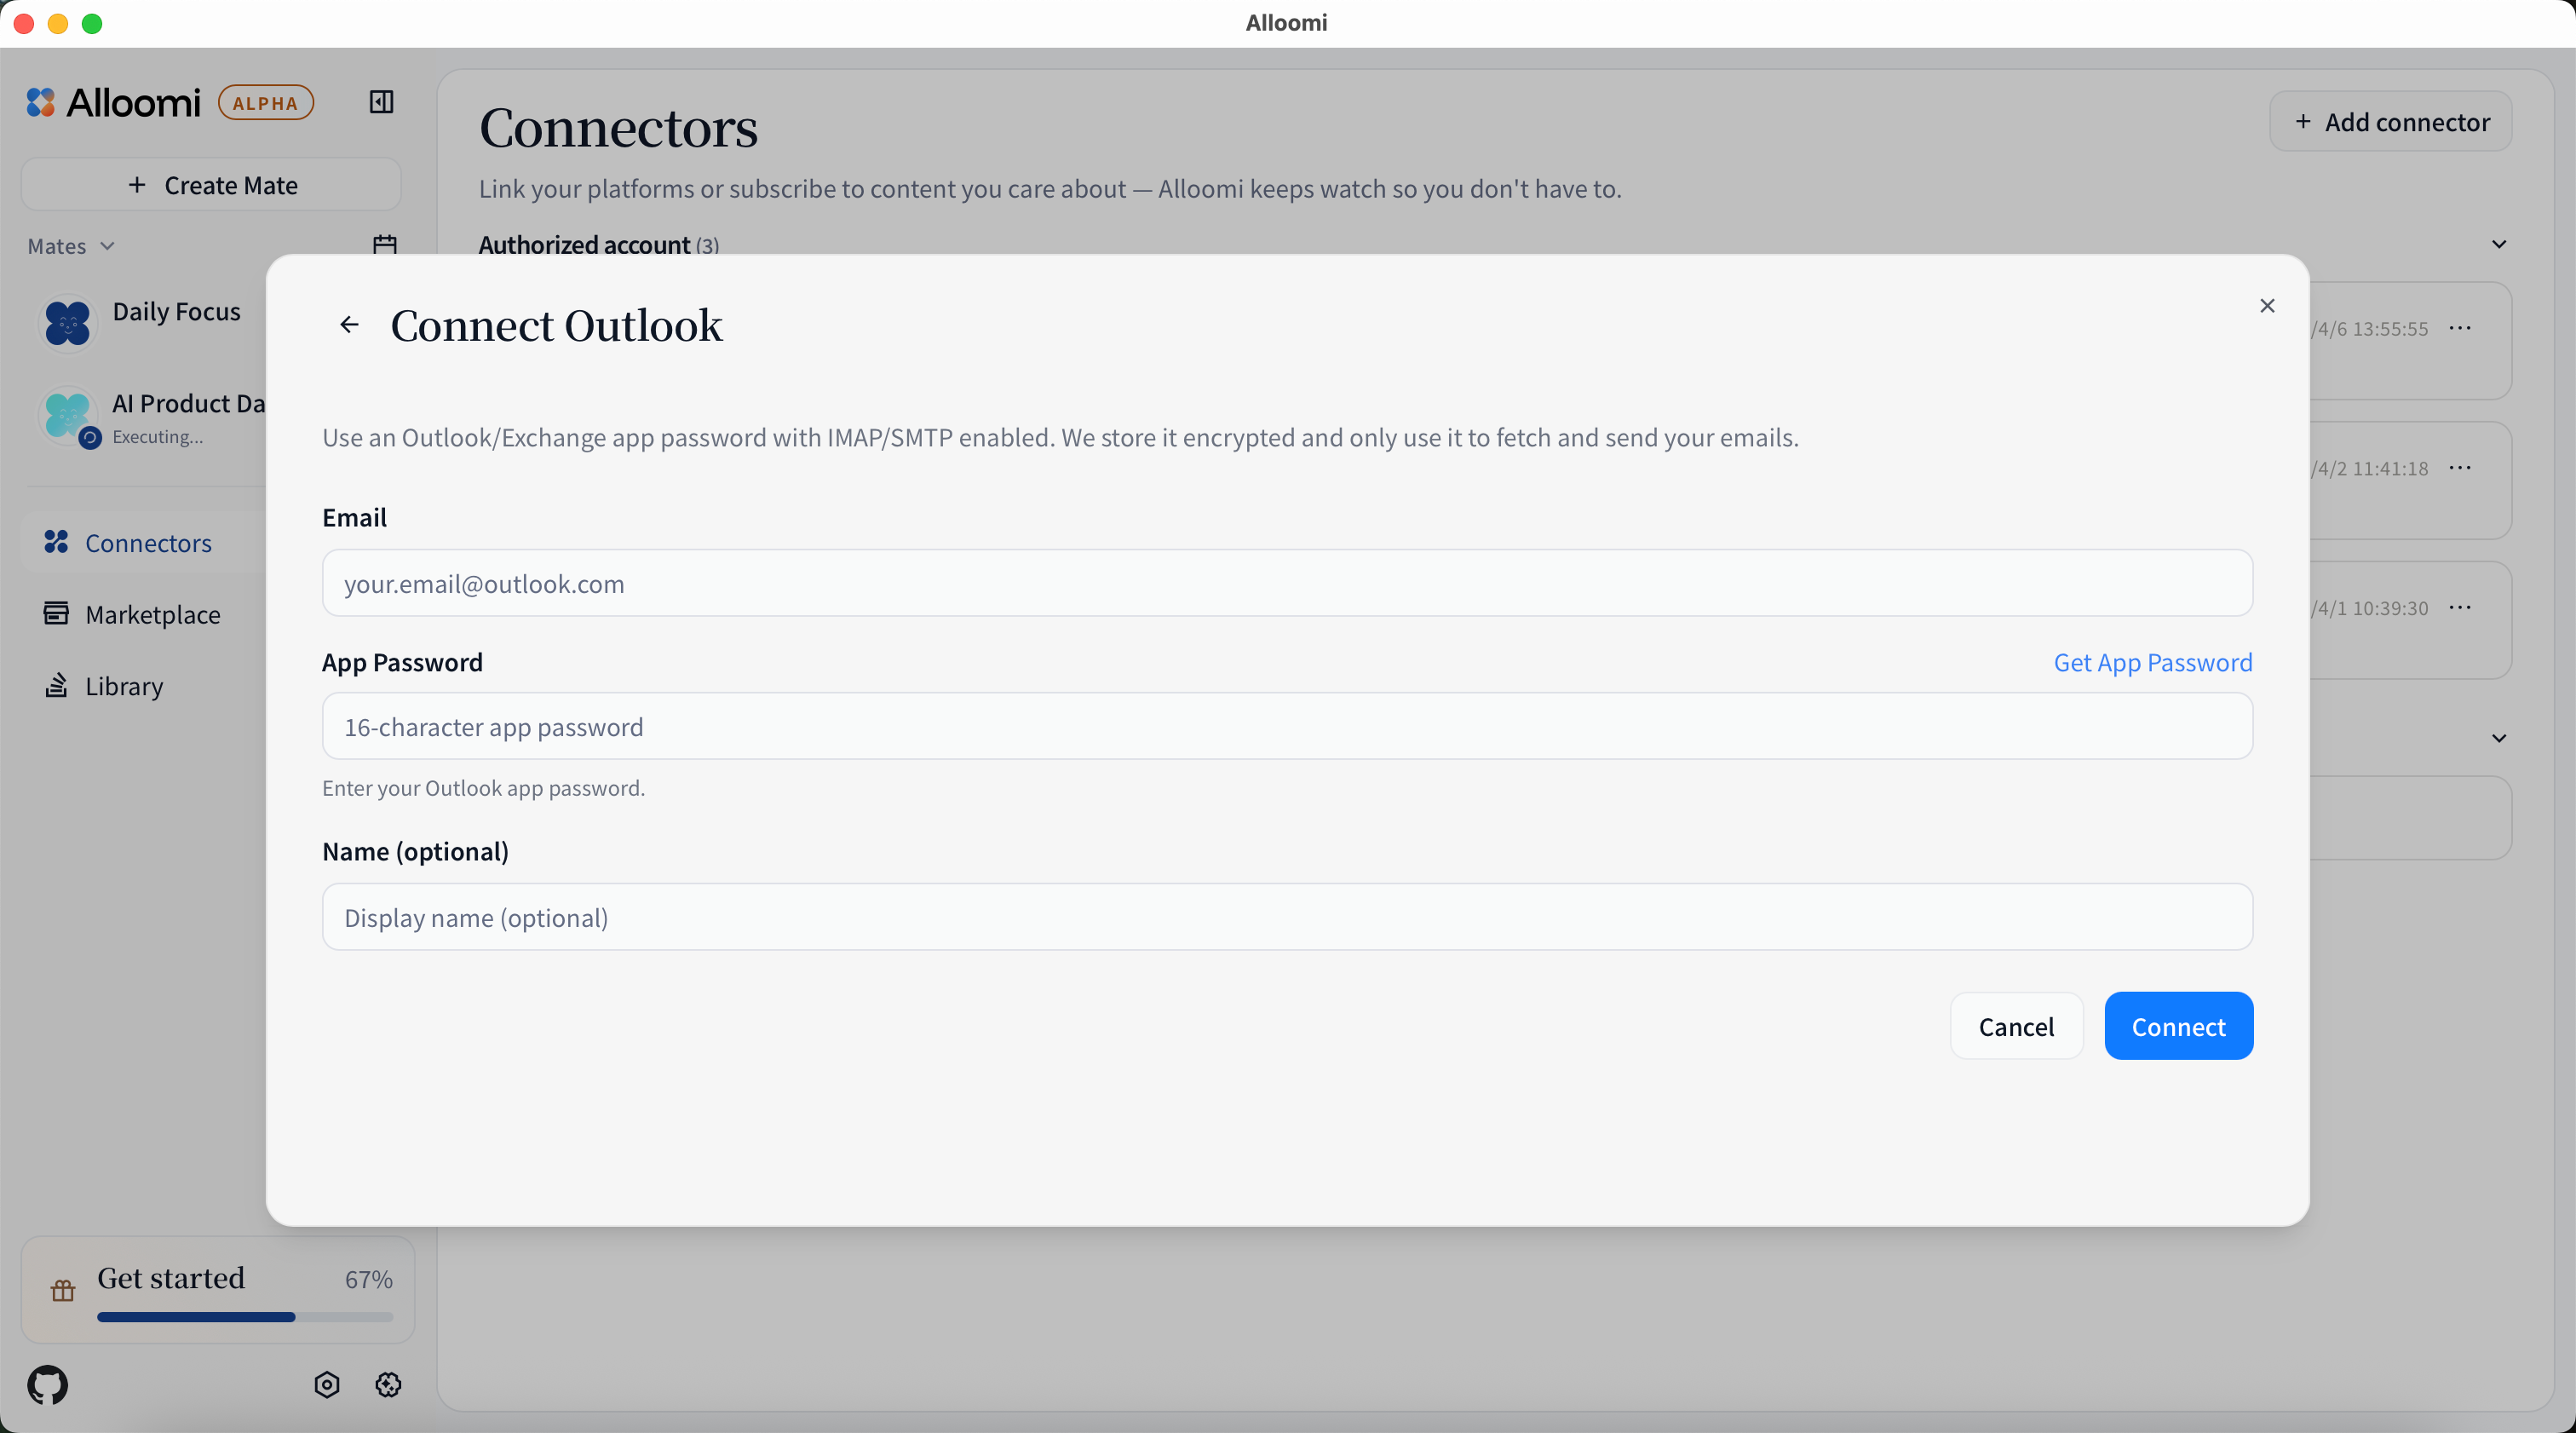
Outlook
After clicking [Connect Outlook], enter your email address and app password to authorize.
X
After clicking [Connect X], complete the OAuth authorization flow to link your X account.

RSS
After clicking [RSS], you can add individual RSS links or upload an OPML file for batch import.

Disconnect / Revoke Access
If you no longer want OpenLoomi to access a connected platform, you can disconnect it at any time.
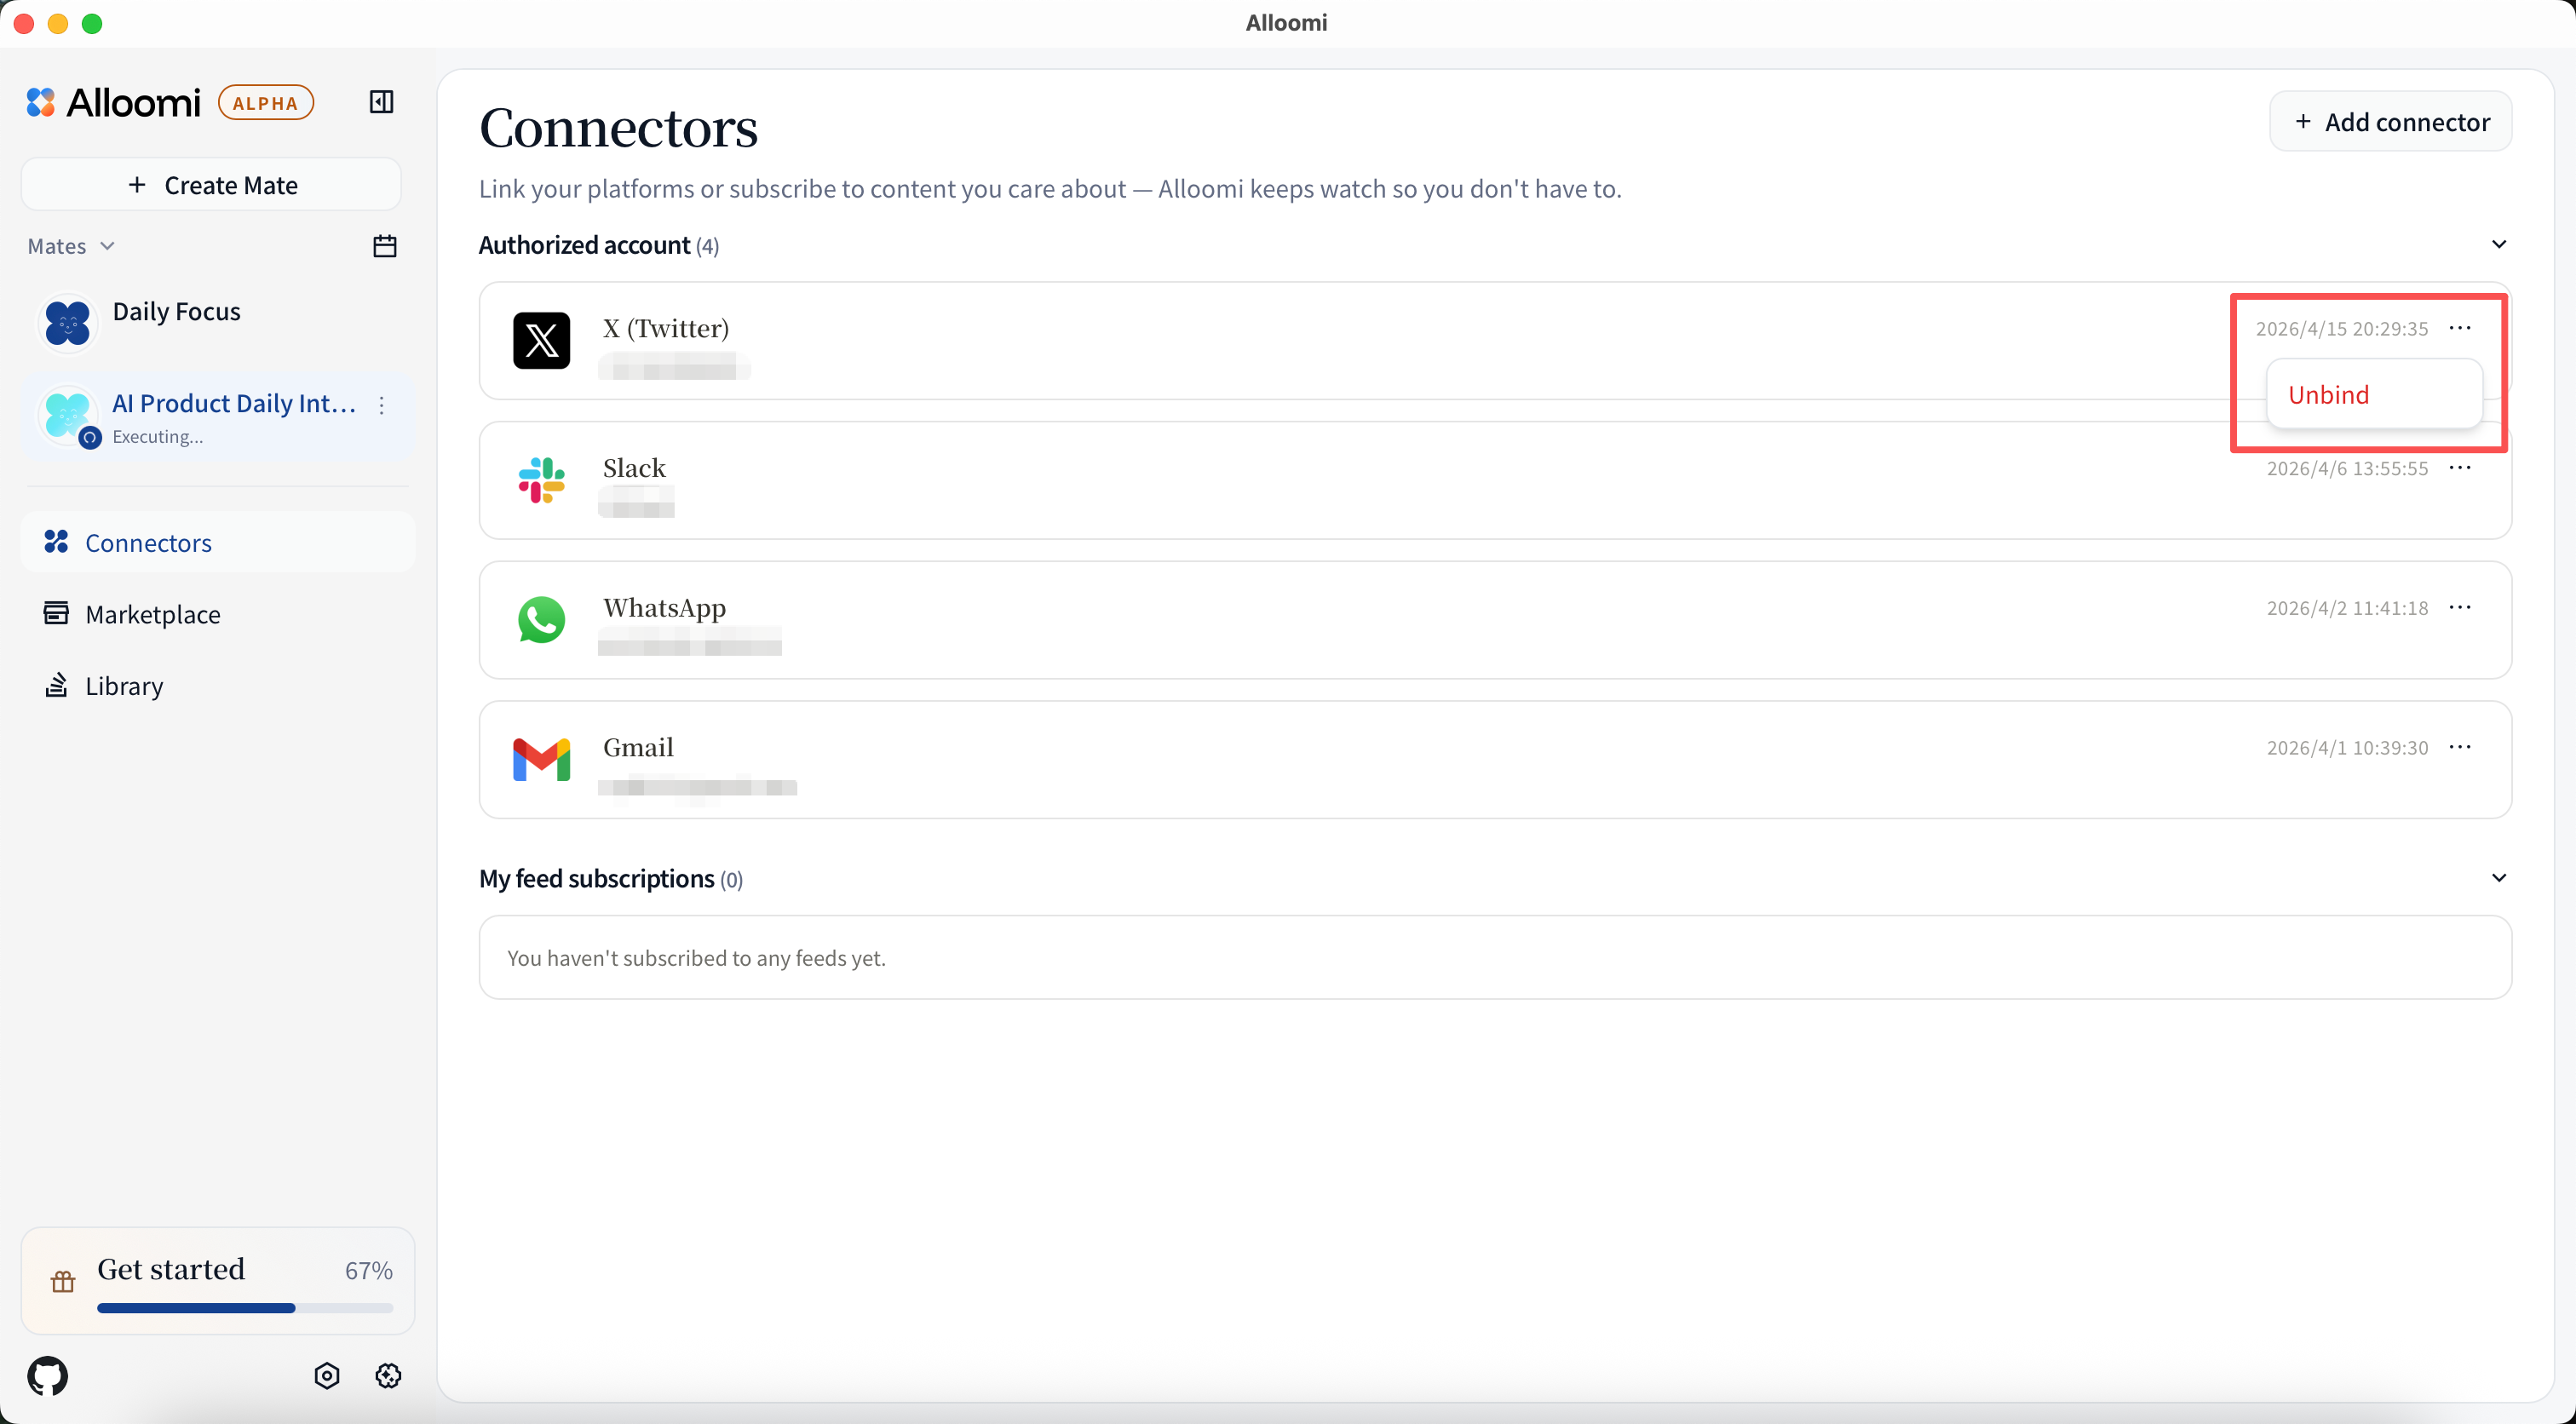
- Go to Settings → Connectors
- Find the platform you want to disconnect
- Click [Disconnect] or the remove (×) button
- Confirm the action
Once disconnected:
- OpenLoomi will immediately stop reading new messages from that platform
- Previously synced data is retained until manually deleted
- You can reconnect at any time by repeating the connection steps
💡 Tip: Before disconnecting, review what data has been synced in the Privacy & Security settings.